
- Clear points: 200,000.
Now that you've made it to the heart of the fortress, you must clear this final stage in order to confront Dr. Wily in person. Naturally, it won't be easy for you. Dr. Wily has been expecting you, and he has a few surprises left up his sleeves, including a reprise visit from the four Robot Masters you've yet to fight a second time. Though this stage isn't particularly long, it will be difficult to make it all the way through without taking a good amount of damage. If you happen to lose against the Robot Masters before you make it past the fourth, you will be forced to fight them over and over until you survive. And even after all of that, you'll still have to fight Dr. Wily!
Stage
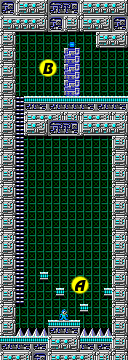
- A: you start at the bottom of the final section of his fortress. Spikes that line the floor are the first ominous sight that you see. A set of Watchers will appear from the top and bottom of the screen, just like in Elec Man's stage. Climb up the left ladder to the screen above, and another set will appear. They try to zap you off the ladder. If you get hit, just keep pushing up on the control pad until you regain your composure and grab the ladder again.
- B: The large weapon capsule here is an opportunity to fill every weapon you have. Using the Super Arm, throw the top two blocks (but be careful to leave the bottom block where it is). By standing on the bottom block and jumping straight up, you can get the weapon capsule. Even better, if you climb down the ladder to the left and back up, the blocks won't respawn but the capsule will. Just stand on the bottom block and jump to grab the capsule, go down the ladder, then back up, and repeat until all weapons are fully loaded.

- C: you will only encounter Screw Drivers through this corridor. All but one of them are mounted to the ceiling, making them particularly difficult to clear out of the way. While you can use the Thunder Beam against them, it's generally more trouble than it's worth. Instead, get close enough to them to trigger their firing sequence, stand in a safe location, and run forward when they stop shooting.
- D: after you jump to this small platform, you will hear the sound of the moving platforms that you encountered in Guts Man's stage. You may have to wait a while for this one to return to the left and pick you up, but it will arrive eventually. This platform works identically to the ones in the past; the platform drops away when the left side crosses the broken part of the rail. However, the broken portion of the rail is so large, there's no way you can hop up and safely land back down. You have two choices. You can run to the right of the platform and be prepared to jump to the small platform above the center of the break, or you can rely on the trusty Magnet Beam, and create your own way across the break. No matter what you choose, get to the other side safely, and resume the trip on the platform. Don't be so quick to climb up the ladder, there are some special items waiting for you to the right. The first is a 1-Up, while the second is a very rare and special item known as the Yashichi. If you collect it, it will restore all of the energy to all of your weapons, as well as your health, and give you a 100,000 point bonus to boot. It may be safer to rely on the Magnet Beam to go between the two items and getting back to the ladder that leads to the teleporter up above.
- E: just as you faced Cut Man and Elec Man in the second Dr. Wily stage, you must now face the remaining four Robot Masters that you've yet to rematch. However, not only must you fight all four in a row, there will be no capsule to restore you energy between each fight. You will have to survive all four fights without fail in order to gain access to Dr. Wily.
Robot Masters redux


When you get this far, you will be at the first checkpoint. If you die, you will respawn immediately in battle with Bomb Man.
- Bomb Man
You start off by facing Bomb Man (see that page for skill-based strategies). Bomb Man likes to leap around the room as he fights. He usually makes huge leaps that can transport him to the opposite side of the room. You may wish to get close to him while you fight. This generally works in your favor since Bomb Man will often leap away in order to get some distance between you. Just be prepared for his shorter hops and don't get taken by surprise.
- Fire Man
After defeating Bomb Man, you'll move on to Fire Man (see that page for skill-based strategies). Out of the four fights, this is by far the hardest fight to avoid taking damage. A flame will appear beneath you if you simply jump up over Fire Man's weapon. And he fires them particularly fast, making it difficult to time your jumps forward or backward effectively. The best strategy is to simply out-fire him. Move around in order to be as safe as you can, and hammer the fire button as quickly as possible to put a quick end to his attacks.
After defeating Fire Man, switch to the Thunder Beam before entering the teleporter.


- Ice Man
The next Robot Master that you must take on is Ice Man (see that page for skill-based strategies). In comparison to all of the Robot Master fights here, this is the easiest fight to avoid taking any damage in. If you know Ice Man's weakness, Elec Man's power, you can make use of a much faster strategy: instead of attempting to dodge his attacks, you can gun him down while he unleashes his first wave of attacks, then run into the teleporter before the volley hits. To do this without using the pause glitch, equip the Thunder Beam and do not move off of the teleporter (or only move a little ways away). Start firing so that Ice Man gets hit as he is first jumping. Then, fire twice more as he floats to the ground. After the second shot, start running back to the left into the teleporter if you were outside of it. Ice Man should die before the bottom projectiles reach the teleporter and if you are in the teleporter, you will be transported just before they touch you.
If you are unable to finish him off quickly, Ice Man's attacks are so rhythmic and predictable that you should have no trouble leaping over any threats. He also succumbs to his weakness pretty fast, so you probably won't have dodge all that many attacks to begin with.
- Guts Man
Dr. Wily saved the biggest Robot Master for last: Guts Man (see that page for skill-based strategies). Unlike the other fights, a little more luck is involved when it comes to taking or avoiding damage. If all Guts Man does is leap around the room a lot, you will have much to worry about because he can dodge Hyper Bomb as it waits to detonate. If, on the other hand, he decides to throw a lot of blocks at you, you'll have to stay on your toes and leap over any attacks he dishes out. All while trying to counter his attacks with your own. Using Hyper Bomb, the weapon he is weakest to, will certainly reduce the amount of time your luck needs to hold out.
Make sure you avoid getting stunned by his stomps. Always jump before he touches the ground. That way, if he grabs a block, you will be able to jump immediately after the stomp and avoid getting hit by the block or its debris particles.
If he stomps his way to the left side of the screen, by the teleporter, it is safer to try and run through his legs than get cornered inside the teleporter where you cannot dodge thrown blocks.

- F: If you beat Guts Man, congratulations. You will end up here, in the hallway that leads to Dr. Wily's control room. This is the second and final checkpoint in the game. There are no threats here. One simple large weapon power lies waiting for you on the floor just before the entrance to the final boss. Choose the weapon you wish to refuel wisely, as this is the only preparation you'll receive before the big battle. Since you will need Fire Storm and you did not use Rolling Cutter, equip Fire Storm and grab the weapon part.
Dr. Wily
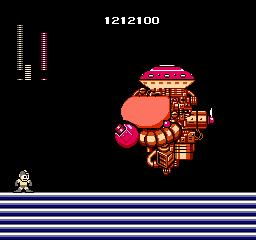
- Phase 1
Upon entering the room, Dr. Wily's small personal transport saucer will fly into the room… only to connect with a far larger machine. The craft that the saucer connects with comes into view and begins slowly flying across the room. It is armed with a cannon in the front, which lobs projectiles into the air at an arc.
These projectiles can do quite a bit of damage to Mega Man, so it's very important to avoid them. The cannon will always aim its projectiles at where you are located on the X-axis, so the best way to dodge them is to move left and right while attacking. Do not stand in the same place for more than a moment. However, if you utilize Fire Storm's shield damage, dodging won't be an issue as you will defeat it in just a few moments.
The cannon itself is the vulnerable point on the machine, and where you should focus your attack. After a little experimentation, you should find that the Fire Storm is the most effective weapon against the cannon. Not only does it do the most damage to the machine, but the shield effect it creates is also especially effective against the cannon. Although it means putting yourself considerably closer to the trajectory of the projectiles, good use and timing of the Fire Storm can take out the cannon in as few as three shots. You don't even need to jump up and shoot at the cannon; shoot once on the ground, then jump up safely underneath the cannon to damage it with the shield.
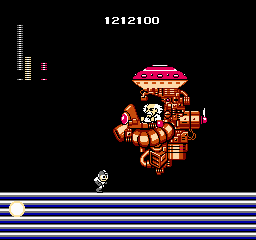
- Phase 2
If you got excited when you defeated the cannon, thinking that you beat the game, well think again. Dr. Wily will not go down that easy. After destroying the cannon, the glass exterior of the machine breaks open and the casing around the cannon disappears, revealing Dr. Wily as the pilot inside and a second, larger cannon than previously used.
This cannon shoots out an orb of energy that loops around in circles as it travels across the screen. It is fired to the left at the place where Mega Man stands, so you can actually avoid it pretty easily by running to the right when it appears. Once again, you might experiment with the various weapons to find out which one is most effective, but you will find that no one weapon does more damage than any other.
That being said, certain weapons are still more effective, simply due to their ability to hit multiple times. From that perspective, the Rolling Cutter is particularly useful against Dr. Wily's craft. It can typically hit the craft two or three times with a single use. Get into a rhythm with the timing of the gun, running right when the gun is fired at you, and then back out to the left in order to jump up and fire off a Rolling Cutter. If you repeat this, you should be able to take out Dr. Wily in as few as eight or nine shots, depending on how good your timing is.
Once destroyed, Dr. Wily will hop out of his craft and grovel at your feet for mercy. You will then be treated to one of the greatest ending animation sequences ever devised at the time of the original game's making. Congratulations!
Ending sequence
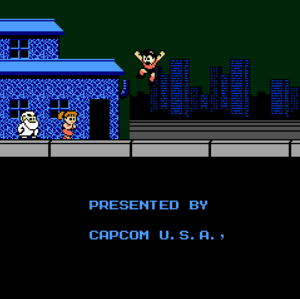
However, the never ending battle continues until all destructive forces are defeated.
Fight, Megaman! For everlasting peace!Then the credits roll:
- Planner: A. K.
- Character Designers: Yasukichi, Tom Pon, Inafking, and A. K.
- Programmer: H. M. D.
- Sound Programmers: Chanchacorin Manami and Yuukichan's Papa.
Presented by Capcom U.S.A.,
Note: "A.K." is Akira Kitamura's alias. "Inafking" is Keiji Inafune's.