Back to Paseo[edit]
Upon returning to Paseo with the Recorder, head back to the Central Tower to deliver your findings. The Commander will order you to visit the Library when you arrive. They will analyze the data it contains, and conclude that something has gone wrong with Mother Brain's control over the climate system. Your next mission will be to investigate what's gone wrong over at Climatrol. You will be given the Keytube item, which unlocks the door below the Biosystems Lab, given you further access to a new area of Mota.

But before you zoom off, head back to your home to see if any new companions have arrived. With your delivery of the Recorder, you will find a fifth companion, Hugh Thompson, waiting to join your effort. Hugh is a biologist. Similar to Amy, he is very familiar with various aspects of medicine, and they can utilize the same (generally weaker) weapons. Unlike Amy, the bulk of Hugh's abilities is geared toward disabling biomonsters, as opposed Amy's healing abilities.
Zema[edit]
After leaving Paseo, return to Oputa and travel back to the Biosystems Lab. From there, explore the region to the south and examine the tunnel that is locked off. Use the Keytube in your possession to open the locked gate and access the region beyond.
In this new land, you won't have to walk too far before you see a little sectioned off piece of land to the north connected by a tunnel. Travel through the tunnel and you will discover a town of Zema waiting on the other side. You may have heard of a resort town on a lake, but currently Zema sits in the middle of nothing more than a dry and arid lake bed.
When you arrive, speak with people for information. Many will tell you about Roron, and the Motavians who love the garbage they find there. Roron seems to be on a peninsula to the south of Zema. Zema makes a good midway point between Roron, as well as other towns like Kueri to the west and Piata to the east. It makes a good resting point while you explore southern Mota.

| Item | Cost | Description |
|---|---|---|
| Monomate | 20 | Heals 20 HP |
| Dimate | 60 | Heals 60 HP |
| Antidote | 10 | Cures poison |
| Telepipe | 130 | Teleports the party back to the last place game was saved |
| Escapipe | 70 | Automatically transports party out of dungeon back to entrance |
| Item | Cost | Description |
|---|---|---|
| Whip | 1400 | Anna Attack +20 |
| Ceramic Sword | 3200 | Rolf Attack +60, Defense +10 |
| Slasher | 2200 | Anna Attack +17 |
| Laser Knife | 4400 | Everyone except Nei Attack +28, Defense +5 |
| Cannon | 2200 | Rudo Kain Attack +36 |
| Poison Shot | 1700 | Amy Hugh Attack +15 |
| Item | Cost | Description |
|---|---|---|
| Titanium Gear | 1400 | Everyone except Nei Defense +14 |
| Titanium Helmet | 3700 | Rolf Kain Defense +16 |
| Shoes | 240 | Everyone except Nei Defense +3, Speed +2 |
| Boots | 1000 | Everyone except Nei Defense +7, Speed +3 |
| Fiber Emel | 1360 | Amy Anna Shir Defense +17 |
| Mirror Shield | 4800 | Rolf, Rudo, Hugh, Kain Defense +32 |
Zema boast some expensive weapon and armor stores, and knowing what to buy can be a bit tricky. Provided you have enough money, you should make sure to purchase Boots and Titanum Gear for everyone except Nei (Rudo may already be wearing Boots, so don't buy him an extra pair.) That will provide a decent boost in defense. For weapons, you can purchase a Ceramic Sword for Rolf unless you have a lot of money and wish to hold out for a better weapon from the next town. You could pick up a pair of Laser Knives for Rudo, but they're rather expensive. The Cannon is also an good choice for Rudo, although the truth is that you can find one for free in a nearby dungeon, so you may wish to save your Meseta.
Beyond what was laid out above, there are a few more purchases you can make if you still have the Mesata. Two Laser Knives for Hugh and/or Amy, and a pair of Slashers for Anna are good choices. However, if you still have a lot of savings built up, and you really want to make the most of your shopping, it might be better to save what you have and instead spend it at the next town over, Kueri.

As always, after the first time you visit a new town, you should make it a point to return to Paseo and check your house. As a result of reaching Zema, Anna will arrive and ask to join your group. Anna is a Hunter who specializes in tracking down Bad Hunters who have gone rogue. As such, she's an excellent fighter. While she might contribute to your party's combat ability, you don't really need Anna just yet, so let her relax in your home with Hugh for now.
Kueri[edit]
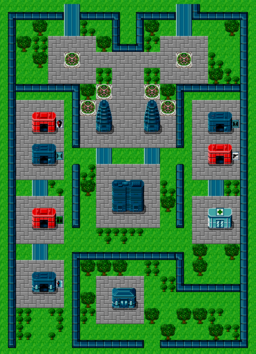
You'll have to travel a fair distance, and through some slightly dangerous territory, but it will be worth the effort. Some people wait to visit Kueri until after they have explored Roron, but whether you investigate it sooner or later, you'll want to bring a lot of money with you.
You'll meet strong enemies on your way to Kurei, but the information you obtain there is very important. You will get some very useful information about Mota's ocean, and a place known as Uzo Island. One important thing to do in Kueri is to find the Professor's home. He studies a subject that you must learn about when your adventure takes to the sea. He will ask you to locate the Maruera Leaf which may be found on Uzo Island.
| Item | Cost | Description |
|---|---|---|
| Monomate | 20 | Heals 20 HP |
| Dimate | 60 | Heals 60 HP |
| Trimate | 160 | Heals all missing HP |
| Antidote | 10 | Cures poison |
| Telepipe | 130 | Teleports the party back to the last place game was saved |
| Escapipe | 70 | Automatically transports party out of dungeon back to entrance |
| Item | Cost | Description |
|---|---|---|
| Boomerang | 480 | Anna Attack +12 |
| Laser Slasher | 6700 | Anna Attack +30 |
| Laser Bar | 3100 | Nei Attack +38, Defense +3 |
| Acid Shot | 4800 | Amy Hugh Attack +25 |
| Silent Shot | 920 | Amy Hugh Attack +10 |
| Laser Shot | 6200 | Rudo Kain Attack +40 |
| Item | Cost | Description |
|---|---|---|
| Titanium Armor | 5600 | Rudo Kain Defense +24 |
| Titanium Cape | 6300 | Amy Anna Shir Defense +28 |
| Titanium Chest | 5400 | Rolf Hugh Defense +21 |
| Knifeboots | 4200 | Nei Anna Attack +7, Defense +5, Speed +5 |
| Mirror Emel | 5120 | Amy Anna Shir Defense +30 |
| Ceramic Shield | 8300 | Rolf, Rudo, Hugh, Kain Defense +39 |
As you can see, much of the gear sold in Kueri is quite expensive, but most of it with worth it. There are three different Titanium armors that provide good protection, but can only be worn by particular characters. Make sure you consult the table before you pull the trigger on any purchases so that you don't buy the wrong equipment and waste your hard earned Mesata. While there wasn't a lot for Nei's benefit in Zema, here you'll find Laser Bars to replace her Ceramic Bars, and Knifeboots which provide an increase to three different stats. Anna can benefit from Knifeboots as well.
Weapons are a different story. While Kueri sells many items that are the strongest weapons certain characters will have access to for some time, they are often quite expensive, and don't always offer a huge boost in power compared to what people may currently be wielding. Whether you purchased a Ceramic Sword for Rudo in Zema or not, the Laser Sword is a very useful upgrade. Laser Slashers and Acid Shots may be a good investment if you can afford them. While the Laser Shot may seem like a good option for Rudo, it only offers around a 10% increase in attack power for close to three times the price of a Cannon. You're better off trying to save your money for some of the truly powerful weapons that will become available to you in Mota's final town.

Once again, before you continue on your adventure, take a trip back to Paseo after visiting Kueri for the first time. Check your house and you will be greeted by Kain. Kain tried to make it as a machine repairman. But it turns out his talent for destroying machinery outweighs his ability to fix any of it. That unfortunate discovery will turn into a benefit for you when you begin to encounter far more mechanical enemies than biological monsters. But that's not the case yet, so let him relax at home until you find that you need him.
Roron[edit]
To reach Roron, start by heading south from Zema. Roron is situated on a peninsula along a beach to the southeast of Zema. The building that you find on this peninsula is a garbage dump. As you explore it, you'll discover several Motavians who enjoy scrounging through Roron's garbage, looking for parts they can use to build other items.
Although it may not be immediately obvious when you arrive, these maps will indicate that the Roron dump is actually divided into two sections, although reaching one of the sections is a little less obvious than the other. Naturally, you will encounter stronger opponents the further you go into the basements.
Floor 1[edit]
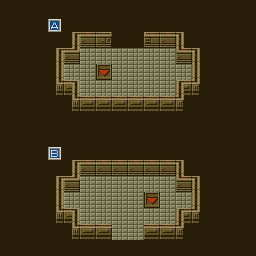
As you can see, the map shows you not one, but two different entrances to the dump. You start above the one at the top. But you'll need to figure out a way to access the other.
While walking on the dark areas of the map would normally cause you to exit a dungeon and return to the overworld, there are cases where you can walk along a dark area without being forced to exit. From your arrival at Roron, you can actuall hug the exterior of the upper chamber and make your way down to the bottom of the lower chamber where you can walk in and reach the other chute.
Basement 1[edit]
| Item | Notes | |
|---|---|---|
| 1 | garbage | |
| 2 | Cannon | Rudo Kain Attack +36 |
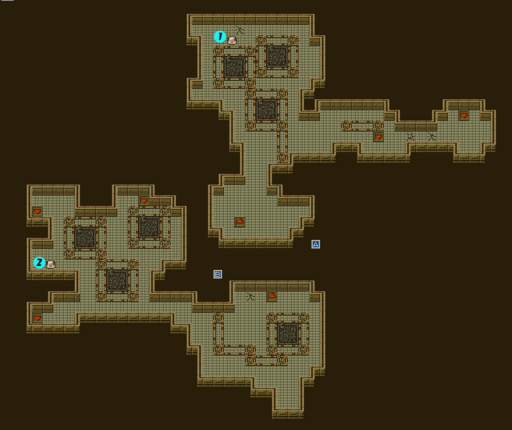
The first basement level doesn't contain too many surprises or multiple branches. Follow either path until you reach chutes that can get you access to the lower levels below. Gauge how your battles are going. The enemies only get stronger the further you go, so don't advance if you find that you're struggling here. While the container in the upper portion only holds garbage, you'll find a free Cannon for Rudo in the lower container.
Basement 2[edit]
| Item | Notes | |
|---|---|---|
| 1 | Ceramic Bar | Nei Attack +27, Defense +2 |
| 2 | garbage |
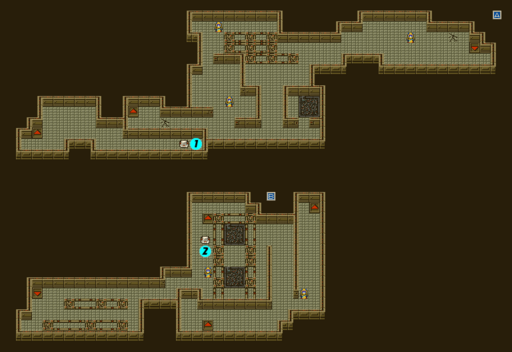
The second basement level isn't too difficult. Both portions of this level have smaller portioned off areas. One small area in the upper portion has a container that holds a Ceramic Bar, but that may not be so useful to you at this point. In contrast, the container in the lower section only holds trash. Follow the map carefully to determine where on the third basement level you may wind up.
Basement 3[edit]
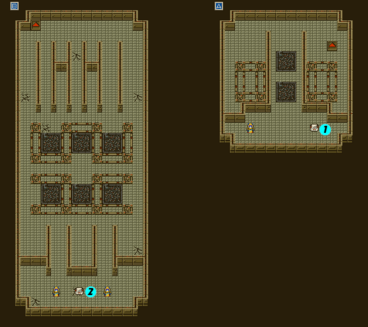
| Item | Notes | |
|---|---|---|
| 1 | garbage | |
| 2 | garbage |
The lowest level of the dump either deposits you in small room, or a large room, depending on which pathway you took at the top. There are Motavians hanging around in both areas, and the containers in either area both have nothing useful in them.
The only thing that truly distinguishes one from the other, is that the Motavians at the bottom of the longer section of map will be celebrating the fact that they were successfully able to cobble together a working jet scooter out of the garbage parts they found down there. Sure enough, after speaking when them, when you exit the dump, you'll find a Jet Scooter waiting in the water.
If you examine it, you'll discover a note explaining that the Motavians have already tired of their new invention, and have left it behind for anyone to take. If you hop on, you'll find that you can now journey across the water and park it at various beaches to explore new areas. This will certainly come in handy as you begin your search for Uzo Island.
