You start out at the Defendant Lobby, but you don't find Lana or Ema. Edgeworth comes to tell you that the reason the trial didn't reach a verdict yesterday is because there was still doubt in the ID Card Record. Once it comes out that the last number is Gant's, there will be no more doubt in the court's mind and Lana will be found Guilty. You have to get Lana to tell the truth about Gant. Phoenix suggests that Edgeworth should help him out, otherwise he'll never know what happened during the SL-9 Incident. It looks like he'll think about it, but before you can press him further, it's time to start the trial.
The trial begins
As the trial starts, Gant takes the stand to make a proposal to have Lana speak to the court.
Lana wants the trial to end immediately, and once again confesses to the murder. She even tries to fire you, and forfeits her right to an attorney. The judge agrees and reaches his verdict.
Before he can do so, however, Edgeworth objects, stating he didn't prove Lana's guilt. Gant, hearing this, tells Edgeworth to keep quiet. Edgeworth refuses, and suspects that the sudden confession must be due to some deal being made behind the scenes. Edgeworth calls a new witness to the stand: Ema. Lana objects, not wanting to hear Ema's testimony, but Edgeworth tells Lana they are doing this to find the truth, no matter how tragic it may be. However, it would be even more tragic if one averted his eyes away from it. The court proceeds to bring her up to the stand and she testifies about two years ago.
Ema's Testimony: Two Years Ago

- I was waiting in my sister's office that day.
- A man came running in, and took me hostage.
- Neil Marshall rescued me,
- but I'll never forget what I saw that instant!
- The man raised up his knife, and… and stabbed Mr. Marshall in the chest…!
Two Years Ago: Cross-examination
Press Ema's fourth statement. As Darke jumped on Neil, a terrible storm outside caused a blackout. Ema told Goodman about the image left in her mind. You have a choice to move on or not. Choose "Hear more". Ema couldn't say anything, so she instead drew a picture. When given the choice, pick "Ask about the picture". The judge asks Ema to add it to her testimony.
- "I drew a picture of that scene once… but it seems to have been lost."

Present the Evidence List on that statement. You hand the judge the list and ask him to turn it over. It's the drawing! Edgeworth scolds Phoenix for having what only the prosecution should have access to. The judge notices the list Edgeworth was given during the SL-9 case is the other half. If Edgeworth was handed the sheet he has, then he was only given half of what they found. If that is true, then there could be more of the drawing on the back of Edgeworth's list. There is, and it looks like the head of the Blue Badger! The Evidence List will be updated in the Court Record.
The judge has Ema testify about the drawing. As Ema looks at the picture, she seems to be thinking about something, but what?
Ema's Testimony: Ema's Picture

- This is the picture I drew two years ago.
- The flash of lightning was so bright all I could see were shadows.
- After that I must have fainted.
- This picture shows exactly what I saw that instant!
Ema's Picture: Cross-examination
On Ema's fourth statement, present Neil's Autopsy Report. The judge wants you to find the contradiction. When you examine the picture, present the tip of the knife held by its wielder. The Autopsy Report says Neil was only stabbed once, and yet the picture shows that the knife was already broken. It couldn't have been broken beforehand either, because its tip was found in the victim. If the knife's tip was found in Neil's body despite the facts, then the tip may be the falsified evidence given to Edgeworth!
Phoenix then recites the story. After winning the King of Prosecutor's Trophy at the ceremony, Neil took Darke in for questioning, along with Gant. During the questioning, Darke fled to the Chief's Office. Neil chased after Darke, but was killed when he got there.
If the story was told this way, then one of the facts could be a lie. Ema denies it. Edgeworth concludes if that is true, then there could be another broken knife that killed Neil. When choosing to agree or not, choose "There is another one". When asked what the weapon is, present the Gant Team Picture from the Court Record. Edgeworth immediately sees what you are showing. The Prosecutor Trophy Neil was holding had the broken knife on it, with its tip broken off! Neil must have taken the blade out of the trophy and followed Darke to the Chief's Office; since he wasn't a detective, he didn't have a gun. However, Edgeworth concludes that if that is true, the man Ema saw raising the knife was actually Neil! But Neil was the one who died, not Darke!
Before you can continue, Ema stops you, as she now remembers everything that happened that moment. She recalls drawing the other half of the picture — the side with the Blue Badger's head on it. The Evidence List wasn't ripped in half when she drew the picture! The judge has Ema testify about her recollection.
Ema's Testimony: Ema's Recollection

- When I saw that man raise his knife…
- I panicked, and rushed toward both of them.
- I think I… I knocked away the man with the knife.
- Just then there was another flash of lightning, and that's when I saw… the Blue Badger!
- He wasn't in the room, but I'm sure I saw his shadow!
Edgeworth objects, saying that the Blue Badger hadn't been designed until just recently. If so, what was it? Looks like a cross-examination would bring an answer.
Before you begin however, Lana tries to stop you, not wanting to go any further. But Edgeworth tells Lana it's already too late. The judge has the bailiff detain Lana. With such an outburst like that, you may be getting close to her secret. You begin the cross-examination.
Ema's Recollection: Cross-examination

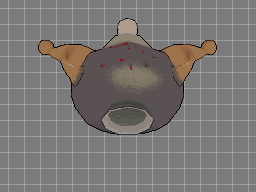
If that wasn't the Blue Badger Ema saw, then what is it? Press Ema's fifth statement. She's sure about it. When asked about what it really was, select "I just might know...". Present the Unstable Jar. It looks like it doesn't resemble the Blue Badger, but if you look at it from a different angle, you may see the resemblance. You automatically check the Unstable Jar.
The bottom of the jar, the small side, has to become the top ball on The Badger's head. The two handles go on either side of it. The top hole on the bigger end should be pointing towards you, and downward. If you see the resemblance, present it to the court.
Edgeworth wants to see your point. It doesn't look like it changes the case. You'll be given a choice of answers: "The location", "The murder weapon" and "The murderer". It doesn't matter what you choose, because all of those actually change! Remember the Gant Team Picture. It looks like there is a knight statue there with the jar. Remember when you visited the room. You saw that statue on Gant's side of the room. This means that the fight didn't take place on Lana's side of the office, but Gant's!
If that is true, then could the murderer have moved the bodies to Lana's side? If so, then there has to be a reason, and you have to show it. There's no going back now.
The tragic truth?

Recall Ema's testimony. She said she pushed the man holding a knife after seeing him raise it up. When she did, the man knocked over the jar. And if that man was pushed in the direction he was going, he might have ran into the suit of armor holding the sharp sword. It opens up another possibility for what happened.
If what you said was true, then Neil's death may have been caused by Ema's actions! Ema screams and faints upon hearing this.
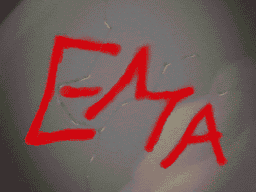
Lana yells at you for pinning the crime on Ema, and wants proof that she did so. It seems like you don't have any, but Edgeworth tells Lana that Neil didn't die instantly, so it's a possibility that he left a message before dying. Lana says it's impossible, and you are given a choice of whether you agree or not. Say the victim's message is in the evidence. Then present the Unstable Jar. There's blood on it, and it looks like Neil tried to write something, but it's been wiped off! Is it the killer's name? Looks like you'll have to connect the dots, literally.
Just press on a dot and drag a line to the correct dot. Make sure it spells "EMA". You can press "Back" to erase the last line you created if you make a mistake.
On the iOS version of the game you have to do the lines in a certain order (many report this as a bug). First the line from the top left dot to the next right dot (the top of the 'E'), then from the top left dot down to the bottom left dot (the side of the 'E'), then from the bottom left dot to the next right dot (the bottom of the 'E'). Next do from the middle of the 'M' to the top right corner of it, then down (the right dot of the 'M'). After that start at the bottom left corner of the 'A' and go to the top middle of the 'A'. Next from the top middle of the 'A' down to the bottom right dot (the right side of the 'A'). Next do the line from left to right in the middle of the 'A'.
Once you have the name, present it to the court. As a defense attorney, you are defending someone. However, you have proven her loved one to be a murderer. Gant takes the stand. He reminds Edgeworth that two years ago, he sentenced an innocent man to death, and to do that, he forged evidence to ensure his sentence. This leads the crowd into such an uproar, the judge calls a recess.
