| Map | Enemy |
|---|---|

|
Uesugi Army |
| Unlock with | |
| Takeda Army | |
| # of Tamatebako | |
| 12-14 |
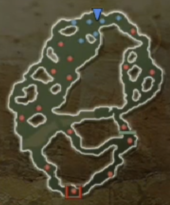
The Battle of Kawanakajima (川中島の合戦) is the name given to the battle that takes place in the territory of Kenshin Uesugi and his army when attacked by Shingen Takeda, Yukimura Sanada, or Sasuke Sarutobi. It is a role reversal of Kawanakajima Conspiracy, and so utilizes the same map with different starting and enemy positions.
Strategy[edit]
From the start, you are surrounded by numerous pole-swingers and squad leaders. Defeat the squad leaders for the tamatebako that they drop. Mounting a horse here is also recommended, as the map is long and you will be tasked with running up and down it a couple of times. Once that's done, proceed to the south of the map, where Kenshin can first be located. You have the option of taking the western or the eastern path to the south. Take the western path, which is safer due to the many hammer soldiers scattered around (as long as you keep moving, they won't be able to hit you with their very slow charged hammer attack). The squad leader between them also drops a tamatebako. While all subsequent squad leaders on the path to the boss do not drop tamatebako, they are a good source of health and Basara.
Defeating Kenshin reveals that this was only Kasuga, Kenshin's trusted kunoichi, in disguise, and so you must defeat her afterward as well (though this isn't necessary if you aren't in need of tamatebako). This also reveals the position of the actual Kenshin, back at the north of the map where you started. While Kasuga is quick, her health is unimpressive and she won't pursue you outside of her small clearing, so you can always escape to build up Basara using foot soldiers or find health in crates (made even easier with the use of a horse).
There is a path at the center of the map which leads to a valley (on the map, this path doesn't connect to the other side). Break the crates here for tamatebako. Above the valley, you should be able to see a deck that appears unreachable. However, if you start from the highest point of the other side of the map as Sasuke, he will be able to glide to the deck using his familiar, allowing him to obtain extra tamatebako. The # of tamatebako listed on this page is between 12 and 14 because most characters cannot reach this area, making the extra two tamatebako only a possibility.
Take the eastern path north to Kenshin if only to unlock the gate at its center. While the squad leader guarding it doesn't drop a tamatebako, the squad leader right on the other side of it does, as do a couple of the subsequent squad leaders (the one standing on the edge of the map does not). Beware of the horsemen on this path; make sure to dodge them as they charge, as they are difficult to hit mid-charge. Approach Kenshin, who may already be attacking some of your army, to trigger the boss battle.
See the boss battle of Kenshin Uesugi in Kasugayama Siege for a strategy against him. The difference here is that Kenshin is surrounded by more enemies, and the field that you fight him in is much more open, allowing you to escape in search of crates holding assistive items and weak enemies that may help you build up your Basara.
