Renegade Port is a Zone Control map in Shadowgun: Deadzone
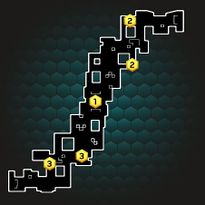
The layout of the map
In short, Renegade Port doesn’t offer much in the way of open space as other battlefields in the galaxy and there is always something lurking behind the next corner. Its streets conceal more than a few surprises. The most furious battle takes place right up the middle (1), which is considerably in the open and only a lucky few will make it through without a scratch. There are always several ways to get behind enemy lines (2 & 3) although each side will do the utmost to make sure no rats squeak through. You won’t always be successful, one mistake is enough to throw your entire defense into shambles. Such moments are decisive in battle…