Jump to navigation
Jump to search
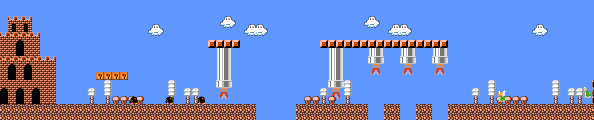
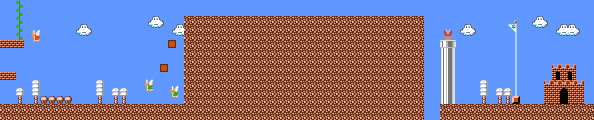


World 5-1[edit]
Part A[edit]

- Stay low. Piranha Plants drop down from the hanging pipes. Wait for them to go back up, then make low jumps.
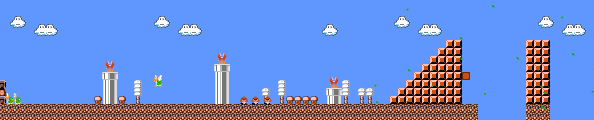
Part B[edit]

- Enter the first pipe in this section to take a trip to coin room D.
- Near the end of this section, a strong wind will blow to the right here and help you fly across the long gaps. Dash Jump and get carried away.
- After the staircase before the first huge gap, above the invisible block is a 1-up that isn't shown in the image above.
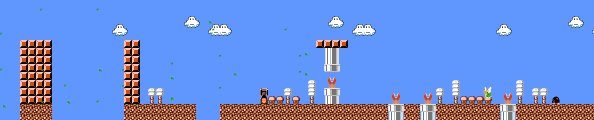
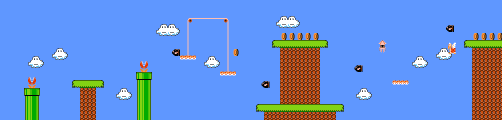
Part C[edit]

- Stomp the Koopa Paratroopa and kick it to the right for a chance of collecting a 1-Up. But remember to jump over the Red Piranha Plants to climb out of the pipes along the way.
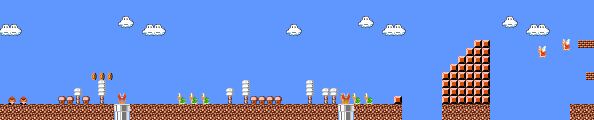
Part D[edit]

- Jump the gap to the staircase at super speed. Then use the two Koopa Paratroopas to the right to reach the platforms beyond.
Part E[edit]

- If World 6 is your destination, you can take a shortcut at the very beginning of this section. Pop up the vine and bounce off a Koopa Paratroopa for a boost to the top. First you'll be taken to Coin Heaven B, and when you're done, you'll arrive at the World 6 Warp Zone.
- Otherwise, you must find a way to scale the massive wall blocking your progress to the end of the level. Two well placed jumps will reveal hidden Coin Blocks that you can use as stepping stones.
World 5-2[edit]
Part A[edit]

- Watch out. If you kick the Koopa's shell to the right under the set of "?" blocks and drop down to the floor, there's a good chance that the shell will bounce back and hit you.
- It's not shown in the picture but try to avoid hitting the brick to the right of the last coin, or you may uncover a poisonous mushroom.
Part B[edit]

- To collect a 1-Up, be sure to grab the Starman found at the beginning of this section. Then jump on top of the second pipe, and hit the brick in the high right corner. As soon as you make it appear, run to the right and grab it when it drops.
- Jump from the first rising platform and make the vine pop up from the brick. Then ride the platform again, leap over to the vine, and climb to the Warp Zone which leads to World 8.
Part C[edit]

- Take the exit pipe to the usual standard exit
- However, if you jump up to the ceiling and dash past the exit pipe, you will find yourself reaching another Warp Zone which will take you to World 7.
World 5-3[edit]
Part A[edit]

- The first leg of this world will continue to repeat, starting at the platform, until the correct exit is found.
- You'll need to make it to the very high pipe in this section to reach a narrow Coin-filled passage, coin room E, and the rest of the stage.
- The one advantage to passing through to the end of this section is that there is a hidden Power-Up on the tall bluff. It also resets automatically, so you could also collect a Fire Flower here.
Part B[edit]

- Bullet Bills blast theough this area at unpredictable intervals. Watch out for them and try to move out of the way in time.
- Leap from the sliding platform in the wide open space and target the flying Koopa. You'll bounce off of its back and land on solid ground.
Part C[edit]

- Stay light on your feet until you make it past all of the platforms in this area. Take a breather on the tree top before continuing on to the end.
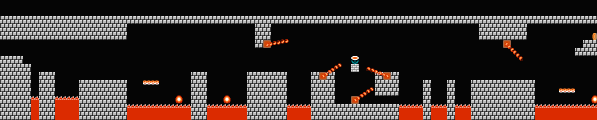
World 5-4[edit]
Part A[edit]

- The Lost Levels are notorious for their challenging passage. This is where they really start to earn their reputation.
- The 1st, 2nd, 5th, 7th, and 12th firebars rotate clockwise twice as fast.
- In Vs. Super Mario Bros., with the first fire-bar there is low clearance on both sides which might make it difficult if you are fire Mario or big Mario.
- In order to safely collect the Power-Up, run to the right to make the Fire-Bar scroll off the screen. Then move back to the left to claim the Power-Up.
- In Vs. Super Mario Bros., there is a podoboo in the lava pit between the first two fire-bars.
- Avoid the falling platforms at the end of this section by jumping up to the top and running to the right.
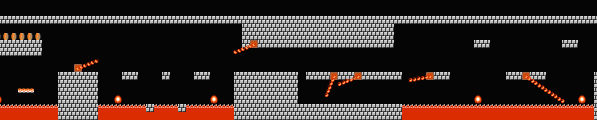
Part B[edit]

- There are Fire-Bars a-plenty and the threat of Podoboos in this area. You'll have to be a well practiced Lost Level adventurer to make it unscathed.
- In Vs. Super Mario Bros., each platform above the first pit of podoboos is only one tile wide.
- There is no place to rest. Jump onto the platform at the end of this section when the Fire-Bar moves to the right, then jump off and move on.
Part C[edit]

- Go low if your plumber is pint-sized here and take the high road if he is big. Either way, this section is quite difficult to negotiate.
- In Vs. Super Mario Bros., the first lava pit in this section has a podoboo.