World 6-5
Clear a runway blocked by Buster Beetles, Koopa Troopas and Ice Blocks. The passage to the goal in this stage is located in an unexpected place. You can only clear this level if you are Raccoon Mario, and even then, it's a tough task.

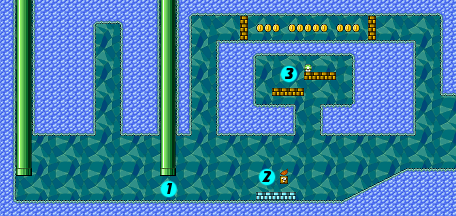
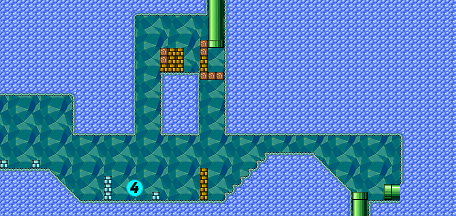
- 1: This hanging pipe warps you to an area (shown right) containing a power-up. Use it as many times as you must to collect a Super Leaf; you'll need it to finish this stage. The other pipe in this area connects to the pipe at the very end of the stage, creating a loop.
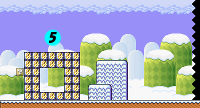
- 2: Buster Beetle is back, and he's particularly aggravating in this stage. Buster Beetles like to show off their burly muscles by throwing Ice Blocks at you. Either jump or crouch to avoid the frosty weapons.
- 3: You may want to take the time to get this 1-Up. You can potentially run out of time attempting to escape from this stage. Clear the first runway of enemies and blocks, then lift off and rocket up to the hidden area. You'll earn a 1-Up for your troubles.
- 4: The only way to reach the end of the stage is to fly up to the top of the cavern with a Koopa Troops shell. The White Piranhas can only be disposed of with a shell. Clear the area below of Buster Beetles, blocks and Ice Blocks, but don't eliminate the Koopa Troopa without taking its shell. Reach flying speed while running with the shell, then zoom to the top of the cavern. Kick the shell to the right to wipe out the dangerous plants and reach the pipe that ends the stage safely.
World 6-6
Brew some hot chocolate—after a frigid swim through an ice cave, you'll need it! Firepower will serve you well in this subterranean lake, since there are plenty of Cheep Cheeps and Piranha Plants about.
- 1: Spike will attack by pulling spiked balls out of its mouth and throwing them at you. Jump on them to discourage Spike's disgusting habit.
- 2: Jumping fish flop from pond to pond. They can be dangerous to pass, so duck and allow them to jump over you.
- 3: A Starman hidden in a Wood Block will protect you from the aggressive flying fish. Bump the block from the side to make a Starman pop out. Get Starman to protect you and
 button run through here.
 - 4: Swim cautiously in the pool of Cheep Cheeps. If you're having trouble, try boiling the icy water with a Fire Flower. If you don't have the firepower to deal with them, swim with care!
- 5: It may seem like just another dead end, but there's a reward in store for explorers. Jump near the end of the tunnel to reveal a concealed 1-Up.
- 6: Collect the power-up sealed in a ? Block close to the surface of the water. If you're Super Mario, a Fire Flower will emerge. Use it to fry troublesome fish.
- 7: As Fiery Mario, the section of the cavern overgrown with Piranha Plants will be nothing to worry about. If you're not so well-equipped, time your movements carefully to avoid becoming a meaty morsel for the carnivorous plants.
- 8: Wait for Spike to waltz over to the edge of the corner, then pounce on him from the ledge above. Be sure not to land on him when he has a spiked ball ready to throw.
- 9: Several Spikes have made a home of the cramped passageway near the exit of the cavern, and they'll cause you a lot of grief if you aren't armed with a Fire Flower. Crouch to avoid the hail of prickly projectiles, then hop onto the Spikes as soon as they stop firing.
- 10: One final Cheep-Cheep stands between you and the end of the stage. Don't chance getting knocked out—wait for it to pass before you head to the warp pipe.
World 6-7
Flash-frozen treats (and terrors) await a plumber who carrier defrosting equipment. Get ready for high altitude anxiety on Donut Lifts. You're in for some frantic jumping in this high pressure world. Most of the time, your only perch is a temporary one because most solid surfaces here are Donut Lifts. Collect 78 coins in this world to make the White Mushroom house appear.
- 1: Hurry to grab the power-up sealed in the ? Block, then stand on a Donut Lift. This is a spot where timing is critical. You have to let the Donut Lift drop for a very short time before you jump to safety.
- 2: Anchor Ahoy. You'll have to risk life and limb to do it, but if you collect 78 coins before the end of the stage, you'll gain access to a White Mushroom House containing an Anchor.
- 3: While collecting the 1-Up, don't hang out on the Donut Lift. If you do, you'll run the risk of falling without collecting the extra life.
- 4: The only way to reach the pipe leading to the exit is to allow yourself to fall on the Donut Lift. If you time your jump right, you'll reach the pipe safe and sound.
- 5: Only Fiery Mario's fireball are hot enough to melt the ice surrounding the gold coins.
World 6 2nd Fortress
Sneak inside a fortress of solid ice, where you'll learn that ice and Thwomps don't mix. To capitalize on the slick ice floor of this Fortress, all the Thwomp Traps here are set up to move horizontally.
- 1: It's pretty easy to get through here if you take your time. Trigger a Thwomp Trap, then run beneath it while it resets. All the while, you'll have to face Boo Diddly, or he'll be on your back in a hurry.
- 2: Be sure to spring this Thwomp Trap before you go through here. Otherwise, it will smash you on the way down.
- 3: As the Thwomp Trap here rewinds for another smash, quickly duck to slide through the opening. You'll have to move quickly to have enough momentum to power your slide. Owing to a clearance issue, it is not possible to continue through this point while in the Frog suit.
- 4: The section at point 4 is a triple threat: a Thwomp Trap, a Roto-Disc and a Boo Diddly. Time your jump precisely to avoid all three. Keep Boo Diddly at bay by staring him down.
- 5: To clear the Thwomp Trap before it shoots down the hallway toward you, sprint through the corridor and fill your P-Meter. Jump or fly through the narrow gap to reach the platform above you. The Thwomp Trap won't be fast enough to hit you.
- B: Slippery ice makes this boss battle a challenge. Don't let yourself get trapped under the blocks to the right.
World 6-8
Green pastures and aggressive undergrowth offer a change of scenery from the icy tundra. Use a P-Wing here to collect 88 coins and perform a neat trick.
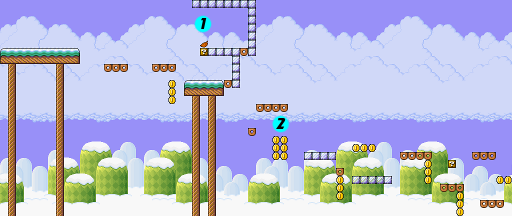
- 1: Pick up an Ice Block and jump with it to hit the ? Block. A power-up will pop out. Snatch it before it gets away from you.
- 2: Jump onto the back of the Koopa Troopa or swish your tail at it from the side; but be careful not to kick it yet, or you'll get pinched. Hold on to the Koopa shell and hop on the short ledge, then kick it into the White Piranhas to the right. Sprint to follow the shell. The shell will ram into all of the enemies ahead and wipe them out, and you'll reap a bountiful harvest of points.
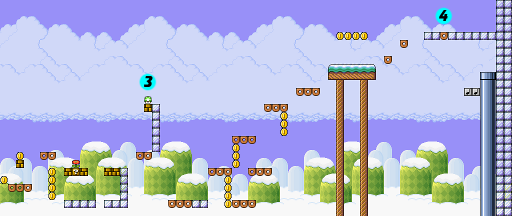
- 3: Throw the Ice Blocks out of the way to get at the ? Block containing a power-up. To raid the ? Block, you'll either have to throw an Ice Block at it from the side or slide underneath it and bump it from below.
- 4: To eliminate the White Piranhas blocking your path, use an Ice Block to perform the trick you performed with a Koopa shell earlier in the stage.
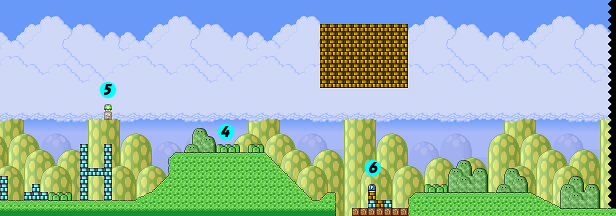
- 5: Take out all of the enemies in the area, then get a running start to leap on top of the Ice Blocks that form an H. Jump straight up from the top of the right pillar to reveal a hidden 1-Up.
- 6: If you have the Raccoon Suit, clear the Ice Block from beneath a regular block. Slide beneath the block and bump it to reveal a Switch Block that was hidden inside it. Stomp the Switch Block and fly into the mass of coins floating overhead. Collect as many as you can before they turn back into the stone. You can get all of them if you have a P-Wing.

