It's recommended to be around level 20 by the beginning of this chapter.
Bone
The layout of Bone can be a but confusing at first. Therefore, start exploring the town without entering any door. When you're done locating the inn, the item shop and the house of healing, enter any of the other doors. After three rooms you'll get to the lower part of Bone, where you can find the weapon shop, the armor shop and the tavern. To get to the tavern you have to pass under a bridge: those are not walls!
After this town, the paths of the seven characters diverge:
- If your main character is Kamil, Valsu, Lejes or Wilme, a kid gives you a remote controller that opens a passage in the Cave of Milto.
- If your main character is Esuna or Lux, the same kid, Perole, asks to be brought to Bonro instead, and his uncle allows you to travel on the vessel.
- If your main character is Olvan, a man gives you the key of brilliance that opens the tower of Grime.
Perole and the key keeper only appear if you collected the three runes of Wind, Water and Star.
| Weapon shop | Armor shop | Item shop | |||||||
|---|---|---|---|---|---|---|---|---|---|
| Weapon | Cost | Atk | Armor | Cost | Def | Item | Cost | ||
| Brill sword | 4500 | 25 | Anim armor | 1600 | 8 | Potion 1 | 20 | ||
| Cour sword | 5300 | 28 | Royl armor | 2400 | 14 | Potion 2 | 100 | ||
| Anger axe | 4000 | 23 | Hope robe | 5600 | 12 | M. Herb 1 | 80 | ||
| Power axe | 8100 | 31 | Kryn shield | 500 | +8 | M. Water | 1200 | ||
| Conf rod | 2500 | 14 | Cour shield | 3000 | +14 | B. Fire | 20 | ||
| Winball | 80 | ||||||||
| Opal | 100 | ||||||||
| Topaz | 500 | ||||||||
| Ruby | 1000 | ||||||||
Path 1: the cave of Milto

- Main path, accessible to Kamil, Valsu, Lejes and Wilme. It's accessible to Olvan too, but he can also access #Path 3: the Grime Tower.
Cave of Milto
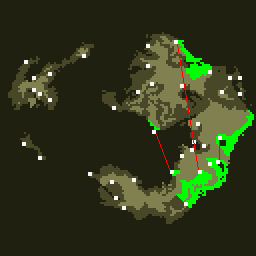
This cave is located straight east of Bone. There are no chests in this dungeon. Use the remote controller to open a secret door. In there, a scientist will proudly show you his submarine, and will offer you a lift to Dowaine.
Dowaine
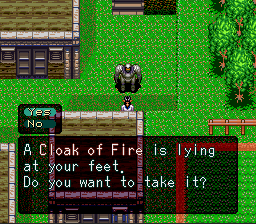
The Fire Cloak is lying in a corner of the town. Search the wall behind the armor shop to find it. This item can be worn by most characters; it increases defense by 20 and it greatly reduces damage from fire spells.
| Weapon shop | Armor shop | Item shop | |||||||
|---|---|---|---|---|---|---|---|---|---|
| Weapon | Cost | Atk | Armor | Cost | Def | Item | Cost | ||
| Brill sword | 4500 | 25 | Pyst armor | 700 | 4 | Potion 1 | 20 | ||
| Cour sword | 5300 | 28 | Anim armor | 1600 | 8 | Potion 2 | 100 | ||
| Anger axe | 4000 | 23 | Seas robe | 3700 | 8 | Antidote | 80 | ||
| Power axe | 8100 | 31 | Hope robe | 5600 | 12 | M. Water | 1200 | ||
| Conf rod | 2500 | 14 | Cour shield | 3000 | +14 | B. Ice | 20 | ||
| Wind ball | 80 | ||||||||
| Opal | 100 | ||||||||
| Pearl | 200 | ||||||||
| Ruby | 1000 | ||||||||

A kid in town sells random items for 100 G each. This is a very good opportunity to get Potions-3 much earlier than any shop. Unfortunaely, he also sells items of very little value. But if you have 9 copies of an item, he does not sell you more, and you don't waste money. Trick: buy nine of the cheap items in other towns, then come here and the kid will only give you the most convenient ones. Keep the useless Tranq swords, sell the Pearls and stock up the Potions-3.
The kid won't sell anything to Wilme and Lejes, though.
| Kid's items | Real value | Notes |
|---|---|---|
| Potion 1 | 20 | Buy 9 here in Dowaine shop. |
| Potion 2 | 100 | Fair price |
| Potion 3 | 400 | You want this! |
| M. Herb 1 | 80 | Buy 9 in Bone. |
| Antidote | 80 | Buy 9 here in Dowaine shop. |
| B. Power | 100 | Fair price |
| B. Fire | 20 | Buy 9 in Bone. |
| B. Ice | 20 | Buy 9 here in Dowaine shop. |
| Pearl | 200 | You want this! |
| Opal | 100 | Fair price |
| Tranq sword | 50 | Not sold in any shop. |
Path 2: the Bonro vessel
- Esuna and Lux only.
Bonro
The lost kid Perole joins you in Bone and asks to be brought to his uncle in Bonro. The man lives in a house near the harbor. He thanks you for bringing Perole back to him and he lets you get on the ship to Pandam for free. In Pandam, the return ticket costs 100 G, so it's better to use the Wind Rune.
Pandam
This town belongs to Chapter 8: you jumped forward two whole chapters! Don't expect amazing equipment parts in the shops, though. In fact, the town is scaled to the level of Esuna when she gets here by ship. The equipment upgrades are barely enough to face the very strong enemies outside.
Check the lower-left corner in the inn to find the super-rare Ring. It grants Esuna (or anyone but Lux ad Wilme) almost complete protection from Vacuum spells.
The shops sell expensive but necessary weapons and armors. The only new equipment that Esuna can use is the Vict. robe, but it costs a whopping 14000 G (ignore the Anger robe). Use the Wind Rune to teleport back to Pell or Guntz (Chapter 3) and fight the enemies to raise money.
After you purchase the Vict. robe and/or any equipment for your characters, leave town ad rush north-west to Brush. Enemies around Pandam are still too strong, and they're even stronger if you try to go east. From Brush, proceed north-east to Tiffana and enter Chapter 7.
Path 3: the Grime Tower
- Olvan only.
Chest list:
- M. Herb 1
- Illus. shield
- K. Trick (boss!)
- Recovery
- Magic seed
- Vitality seed
- Agility seed
- Ruby
- Magic Water
There are two separate paths inside the Grime Tower: one leads to the Illus. Shield, the other one to the Teleporter that connects to the North Tower. The North Tower, instead, is far more linear.
Before challenging the two towers, it's better to do some grinding. Make sure that Olvan and his companion have 7-8 of every healing, support and debuff item, plus a couple of Exigates. In particular, go in the areas of Chapter 3 (Eygus, Pell and Guntz) and keep fighting Brains until you get 7-8 Life Recoveries. Obviously, Olvan & Co. must equip the best weapons and armors available at that point of the game.
Hint: whenever you get up or down a flight of stairs, enemies locations get "reset" and you buy a bit more time. Therefore, even if some stairs lead to detours, climb them up and down just to push the monsters a bit away.
Path to the Illus. shield

- Ground Floor: At each of the two forks, take to path to the right, then climb the stairs.
- Floors 1 and 2: These two areas are quite small. On floor 1 the stairs are to the left. On floor 2 there's one direction only.
- Floor 3: There are three chests here. The lowest one is a King Trick, sort of a boss for this dungeon. Open the other two first, and get a Magic herb 1 and the fabled Illus. shield. After you defeat the boss, use an Exigate and the Wind Rune to go back to safety.
Path to the North Tower
This path is tricky and labyrinthine, with several loops that only make things longer. Normally, it would be just a nuisance, but the strong monsters make it a real matter of life and death.
- Ground Floor: Turn right at the first fork and left at the second one. Climb the first stairs you meet. If you continue on, it's just a longer loop that leads to the same area on floor 1.
- Floor 1: From the stairs, go to the right. If you go the other way, you get back to ground floor.
- Floor 2: The stairs that is visible right away is another loop. Go all the way down the area instead, and walk to the left through a narrow and half-concealed passage. The stairs that you meet at the and lead down, but it's the right path.
- Floor 1-b: A small area that brings back up to floor 2. The chest contains an useful Life Recovery.
- Floors 2 to top: From now on it's all linear. On the small floor 4 there are two chests containing a Vitality seed and a Magic seed. The next floors are all extremely small, and you should get quite easily to the top floor 13. The teleporter there connects to the North Tower.
The North Tower
Enemies here are definitely stronger than those in the other tower, and monsters outside are even stronger. In fact, this tower belongs to Chapter 7.
- Floor 4: We start easy, with two chests: get an Agility seed and a Ruby, then climb down.
- Floor 3: A long, spiraling corridor, otherwise featureless.
- Floors 2 and 1: Two small areas theat lead quickly to the ground floor.
- Ground Floor: You're not done yet: this small area leads back to the first floor.
- Floor 1-b: The stairs upwards just bring you to another long loop. Walk all the way to the bottom of the area and climb the stairs down.
- Ground floor and exit: Can you see the exit? There is a shortcut to get there! Walk through a secret passage in the lower-left corner of the area where you are.
You are in the middle of nowhere now. The nearest town is Polasu, to the West, but the enemies on the way there are far too strong for now. Therefore, head east to Padal, that is just a little bit farther away, and to the beginning of Chapter 7.
In the shops you can upgrade your equipment and purchase some Bottles of Agility.
The last chest in North Tower
Coming down from the North Tower you probably noticed a chest beyond the wall. It contains nothing important, just a Magic Water. For the sake of 100% completion (and some extra grinding, that is always useful), this section helps going quickly through an otherwise very intricate maze.
- Ground floor: From the entrance, walk into the wall on the right and through the secret passage, then climb the stairs.
- Floor 1: There's another secret passage in the lower-left corner, pretty much above the secret on the previous floor. Cross there, then walk all the way up to get stairs leading back on the ground floor.
- Ground floor again and floor 1-b: A small area on the ground floor leads back up to an even smaller dead-end area containing the chest. Enjoy your Magic Water!
Padal gives start to the events of Chapter 7, thus skipping Chapter 6. If you want to get the Sky Rune first, you can travel from Padal to Telaine in the East.


