Tip: Bombs and the flail will be your best friend when handling the lizardmen.
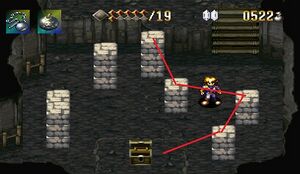
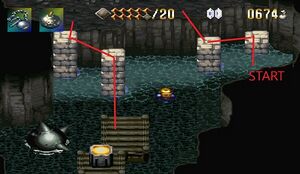
After entering the Reptile Lair, swim over to the wooden platform near the moving platforms. Jump on to the quick moving platform. They move in a pattern so wait for them to align before jumping. After making it to the third platform, jump to the cliff with the treasure chest. Inside this chest is a medicinal herb. Then head down and left to activate the switch. Jump down from the cliff and head south for another treasure chest containing a strength tonic.
Head back to the wooden platform and jump on the quick platform. Jump to the second platform and wait till it nears the wooden platform in the south with the three reptile statues. After making the jump use a bomb on the rock near the stairs. Inside is a treasure chest with a medicinal herb and many slimes. In the Northwest corner is a ladder which leads out of the dungeon through a sink hole. In the south part of the room is a teleporter that leads to a room with a healing triangle and two treasure chests, ignore these until after the boss fight.
Head back to the room with the stairs and go down. Destroy all the lizards in the room. To the west of the room are three lizard statues that come to life when you get close. Go through the door in the North to find a room with spikes in the ground. Navigate through these and head to the wooden platform with the boulder. Pick this up and make your way across the room on the wooden platforms. At the last platform carefully toss the boulder close to the edge of the wooden platform. Jump on the boulder then across the water to hit the switch. A tone and explosion sound will be heard after hitting the switch. Head back to where the three lizard statues were and the stairs going up are now available.
In this room there are statues that come to life, four sword lizards and one spear throwing lizard near the switch. The stairs will activate. Go down the stairs on the top west side of the room. In this room use the flail to destroy the top two blocks and one of the middle blocks. This creates stairs to continue up the cliff. At the next set of blocks do the same creating more stairs. Head to the top of the room to find three lizard statues, two sword lizards and one acid spitting lizard. Lizards will not stop spawning until the statues are blown up with bombs. Once statues and all lizards are destroyed, the west wall will explode creating a hole to continue. The next room will begin to shoot fireballs, avoid these and head south then up the stairs.
This room holds a treasure chest with medicinal herbs. Three more statues, two sword lizards and one acid spitting lizard that must be destroyed with bombs. Once complete, head south and DO NOT destroy any of the blocks. Jump on the nearest stack of three then to the following stacks of two to acquire the key in the treasure chest.

Head back to the beginning of the dungeon room with the water and wooden platforms. Use these wooden platforms to jump across and then walk around the waterfalls. This area has two sword reptile statues that come alive. Deal with these two and then walk over to the door to use the key to unlock it. From here you can jump to the platform with the treasure chest containing a strength tonic. Then head down the stairs to the next room.
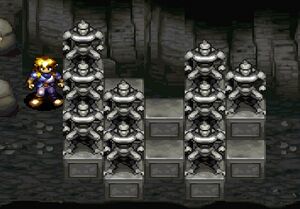
The room has a treasure chest with medicinal herbs. Head south and use the flail to destroy all breakable pillars. Jump from the pillars to the area with the lizard statues. The two center statues will come to life with acid spitting lizardmen which need to be destroyed with bombs. Once this is complete the stairs going down will become available. This room contains eight lizardmen statues which pulse green. They only pulse green nine times then stop, making them unbreakable forcing you to leave the room and restart. Jump from the stairs and strike the statue with the flail. Jump and strike each statue until they are all gone. The stairs to the next room with open. This room contains a glowing save point teleporter, a teleporter to a room with two lizardmen statue but no way up, and stairs to the next room. Take the stairs for now into the next area with two sword lizardmen statues. Use bombs to destroy the statues which then opens a door leading North. This room has fireballs that chase you around, quickly navigate your way to the stairs on the West side of the room.
This area has a treasure chest containing a strength tonic and five sword lizardmen statues that must be destroyed with bombs. Head down the stairs to the next room with a locked door and stairs south. Ignore the door for now and head up the stairs. Walk across the bridge to find twelve lizardmen statues, four sword, four spear, and four acid spitting. Destroy all enemies and jump on the platform on the west to jump to the cliff. Jump down the cliff and head across the southern bridge to the switch and treasure chest containing a life vessel. Hit the switch and receive a tone which activates a moving platform between the two lizardmen statues in the northwestern part of the room. Use the platform to head of the stairs.
This next area has three lizardmen statues, one spear, sword, and acid spitter. Destroy them with bombs then use the west wall statue platform to access the yellow pressure switch. This will activate the second pressure switch south. Use the statue platform to jump to the two blocks, then onto the head of the statue and over to the last pressure switch, the door will unlock. The Southwest side of the room leads back to the glowing save point room and now has a platform to get back. Now head through the unlocked door and use the flail to break the blocks hiding the pressure switch. Once stepped on all eight of the statues come to life. Deal with these lizardmen and head back out to the now unlocked southern door. Charge run activating all eight statues and take them all out to open the stairs.
Three of the lizardmen statues will come alive, one sword and two spear, and need to be destroyed with bombs. Once complete the stairs will activate. Use the statue platform, then blocks and the statue itself to access the stairs. Take out the lizardmen and continue through the West door. In the spike room use the flail to hit the switch and create the moving platform. Jump on the platform to hit the other switch creating the last platform. Transition to this one to reach the other side, ignore the Keep of twin reptiles statue, and head up the stairs.
Head into the water and hug the west wall to get around the spiked ball. Use the blocks to access the switch, a tone and explosion will sound destroying the boulder blocking the way to the stairs.

Head back up the blocks toward the lizardmen statues and find the treasure chest containing the gilded falcon. Now head up the stairs, this room has seven statues and a big one in the back. Destroy the statue in the middle and the big one with bombs and head back downstairs. Make your way back to the spike floor room and the Keep of twin reptiles statue is now gone. There is a healing triangle and four statues to destroy to get to the door on the east side of the room.

Once inside the door behind will collapse, head in to find a fissure in the wall. Use three quick bomb placements to destroy that part of the wall. Boulders will begin to rain down and an army of lizardmen will step through. Destroy all the lizardmen and boulders will drop to cover the whole followed by a treasure chest containing a key. Head back and heal then activate the switches in the spike floor room and start heading back to room with the two switches and teleporter to the glowing save point.
From here head North and down the stairs. This puts you back in the room with the twelve statues however as long as you do not walk between them they will not activate, just hug the Northern wall and head across the bridge. Head down the stairs then North in the next room to unlock the cave door. Inside is a healing triangle, then go through the West door. PREPARE FOR REPTILICUS MAXIMUS!
Now head West to collect the two treasure chests from earlier which contain the fire scroll and sapphire crest. Now head toward the teleporter and leave through the sink hole at the top of the ladder.