The Bridge[edit]
You will arrive on the left side of Orange Cavern B through the door marked with a S. Travel to the right, taking care to avoid the bats and scorpions, and climb the vine that rises up to the section above. It just so happens that there is a big secret hidden on the left side of the bridge, where you arrive after climbing the vine. Click on the spoiler below to learn about it.

When you are ready, you must begin to cross the bridge and reach the opposite side. The bridge is in terrible shape. Planks are rotted out and in some cases, completely missing. Moving platforms will ferry you across particularly large gaps. While you cross the bridge, you will be attacked by the familiar crows, along with two new enemies.
Lockjaws are mysterious floating skulls. They take three hits to defeat, and they move quite quickly. In order to make it across the bridge, it is very difficult to avoid getting hit by these small enemies, and when you collide with them, they will steal your boomerang! This is more of a nuisance and not a tremendous loss, since you will need to return to the location where you can collect the boomerang shortly.
The other new enemy is another Fratelli brother who is armed, not with a gun, but with a bow and arrows. And he doesn't just fire one arrow, but three. Hit him twice to knock him on the ground. When you reach the other side of the bridge, climb down the vine to arrive in the Purple Cavern.
Purple Cavern[edit]
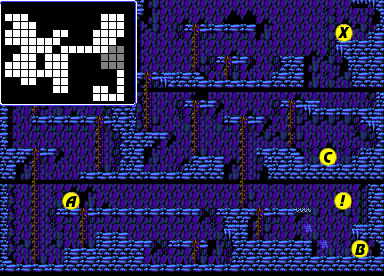
The Purple Cavern, like its red counterpart, is more of a transition area that you will visit to reach other areas. You begin on the left side of the middle row. Drop down to the left platform and climb down to the section below. Climb up the nearby vine to reach Door A
Door A[edit]
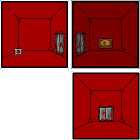
Pass through the first set of doors, and you will reach a pitch black room. Light the candle to see the area, and you will find a hint-bearing safe. Use a key to read the hint, or simply highlight the space between the parenthesis to read it (A DIVING SUIT IS IN A GREEN CAVERN.) The door to the left leads to one more room where you can collect a Magic Locator Device which will show you the location of the next Goonie that you will rescue.
From this door, run across the top platform and jump over the gap to the right. You will see door B below, but before you visit it, there is another hidden door that you can find by pushing up on the control pad while you ride the moving platform.
Door ![edit]

For your investigative efforts, you are rewarded with another appearance of Konami Man. He will refill your energy once again, which may be necessary after the trip across the bridge. Head back outside. And drop down to Door B
Door B[edit]

In here, you will find nothing more than an old lady who will ask if you have a Vest and a Coat to protect you. She is alluding to two defensive items that will greatly aid you in your quest. Return to the Purple Cavern.
Climb back up the vines to the section above. While you might be tempted to explore the region to the left and climb all the way up to the top section, you will find that you are unable to reach door X with your current inventory. Since there is no way to jump across the gap, you'll have to return to the middle section and investigate Door C.
Door C[edit]

When you arrive, the room looks completely deserted, but you know better than that by now. If you take a hammer to the back wall, a door will appear. Head through the door to find another door, and pass through that door to arrive at your next destination: the Green Caverns.
Green Cavern[edit]
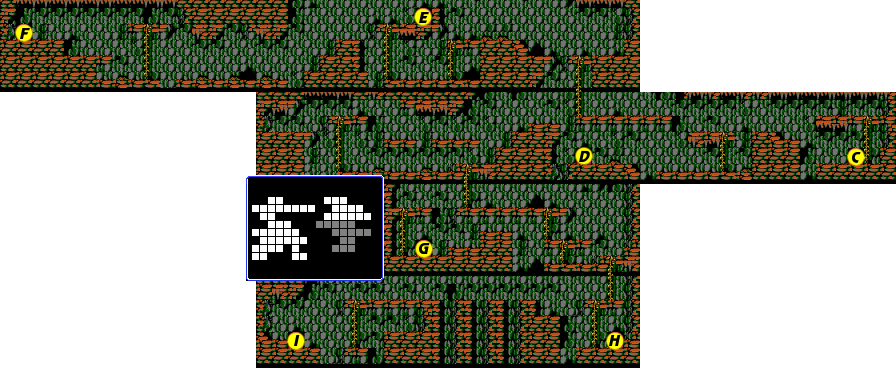
Through door C, you will arrive on the far right side of the green colored cavern (scroll the map over if you cannot see it.) Despite this cavern's large size, it is actually not that difficult to explore. However, you will have to be mindful of the geysers that fire scalding drops of water into the sky. You will soon be able to collect a raincoat that will protect you from them. To start, make your way to the left, and stay along the bottom path until you reach Door D.
Door D[edit]

Once you head inside, you will see a lone door in the back. Pass through it, and you will find what appears to be an empty room. From your usual bag of tricks, try hitting the back wall with your fist. A Fire Box will appear, and when you collect it, it will increase your maximum capacity of Molotov Cocktails from 5 to 10, and fill up your inventory. Return to the Green Cavern.
Now return to the right, climb up the vine, run back to the left and jump the gap to take the upper route. You have two choices as this point; you can continue running left and climb down to the lower portions, or you can climb up the first vine you reach and explore the top region.
For the purpose of this walkthrough, climb up the vine to the section above. Continue running left, and eventually you must drop down below, and then climb back up the vine in order to reach Door E.
Door E[edit]
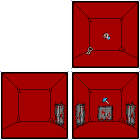
The rooms behind Door E are quite mysterious. You arrive in a room with a single door to the right. Enter through the door, and you will be in a new room with the door you came from on the left, and a new door on the right. Oddly enough, no matter how many times you take the new door on the right, the next room is always the same! However, as soon as you return through the left door, you will find yourself back in the initial room. The secret to this repeating room is to hit the back wall with a hammer. That will reveal a new door which you can pass through to arrive at an empty room. Hit the back wall with your first, and a third ![]() Keyring will be revealed. Now you can hold up to 6 keys, and your stock will be replenished. You'll be needing them. Return to the Green Cavern.
Keyring will be revealed. Now you can hold up to 6 keys, and your stock will be replenished. You'll be needing them. Return to the Green Cavern.
Now continue to proceed to the left end of the very top section to arrive at door F.
Door F[edit]
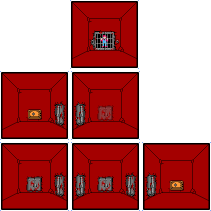
Behind door F is one of the bigger chambers. From the entrance, you can travel up once, or to the right twice. Both directions will reveal a safe containing a hint. Highlight the space between the following parentheses to read the hint of the safe above the start room: (KONAMIMAN WILL BE NEAR A MOVING ROCK.) And highlight the space between these parentheses to read the hint of the safe two rooms to the right of the start room: (YOU MET A TESTY OLD LADY WHO MIGHT HELP YOU?) The real secret behind Door F lies in the single room back and to the right. The Magic Locator Device that you picked up in the Purple Cavern indicates that this is the location of a Goonie. If you break out your trusty glasses, you will be able to see a door in the back wall. Head through it and it is here that you will find the location of the third Goonie. Rescue him and you will now have five energy bars to bolster your strength. When you are ready, head back out to the Green Cavern.
Now that the Goonie is rescued, lets explore the regions down below. Return to the right, and climb down the vine to arrive at the location above Door D. Move to the left and continue until you find a vine that extends to the region below. Climb down and drop through the gap to the left and you will see Door G.
Door G[edit]
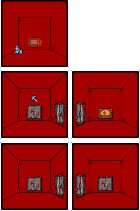
Behind Door G, you will find a set of four rooms that mostly contain doors, and a hint safe in the back right corner. Highlight the space between the parentheses to read the hint it contains (KONAMIMAN WILL FILL UP YOUR ENERGY.) It may not be evident but there is certainly more to this chamber that is worth exploring. The room to the left of the safe has an empty back wall. However, if you apply a hammer to it, you can make a door appear. Passing through the door leads you to an empty room. Now it is time to put on your glasses, which will reveal another safe in the wall. This one is definitely worth using a key on, as opening it will give you access to its contents: ![]() Diving Gear! You will need this to rescue the fourth Goonie so don't leave the Green Cavern without it.
Diving Gear! You will need this to rescue the fourth Goonie so don't leave the Green Cavern without it.
Outside of Door G, you must climb up the left vine in order to return to the top platforms, and run right to reach the vine which leads down to the section below. Climb down the vine and you will see Door H on the bottom. Climb or drop down and enter inside.
Door H[edit]
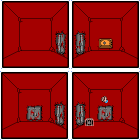
The interior behind Door H greatly resembles the interior of Door G. It contains a safe, whose hint can be read by highlighting the space between these parentheses (THERE'S A SECRET DOOR BEHIND THE FALLS.) But no amount of effort will reveal any secrets from the back room on the left. In fact, the secret that this chamber contains is really in the front right room. Even though there's a door on the back wall, if you hit the space above it with your fist, you will reveal a Bomb Box! This will increase your maximum bomb count to 10 and refill your stock of bombs. After you collect it, return to the Green Cavern
Climb back up the nearby vine and start making jumps to the left to reach the far end of the lowest section. Here you will find Door I.
Door I[edit]

When you arrive in this simple empty room, do what comes naturally and whack the back wall with your hammer. A safe will appear. Use a key to open this safe, and you will obtain a useful item: the ![]() Raincoat. This coat will prevent you from taking damage from any water-based attack like geysers and waterfalls.
Raincoat. This coat will prevent you from taking damage from any water-based attack like geysers and waterfalls.
At this point, you have explored the entirety of the Green Cavern, rescued three Goonies, and have three more to go. With the Diving Gear in hand, you are ready to return to the hole in the floor filled with water that you found in Freezer A. From your current location, you must return from the Green Chamber to the Purple Chamber through Door C, make your way back to the bridge, cross back over to the left, climb down to the Orange Cavern, pass through the door to return to the Red Cavern, and enter through door E of the Red Cavern to reach Freezer A.

