You begin in a small room with pairs of blue and green bouncing balls. Clear a path out from the door and remove the creatures. From here, you will follow the path up and around several screens until you reach X3 Y10.
X3 Y10
The same green and blue bouncing balls that greeted you at the entrance will appear in this room as well. Defeat them and shoot the item capsule in the middle of the room to obtain the Side Wave gun, a weapon that will come in handy shortly. If you wish to get a password, or simply check in with a Blue Lander so you won't have to traverse a lot of ground in case you die, go west one screen, and access the door at the top and enter X2 Y9. Then return to this room and follow the southern path.
X4 Y11
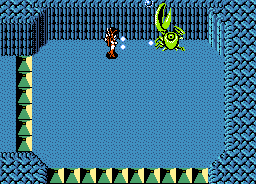
You will face the first area mini-boss here, a green crab-like creature. It will appear somewhere in the room and crawl up or down in an effort to become level with you. Once it does, it will raise it's claw in the air and spray bubbles in your directions. The best strategy to dealing with these crabs is to lure them up to the top of the screen. While standing there, many of the bubbles that they shoot high into the air are lost and do not return to the ground. Pelt it with your main weapon and a special weapon until it is defeated. An item capsule will appear in the middle of the room, and it will contain the very powerful Fireball weapon. Collect it, and exits will appear along the wall. Continue south from here.
X4 Y12
Just one room south of the mini-boss is another room that contains a weapon. Three orange bats occupy the room. Remove them from the safety of the side of the room, and then shoot the item capsule in the middle. Inside, you will find the Cutter Laser, which behaves like two Saber Lasers that appear on either side of you. From here, travel west.
X1 Y12
While exploring the labyrinth, it is not uncommon to come upon tiles arranged in the shape of large arrows. While they may suggest a direction to take, they are far more decorative than helpful. You have a choice from this room. You may either follow the arrows suggestion and continue west, or you may proceed north. Either way, your goal is to reach the far west side of the map, and continue north until the path takes you back to the east.
X1 Y10
Regardless of which path you took, you should follow the arrow's advice and proceed north. If you haven't checked in with the Blue Lander located at "X2 Y9', you may wish to do so now just in case.
X1 Y9
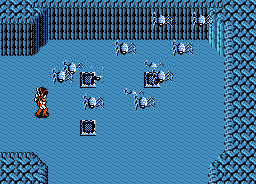
The lone blue spider that you encounter in this room is an interesting opponent. If left alone, it cycles from blue to yellow and then to red, before multiplying and spreading out. Each new instance of the spider will exhibit the same behavior until the room is flooded with many spiders (at least, as many as the game will permit.) If you are in dire need of health and/or chips, it's not a bad idea to sit around in this room, let a few spiders multiply, and then destroy them in an attempt to generate item capsules. The Bullet Shield is a useful special weapon to use in these situations, although it does drain chips fairly quickly. Don't let them overtake you, however. If the action gets too intense, leave the room and come back, and the entire brood will be reduced to the original spider. You will encounter this a few more times in the labyrinth, including X1 Y7 above the Corridor 11 entrance.
X0 Y9
If the action in the previous room with the spiders got a little rough for you, or the area in general has taken it's toll, shoot the item capsule in the middle of this room to reveal an energy tank which will fully restore your health. Just watch out for the bouncing orange balls that occupy the room. Head north and open the door.
X1 Y8
This is the entrance to Corridor 11. You don't need to do anything special to open it, the gate will open automatically. However, do not jump in right away. Instead, visit the path through the north door first and face the mini-boss at the end. You'll receive a useful item that will give you a better chance for survival against the difficult boss at the end of the corridor. When you do complete the corridor, you will be awarded the Grenade weapon for your efforts.
X0 Y6
The boss that you face in this room is a blue version of the green domed mini-boss that you faced in Area 0. Unfortunately, the color isn't the only thing that's changed. This version is much faster and much better at keeping up with you whenever you try to run away from it and try to put some space between you. That strategy is much more difficult on this machine. However, if you picked up the Fireball weapon at this time, you can destroy it with just 4 shots due to its high damage. Eventually, you will defeat it, and you will receive a Red Lander for your efforts. This Red Lander will increase your maximum chip capacity to 150. With this item, return to X1 Y8 to take on Corridor 11.
This corridor starts out with attacks from the thin fish that appear on either side of the screen. These orange fish will be joined by attacks from starfish which appear from one of the top corners, fly diagonally across the screen and randomly choose a spot on the ground to drop down and spread out, before taking back off toward the top of the screen. A few of the bullet shooting creatures on stalks will appear as well, initially only on the left side, but eventually throughout the screen.
After a small batch of starfish attack at once, there will be a lull in the action. Then two orange fish will appear, followed by a manta ray. Fish and manta rays will appear for a while before the bubble shooting plants return. When they do, a lobster-like creature will swim across the top of the screen. They stay near the top, showering bullets down at you. Finally, three pairs of fish will appear on either side before the approach to the boss.
The boss of this corridor is the first of many such bosses. He is the easiest of an incredibly difficult breed of boss. Known as a Green Optomon, it will stay at the top of the screen and slide back and forth. It has two forms of attack; regular bullets which it fires in your direction, and strands of seaweed which it releases straight down. The bullets are harmful, but the seaweed is devastating to touch, potentially reducing your health by over 50% so it's vital that you avoid it. When the Optomon is producing the seaweed, it flies back and forth with the Optomon until it reaches its maximum length, and the seaweed drifts down. If you have to choose between getting struck by the bullet or seaweed, you should always get struck by the bullet.
You should remain on the bottom of the screen as much as possible throughout this fight. Rising up risks getting tagged by the seaweed, but it's sometimes necessary in order to avoid older seaweed that is passing through the bottom of the screen. Unless you decide to backtrack to Area 2 to collect the gun power up first, your weapon and special weapon damage is very low, with the exception of the high recommended Fireball a this point.
If you are playing corridor rush, you are likely to have the Grenade before fighting this Optomon. In this case, you may try to always toss grenades into a corner so that the Optomon always catches the blast.
You'll have to be patient and vigilant. Eventually it will go down. If you're having trouble surviving this battle, you may wish to visit Area 2 first and return here when you are stronger and more powered up. Successfully defeating the Green Optomon won't net you a new key, but it will return you to the corridor entrance in Area 1. Upon arriving, you will receive the Grenade weapon, and you will be ready to visit Area 2, which you can access through X7 Y13 of Area 0.