As you will find is fairly common, Area 3 starts off with a Blue Lander who can record your progress and provide you with a checkpoint that you will return to if you perish. Proceed through the bottom door and follow the path south. You will notice that you are no longer in an underwater themed area, but rather a forest themed area.
X7 Y20
Below the downward arrow which contains a few blue chips for you to collect, you will reach this room, occupied by five orange bats. Deal with them and explore the path to the left. One screen to the west serves as the entrance to the room containing Corridor 13.
X5 Y20
Not only does this room contain the gate to Corridor 13, but it also contains a door on the left side. Passing through it will take you to Corridor 3, but you don't yet know the mechanism to open the gate. For now, hop inside of Corridor 13 and clear it. You will receive your first defensive upgrade as a reward. This will come in handy during the next mini-boss fight.
Corridor 13
Continuing with the forest theme introduced in Area 3, you will be flying over a lush forest. Wayward green asteroids like those encountered at the very beginning of the game will descend upon you. This will be the only enemy for a while until flowers begin to appear on the ground. They spray "pollen" bullets into the air, so shoot them and destroy them as fast as possible to reduce the amount of dodging you need to do. Spinning red ships will join the fight, as will the highly resistant blue orbs, both of which were also first encountered in Template:~.
When the flowers return, so too will a new enemy, a type of pterodactyl that flies onto the screen, gets somewhat close to you, and then quickly retreats through the top of the screen. Another new enemy will appear, a red plant that bursts when you get close to it, sending a number of particle in your direction. Learning how to deal with this mass of particles is crucial to your continued survival in later corridors. More asteroids will fall, and the circle of blue asteroids that turn red will return from Corridor 0. Diagonal rows of four flowers will appear on the left side of the screen, as more pterodactyls appear. After another particle bursting plant, a bed of flowers will appear as a new type of blue spinning ship cross the screen in an arc.
The boss of this corridor is a silver Bombarder. Bombarders appear in one section of the screen, launch a barrage of heat-seeking missiles in a full circle, and then disappear from the screen before reappearing in a different location. Since it holds still during his appearance, it's actually rather easy to hit. However, the volume of missiles that it fires is the real threat. After the Bombarder disappears from the screen, you may need to lure the missiles to one of the top corners, before double back to get beneath the pack and shoot at them to destroy them. The quantity of missiles also works in your favor since you are more likely to find item capsules by destroying them in big numbers. Keep focusing your attack on the Bombarder whenever it appears, and dodge the missiles when you can no longer hurt it.
Be sure not to remain below the boss if it appears particularly low on the screen. The Wave Attack is a useful special weapon since it can neutralize many of the missiles before they get too far, but the wave is not too powerful against the boss itself. The Multi-Bullet and Fireball are a bit more effective. If you are skilled enough, a well-timed grenade can wipe out all of the missiles as soon as they come out. Defeat the boss and return to Area 3, where you will collect your first defense upgrade.
Return to Area 3
From Corridor 13, return to Area 3 through the right door, head east two screens, back to the bats, and proceed south to the bottom of the area before turning left.
X6 Y23
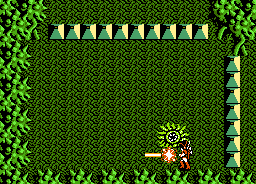
The first mini-boss of this area, known as the Green Leech, is a major increase in difficulty than the other mini-bosses. The Leech bounces around the room, typically in the Guardian's direction, making it very difficult to shoot normally without taking damage. The best and cleanest way to beat the Green Leech with the least (possibly no damage) is to walk in an infinity symbol (a 90 degree rotated "8") and fire your side waves. Let the side waves do the dirty work and eventually, you will kill it. Using any other weapon will be very difficult to hit (though the Repeller may also work). If you want to get it done quickly but take a lot of damage (possibly to "0" health), simply stand in one spot and spam either your Cutter or Front Wave while shooting your regular weapon.
X6 Y22
Just one room north of the first mini-boss, you will encounter the roaming creatures coupled with the smaller darting creatures that track your position and usually leave item capsules behind. In the center of the room is an item capsule that, when shot, reveals a Red Lander for you to collect. This one will boost your maximum chip capacity to 400. Unfortunately, that will not unlock a new fire pattern, as the next one won't occur until your chips increase beyond 2050. Follow the path to the left and continue moving west.
X4 Y22
Three orange bats fly around this room. A door to the south takes you to another Blue Lander who can record your progress, give you a password, and serve as a check point. Use it if you like, and then continue west and stay below the red barrier.
X2 Y22
A new enemy type appears here, a type of shellfish. They take a lot of shots to destroy, but they are slow, and relatively easy to defeat. Clear them out and continue west.
X0 Y22
You may notice a lack of enemies through this section. When you arrive in this room, a lone item capsule occupies the center of the room. Shoot it to obtain another rapid-fire upgrade.
From here, head south and visit the room beyond the door that you find. In the room beyond, you will receive the hint on how to open the gates to Corridor 3. Then exit the room and begin to follow the path to the north. When you reach the top, continue to the right.
X1 Y20
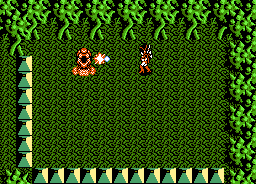
You will find the second mini-boss here, but it's nothing you haven't seen before. This is the mini-boss that appears somewhere, sticks up its head before retreating, and leaves enemies in it's place. The only difference with this boss is that it takes more hits to kill, and it leaves two or three enemies in its place instead of merely one. The Saber Laser is once again a very effective weapon to use against this entirely stationary enemy. Once it is defeated, collect the weapon in the item capsule that appears in the center. This is the final weapon of the game, the Enemy Eraser, and it is different from all other special weapons. It does not rely on chips. Rather, you have a limited supply of them that you use up one at a time. Now that you have collected this item, you may encounter more inside of item capsules dropped by defeated enemies.
Continue south and follow the path to the east. You are ready to return to Corridor 13, and you may take any path that you like back to X5 Y20. When you enter the room, shoot the door on the left side open and proceed to the next room.
X4 Y20
If you observed the hint given to you in the lower left corner of the map, you will be told to wait for the gate to open. When you arrive in the room, simply hold still for 20 seconds, and the gate will open for you automatically. When it opens, hop inside and tackle Corridor 3. When you return, you will obtain an Energy Tank item for your efforts, which is nice, but no upgrade.
Corridor 3
You will begin this corridor by encountering a breed of slowly falling mushrooms that glide back and forth across the screen. They are easy targets to remove. Pollen spewing flowers follow. A second variety of mushroom will appear, and they attack much more directly. They fall from the top of the screen in an effort to land on you, before bouncing back up to the top of the screen and repeating their attack. Destroy them as quickly as possible.
Blue spinning ships will appear and cross the screen in front of flowers. Pterodactyls will join the flight when the slower floating mushrooms return. Soon enough, the circle of asteroids will appear. Because you have collected some defense upgrades, their behavior will change. They will form a much wider circle that occupies more of the screen, although fewer asteroids are created. Green asteroids and red spinning ships join the fight when the asteroid circles cease. The red particle-bursting plants will return. Attempt to destroy them when they are in tact, before they burst to reduce the amount of objects you need to deal with.
When you finally reach the boss, you may be dismayed to find that it is a Blue Optomom. This time, the strands of seaweed that it produces are much longer, and can sometimes shoot a faster seaweed shot, making the fight less predictable. You will not be able to obtain any more power ups than you already have until you defeat this boss, so you'll have to rely on the power levels and weapons that you currently possess. The only weapon you can upgrade at this point is your Hyper Laser, by visiting location X10 Y11 in Template:~, where you can now afford to pay the price of 300 chips for the upgrade.
The quickest way to defeat it at this time is to use the Repeller or the Fireball. While you still have to dodge the bullets, both weapons inflict the most damage at this time and Optomon's movement patterns will still take both weapons' damage.
If you become desperate for power-ups, you may attempt to use the Enemy Eraser. It will have no effect on the boss, but it will destroy the bullets, and if you're lucky, one of the destroyed bullets may drop an item capsule. When you are ultimately successful, you will obtain the key which open the access to Template:~, which you can reach through X13 Y8 in Template:~. Collect the Energy Tank that you earn upon your return to Area 3, and make your way to the next area.