Task 1: Getting the Ball and Chain[edit]
The Pumpkin[edit]
Once you enter the mansion, defeat the poe in the central foyer, then proceed north to where Yeta waits. She gives you a map and asks you to find the key for her. She marks a location on your map and opens a door. Go through, and approach the soup Yeto is making and scoop it up (if you have an empty bottle) to get some Simple Soup.
Warning: This dungeon perhaps can be difficult if you don't have jars full of fairies. Since none of the enemies leave hearts behind, you just need to survive until you have no fairies left. As a last resort, though the soup is unlimited, you have to fill your jars with soup as it goes from two hearts all the way to eight hearts at the end so be prepared for this.
Block Puzzle One[edit]
North of the kitchen, you'll find a block-sliding puzzle. Push the closest block west, then push the other block south, west, and south again to slide it onto the switch. Go through the now unbarred door and transform into a wolf. Dig under the crack in the wall to enter the courtyard, then defeat the White Wolfos. After they are gone, dig up a chest in the snow to find a small key. Advance west through the door, then north.
In the next room, defeat the three Mini Freezards to go west. In that room, approach the door seperating you from the chest to prompt two Chilfos to appear. Attack them with jump attacks to defeat them, then move onward to the chest to collect the Ordon Pumpkin.
Cheesy Goodness[edit]
Travel south, back to the kitchen, and talk to Yeto to get him to add the pumpkin to the soup. Scoop the Good Soup up (dump out your Simple Soup if you still have it) so that you can enjoy it in a tight spot. Afterwards, speak to Yeta and she will open another door and mark another location on your map. Proceed through that door and head toward the northeast corner. In that room, pick up the cannonball and navigate through the maze to reach the cannon. Put the ball in and a bomb in after angling it south to destroy a Freezard, allowing you to continue.
In the room to the south of the maze is…another maze! Walk along the beams while avoiding the white icy parts, hitting Mini Freezards with your clawshot to knock them off. Hop over a few short gaps to claim the compass, then head back to the courtyard. After you defeat the White Wolfos, engage your senses and dig (as a wolf) to find a chest containing a small key. Use it to open the door on the courtyard's east side. Grab a cannonball from the room and place it into the spoon-shaped device on the wall. Go back outside, then pull the lever to make the cannonball come out. Pick it up and go to the cannon, turn it towards the Freezard, and place the ball and a bomb in. With the Freezard gone, you can now enter the armory of the mansion.
Miniboss: Darkhammer[edit]

In the armory room to the north of the courtyard, there's not much here to do but advance to the far side. However, when you do, the doors will lock.
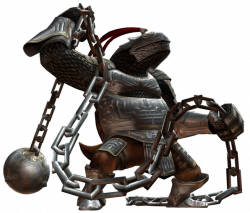
Suddenly, you hear loud, clunking metal approaching you. The armor behind you is smashed to bits, and right behind the clattered mess is Darkhammer, the miniboss of the mansion, who has plundered the Ball and Chain.
With nowhere to go in the narrow armory, Darkhammer will slowly close in to attack. Assign your Clawshot to ![]() . When Darkhammer gets close, grapple over him, then run from him and dodge when he releases his ball and chain. While he is reeling it back, run to his backside and hit his tail with your sword (you should get about three jump attacks per round). After a few rounds, the knight will groan and die, and leave behind the Ball and Chain.
. When Darkhammer gets close, grapple over him, then run from him and dodge when he releases his ball and chain. While he is reeling it back, run to his backside and hit his tail with your sword (you should get about three jump attacks per round). After a few rounds, the knight will groan and die, and leave behind the Ball and Chain.
Also, you can just have the arrow and bomb combo to shoot at his tail once.
The Ball and Chain[edit]

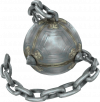
With Darkhammer's mighty weapon laying on the floor, you are free to claim it for yourself. With this beast of a ball in your hand, you can smash through almost anything you come across, or wallop enemies. In the next room, swing it through the ice in your path, allowing you to continue to your prize, a wheel of Ordon goat cheese. Be careful, though. Smash a nearby suit of armor, and you'll find an Ice Bubble. However, you'll get a lot of Rupees for defeating it.
Task 2: To the Bedroom[edit]
Ball and Chain Practice[edit]
Head back to the kitchen and speak to Yeto so the cheese can be placed into the soup. Scoop some Superb Soup, which replenishes as much as a Red Potion, into an empty bottle and head over to Yeta. She finally remembered where the key was and marks the location on your map and unlocks another door.
Go in, and make a left, then push the block into its resting spot. head back to the room you were previously in, then start heading up the spiral ramp. Hit the Freezards through the gap in the bars twice to destroy them so that you can proceed upward. When you reach the second floor room north of the spiral path, destroy the ice on the wall with the ball and chain to reveal a grappling point. After that, move directly south of the chandelier and hit it to start it swinging. Jump onto it when it is close to you, and jump off when it is close to the northern platform, which contains a small key. Head back to the spiral path room.
On the carpeted area, bomb the weak floor section and drop through the hole to collect a piece of heart, then use a grappling point to return to the second floor and head over to the foyer. Destroy the ice to reveal a grappling point, then either collect piece of heart #22 or head into the next room. Defeat the enemies there, break the ice to reveal a poe, then head north into the block puzzle room.
Block Puzzle Two[edit]
Push the block on the platform down to create a path back up, then break the ice on a block and a switch. Push the block resting on the first switch north, then push the one that used to be in ice south, west, then north. Return to the first block and push it east, south, west, then north to have it rest on the middle switch. Go back to the block previously covered in ice and push it east, south, west, then south again to put it onto the original switch (just in case you needed to go that way again).
To summarize, start on land and face the block that is on top of the first switch. Push that block forward and it will go across and hit the other side. Then push the block closest to the one you just pushed down to where the first switch was. Afterwards, push the same block in front of the first switch, and push it towards the block sitting in the middle of the ice to land on that switch.
Climb up onto the boxes to return to the second floor, then exit to the east. In the courtyard, hit the Chilfos from a distance with the ball and chain or bomb arrows (it takes two bomb arrows to defeat them), then head to the north. Look through the crack in the wall to see a grapple point. Proceed through the door. In the northeast corner, break the ice on the wall to reveal a grappling point, then swing on two chandeliers to reach the small key.
Cannonball Fun[edit]
Use the key to get to the room between the foyer and the courtyard on the second floor. Defeat the enemies with the ball and chain, push the blocks on the wall, then run down the spiral path and into the northern room. Push the block forward to find a cannonball. Transfer it into the room with the path, place it into the cannon, turn the cannon west, and fire it. Head into the western room, pick up the cannonball, and transfer it into the courtyard. Shoot the Freezard with the cannon, then work your way to where it once stood. Enter the chapel and defeat the Chilfos with the ball and chain to retrieve the big key, then head back outside to find Yeta. She'll lead you up to the bedroom at a rather slow pace, so run ahead of her and go in.
Twilit Ice Mass: Blizzeta[edit]

When you reach the bedroom, Yeta will show you to the Mirror Shard. As she takes a look at herself in the mirror, she keeps thinking about how pretty it is. She suddenly starts to twitch and groan, and then she changes into a monster... BLIZZETA.
Stage One[edit]
Yeta has been possessed by the Mirror Shard's magic and has turned into a giant ice statue that behaves much like a Mini Freezard. Hit her with the ball and chain multiple times. When she gets back to normal size, she'll radiate small statues. Dodge them and counter with more ball and chain attacks.
Stage Two[edit]
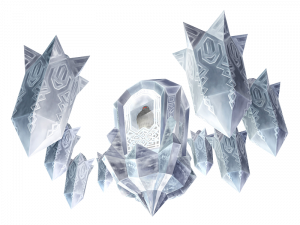
For the second stage, Blizzeta will surround herself with ten icy spikes and hover above you. When you see the reflection of the spikes forming a line, roll out of their way and destroy one with the ball and chain after they all land. Shortly after they land, the spikes rise again and form a circle around you. Head toward the gap in them so Blizzeta doesn't land on you, then hit her with the ball and chain. If you do not complete three final hits quick enough, the more spikes regenerate minus the number of spikes you take out. This might give you the advantage you need. Each time you complete three quick hits, ten spikes will regenerate again.
After three direct hits, Blizzeta smashes into a window, and the light from outside turns her back into Yeta. You recover the Mirror Shard, however, Yeta is left in an awful state, and Yeto hurries over to her. After the two of them hug, several Recovery Hearts spill out, and then a Heart Container.
