Task 1: Retrieving the Dominion Rod[edit]
Gates and a Map[edit]
As you enter the temple, Midna will comment on the lack of symmetry in the foyer. Transform into a wolf and engage your senses to see the ghostly outline of a statue that is missing from its resting place. In front of the room's remaining statue, there is a smaller statue on a pedestal. Put it onto the pressure switch in front of the missing statue's location to gain access to the stairs. Climb up, then down to the other side and light the torches to earn a Small Key.
Head south into the chamber with the golden gates. Defeat the enemies, but leave at least one pot intact. Place the pot on the switch in the middle of the room to make two gates open and one close. Open the chest behind the southern gate, then go west past the other open gate and hit the pot with an arrow. The gate blocking you before will now open, allowing you to proceed westward.
An Armos statue awaits on the third floor room. Approach it to bring it to life, then work your way around it and hit the jewel on its back. The statue will hop around for a while and then explode, which causes a chest containing the Dungeon Map to appear.
Platform Peril[edit]
After placing the small statues at the gate it will open, climb up the stars in the large round room to the fifth floor. Fight off the enemies and then push the arm of the central platform to make it sink, pick up a small statue, put it on the platform, and make it rise again. Place the statue on a switch near the south door, get another statue to the west, and put it on the other switch. A couple of seconds after you place both statues, the white tiles will rise. Make sure you get onto them before they do, as they give you access to the south door.
In the next room you'll find two Armos statues. Engage them one at a time, hitting the jewels on their backs. Once both have exploded, you'll earn a small key.Return to the previous room and head north to the locked door.
Archery Practice[edit]
In the room on the north end of the fifth floor, hit the green diamond to make the barriers move out of the way. Defeat the Beamos, proceed to the middle of the room, and shoot the now-red jewel with an arrow. Defeat the next Beamos and collect the compass. After you get the compass, hit the jewel again with an arrow (you might want to use the Hawkeye) allowing you to exit to the east.
The next chamber again has jewels that activate barriers. Stand on the circles in the floor to get a clear shot at the jewels to proceed eastward. However, you'll fight Armored Lizalfos after each barrier moves, so get ready to fight.
Climb up the stairs to the northeast corner of the seventh floor, then step onto a giant scale. Your platform will sink and the other will rise. Toss the small statue onto the other platform to make them even, then advance to the south. (Note: Defeating every bug in that room will yield a chest with 50 rupees.)
Place of Pain[edit]
Once you get into the room, destroy the Beamos to prevent it from blasting you. Then, run with the flow of the spiked mechanisms to reach the stairs. Climb up, fight three Lizalfos, then avoid a spiked roller and a bladed pendulum to get the key in the southwest corner. Then, pick up a small statue in the northwest corner and take it to the switch on the floor. Place the statue on the switch to turn the electrical barrier off, then head up the stairs to the north.
The room in the north end of the eighth floor houses two Armos and a lot of spiders. Before you drop down, destroy the spiders, then drop down and destroy the Armos one by one. The door to the east will open.
Miniboss: Darknut[edit]

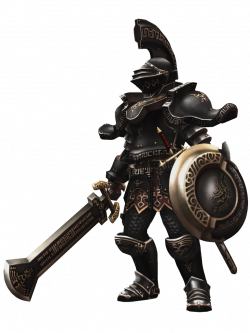
Upon reaching the top floor of the Temple of Time, you'll find someone waiting for you. However, the only thing he's interested in is a duel. This is the mini-boss of the Temple of Time, a Darknut.
Be wary as you face the Darknut, because he is an elite armored warrior with a strong attack. Hop out of the way of his lunges, then counter with your own attacks. The Back Slice and Helm Splitter moves are very effective. As you continue to attack him, his armor will fall off, allowing him to move faster and faster. Eventually, you'll knock all of his armor off. He'll throw his sword at you (which you should dodge automatically), and draw out a small rapier sword. In this stage, the Darknut is very quick, he slashes without warning, and blocks almost all of your normal attacks. Either try using Back Slice and Mortal Draw (Warning: If Mortal Draw gets blocked, you'll probably lose four hearts) or circle him without targeting, listen for him to slash at you, then target him and swing away. Either way, you'll eventually best the warrior and earn access to the Dominion Rod.
The Dominion Rod[edit]

Grab the Dominion Rod from the chest in the room. When you retrieve the Dominion Rod, you will be able to move statues with its power. Aim it at one to see what happens, namely the one in this room. From here, everything turns to backtracking to the first room.
Task 2: To the Boss[edit]
Guide the Statue[edit]
After you make statue on the ledge above you come to life, guide it to the disc under the bell-shaped device to transfer it into the next room. When guiding statues with the Dominion Rod, they will move as you do. You can make them attack with ![]() .
.
In the next room, press ![]() to have the rod-controlled statue swing its hammer and destroy the golden gate, then clobber the two Armos in the room. Since the statue cannot climb, put a pot or small statue on the floor switch in the room to make the white platform sink. Guide the Statue to the platform, then destroy the pot or move the small statue to make the platform rise.
to have the rod-controlled statue swing its hammer and destroy the golden gate, then clobber the two Armos in the room. Since the statue cannot climb, put a pot or small statue on the floor switch in the room to make the white platform sink. Guide the Statue to the platform, then destroy the pot or move the small statue to make the platform rise.
Path to a Bell[edit]
The statue is impervious to electricity and damage from spikes and the like. Have it go ahead of you through the electrical barrier and stop on the switch that turns it off. Then guide the statue through the area with spiked rollers, using him as a block. In the room to the south, have the statue destroy the spiked mechanisms and the Beamos to reveal a switch on the floor. Guide the statue to the white tiles in the south end of the room, put a rod-controlled small statue on the switch to make the platform rise, then guide the big statue to the bell.
The Big Key[edit]
In the next room, guide the big statue onto the scale's first platform, then collect the six smaller statues around the room and toss it onto that platform as well. That will give you enough height (when standing on the other platform) to grapple to the spot above the room's big bell. Ride a Spinner track west to collect rupees and a poe soul, then proceed westward into the next room.
The gate in the next room will lock behind you. Use your Clawshot to pull the armor off the Helmasaurs in the room, then defeat them with your sword. After that, defeat the Armos. The gate will open when all of the enemies are gone, but don't leave the room yet. Grapple up to the balcony and place small statues on three of the four switches. Then use the Clawshot to grab one of the Helmasaur's armor and put that on the final switch. That will give you access to the Big Key.
A Balance and a Heart[edit]
Return to the room with the scale. Lead the large statue to the first platform, then place four small statues on the second to even out the scale. Move the big statue to the second platform and relocate the small statues to the other platform. Once you step off, the scale will even out again and you can guide the big guy to the bell.
When you reach the room with the diamond and the sliding barriers, you'll see the statue on the other side of the fence. Use the Dominion Rod to make it walk past the first barrier, then hit the diamond with an arrow to allow you to pass. Guide the statue to the floor switch (which turns the electrical barrier off), then advance to the treasure in the northeast corner. It's a piece of heart. Guide the statue into the next room.
Destruction Frenzy[edit]
Crash through the next room with the sliding barriers, and lead the statue to a bell to get it into the large circular room. If you wish to get a piece of heart, push the lever on the pedestal to make it sink into the floor (If you don't want the heart, skip to the next paragraph). Pick up a small statue, then take the pedestal back to its starting point. Place the small statue on one of the floor switches near the southern door. Pick up the other small statue (to the west and put it on the other switch. The white-tiled platform will rise, giving you access to the door. Run to the southeastern corner of the southern room and use the Dominion Rod to make a small statue on the other side of the railing come to life. Guide the statue north to a switch. Toss another small statue over the west railing and guide it to a second switch. The treasure will appear.
After you get the piece of heart (or if you opted not to), return to the round room and take the pedestal to the top. Take control of the large statue and guide it to the pedestal. Sink to the floor and have the statue destroy the spiders, which causes the electrical barrier to shut off. Before you put the statue under the bell, have it break the golden gate that protects the room's Poe. Defeat it for a soul, then guide the statue under the bell.
In the Homestretch[edit]
Use the Clawshot to get over the gate in the third floor's west room. Bring the statue to life, have it defeat the puny Armos, and move it onto the bell in the second floor. Go to the first floor foyer to find the statue waiting for you. Bring it to life once more and guide it to its final resting place, alongside the main door, which will open.
On your way to the boss room, you'll jump over a gap, use arrows to destroy Beamos, and run past swinging pendulums, nothing you can't handle. Pick up a small statue and place it on a switch to open a gate. Pass through the gate, and use the rod to move the statue. The gate will close and another will open, giving you access to the boss room. Before you head in, however, look for a fairy in a pot.
Twilit Arachnid: Armogohma[edit]

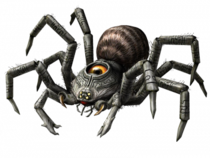
As you enter the lair of the boss, you'll find it much darker than the rest of the rooms of the temple. Suddenly, everything gets even darker, causing you to look up- right into the eye of a giant spider: ARMOGOHMA.
The great spider Armogohma crawls on the ceiling, drops large groups of little spiders, and fires lasers from the eye on its back. Avoid the lasers and defeat the little spiders for hearts and arrows while waiting for the spider's eye to open. When it does, hit it with an arrow. A single shot makes the arachnid fall to the ground. Run to the statue closest to the spider, bring it to life, and have it smash Armogohma. The spider will go back up to the ceiling for another round.
You'll seemingly destroy the spider after three hits, but there's one more trick this spider has left: the eye will remain, turning into a spider itself, joined by a horde Baby Gohma. Slice the spider, shoot it with three arrows, one bomb arrow, or two spinner attacks to finish the battle, collect a heart container, and claim a mirror shard.
