Ninjas
Black Ninjas

Black Ninjas are the most common and simplest of all the ninjas you will face throughout the game. They aren't particularly fast, make little effort to hide themselves, and always use throwing stars which can be deflected by your own weaponry. They occasionally drop ammunition scrolls.
White Ninjas

White ninjas are a lot more crafty than their black garbed cousins. They use more subversive techniques to sneak up on you like hopping out of the water, or attacking four at a time from every direction in castles. They are also a little faster than Black Ninjas, but they too use throwing stars. White Ninjas always leave ammunition scrolls behind.
Red Ninjas

Red Ninjas know the secrets of the fire throwing techniques. While they are like Black Ninjas in every other respect, they distinguish themselves by throwing balls of flame at you. Fireballs cannot be deflected like throwing stars, so they must be dodged at all costs.
Blue Ninjas

The Ninjas dressed in blue rarely attack directly. They prefer to attack from the edge of the screen or from the rooftops instead, tossing throwing stars at you before disappearing. They are more of a nuisance then a threat, and attacking one of them rarely does any good. Focus more on deflecting the stars that they throw.
Flashing Ninjas

Flashing Ninjas are incredibly dangerous. They come equipped with land mines that they attempt to place down throughout various parts of the screen. Because they possess explosives, Takamaru must be especially careful when killing them because they quite literally explode. Killing a Flashing Ninja will also detonate any land mines that were present on the screen when you arrived.
Invisible Ninjas

Only found in the castles, the Ninja's have mastered the art of stealth and concealment. Unfortunately for them, they haven't mastered the art of lighting—their shadows are entirely visible at all times, giving their position away. Still, it can be difficult to anticipate the movements of a shadow when you can't see what direction they are facing, so attack carefully.
Flying Squirrel

Initially, you will only encounter these elite Ninjas on special mountain side screens, but they later become quite common as you get closer to Murasame Castle. They leap in various directions and travel to one edge of the screen before disappearing or choosing another direction fly in. Track their motion carefully and strike when the time is right.
Castle Ninjas
Outdoor enemies
Land Mines

Land Mines are inanimate objects that act as proximity bombs. When you get close enough to them, they will detonate. They flash for only about a second before they explode, and can hurt you if you are one square's distance around them. They are more easily detonated by approaching from the right or left, than from the top or bottom, so don't attempt to bypass them unless you walk above or beneath them with the Red Sandals speed power-up. It's safer to get close enough to make them flash and back away until they explode.
Bomb Chunin

As you approach certain exits from a screen, a Chunin may appear to prevent you from passing. The first Chunin that you will encounter are the Bomb throwing Chunin. These Chunin have the ability to toss a bomb all the way to your location. And the bomb will detonate when it reaches the place where you were standing, or if you get hit by the bomb. Lure the bomb tosses to one section of the screen, and turn around and attack from another. It's best to get inside and slice the Shinobu between bomb throws.
Fire Chunin

Starting on the second stage, a different kind of Chunin will be introduced. These Chunin belch balls of fire at you. Unlike the bombs thrown by the Chunin above, they don't detonate, but they do travel at a good pace. Once again, mislead the Chunin to spit fire at a location where you do not intend to stay, and dodge the attack while you close the distance between you so that you can strike and remove them quickly. Projectile weapons do work against the Chunin, but they have the power to block your shots.
Tengu

The Tengu is a special air demon who travels by summoning a whirlwind to whisk him from location to location. While travelling in the whirlwind, he is invulnerable to attack. Fortunately, when the whirlwind drops him off, he tends to hold still for a long time, making him easy to attack. But you must watch out for the smaller whirlwinds that he attacks with. Time your attack between the small whirlwinds.
Earth Demon

The earth demon quite literally digs his way out of the ground to attack you. When he appears, he will throw three throwing stars at you before returning to the earth. Attack him while he still stands to prevent him from returning for another strike.
Bandit

Bandits are probably the rarest regular enemy in the game. They only appear on the mountainside screens where you first encounter the Flying Squirrels. They slowly walk forward brandishing an axe to all those that dare to intrude on their hillside homes. They don't pose much of a threat, but you shouldn't underestimate them and focus on a Flying Squirrel when a Bandit is closer to you.
Castle enemies
Samurai

The sword wielding Samurai are the first of many surprises that the castles will throw at you. Some of the doors in the castle are locked, and will remain locked until you defeat key enemies. These samurai are one such enemy. They track your vertical movement, never stepping left or right to approach you. They face you with their sword drawn ready to strike as soon as you get close. When you are close enough to strike, you must quickly swing your blade twice; once to deflect their blade, and once more to strike them down before they have a chance to swing their sword and retaliate. Alternatively you can move just out of range, close enough to cause the Samurai to raise their sword, and fire into your unprotected opponent.
Spear Chunin

These Chunin are masters of the spear. When a threat approaches, they begin to twirl their blade around in a circle. They can still approach you as rotate. If you get too close, the spear will knock you down. You can attack from a distance, but many of your shots will be deflected by the spear. Only persistent attacks will slip past the whirling blade. A lucky inside strike can knock them down, but it's generally too dangerous to attempt.
Flame Ninja

These fighters are true masters of the Ninja arts. By focusing their Ki, they can summon a ring of fire to surround them and send a number of flames in your direction as well. This Ninja is one of the toughest enemies that you will face. Their protective flames can stop many projectiles, but not all. Getting inside to strike them is next to impossible without the invisibility technique or the magic helmet. And to make matters worse, you cannot deflect their flame attacks, you can only dodge them. It is best not to stand too close to them when attacking, as it can be difficult to distinguish their protective flames from an attacking flame. This is a truly formidable enemy.
Castle Chunin

Guards only appear in the fourth (pink) castle. They are a lot like the Bomb Chunin. They appear to block an exit, and throw bombs at you. Use the same strategy that you use against Chunin. Lure the next bomb toss to one location, and quickly get out of the way while you approach and get inside for a quick strike. Be careful, though, as these guards tend to throw bombs much faster than their outdoor cousins.
Gate Keeper

The Lords of each castle secretly track your progress. But when you get too close, they quickly retreat through a back door to prepare for battle. When they retreat, they will leave you in a room with three or five of these Gate Keepers, along with fire billowing statues. Of the three or five Gate Keepers, one will occupy the top of the room, moving left and right, and firing downward. The rest will be divided among the left and right sides of the room, moving up and down, and firing across. They shoot wispy projectiles at regular intervals that travel straight and cannot be deflected or destroyed. It is difficult to attack them head-on, but it is slightly easier to attack them from the sides since they are unable to change attack directions. Attack the side Porters from the bottom, but watch out for the flame projectiles being fired at you from the statues.
Hannya

As you wander through the castles, you will encounter the rooms of the princesses being held captive in their rooms. Ordinarily, when you approach a princess, they will turn to greet you and reward you with 8,000 points and an extra life. But on occasion, the princess that you find may turn out to be the jealous spirit of an enraged departed female. Once you get close to these spirits, they show you their true form, and float around the room to attack you. They are quite strong, and you must react quickly to avoid their attack. You will be awarded 8,000 point for defeating them, but no extra life. These enemies will also follow you around the castle if you go out of the area that it is in until it is killed.
Murasame Castle enemies
Jaki

The Jakki of Murasame Castle replace the standard Ninjas that appeared elsewhere. They move about much like Ninjas and they can throw two different projectiles. One is the standard flame projectile while the other is a multi-colored projectile that can be deflected like a throwing star. They move and attack quickly, so don't remain in one place for long. Takamaru should generally not concern himself with them unless they get directly in his way.
Bridge Guard

Certain entrances inside of Murasame Castle are protected by a moat and a drawbridge. To guard the drawbridge, two monsters occupy either side. They scrunch down to build up energy, and pop up to release the energy in the form of eight projectiles that scatter in every directions. They rarely fire off at the same time, so you have time to prepare yourself and reach a safe location before the next one explodes. Both monsters must be defeated in order to lower the drawbridge and proceed to the next screen.
Bomb thrower

These monsters behave very much like the Bomb Chunin that you've seen outside the other castles. However, the biggest difference is that Fire Demons appear from the bombs when they explode. They appear just in time to block certain exits, and throw bombs at you to prevent you from getting close to them. Lure the bombs in a different direction, then get in close to attack, but watch out for the flood of demons if too many appear on the screen at one time. You may consider leaving the screen and coming back to clear out the clutter.
Flame thrower

These creatures are the Mursame Castle equivalent of the Fire Chunin from previous stages. They protect certain pathways and shoot fire at you from their mouths. Attack from a distance or up close between shots, but remember to dodge the fire attacks because they can't be deflected.
Bosses
Blue Castle Lord

The Lord of the Blue Castle attacks with bombs. He has many at his disposal, and throws them in your direction in a sequence of four at a time. You'll need to continue moving in order to avoid them. One strategy to employ is to start out directly in front of him and wait for him to begin throwing bombs. When he starts throwing begin moving to either side of him. You should have time to get one or two attacks in before he starts throwing more bombs at you, at which point you begin moving back to his front. Attack him again and repeat the pattern of moving from the front to the sides and back, attacking between his bomb throws until he is defeated. He will leave behind a blue orb. Slash it to proceed to the next level.
Red Castle Lord

The Red Castle Lord may look like a fierce fighter, but he prefers to leave the dirty work to his White Ninjas. He attacks by throwing capsules at you. When these capsules hit the ground, White Ninjas appear from them and proceed to attack you. He doesn't attack as frequently as the first Castle Lord, but it is still enough to create only a limited number of attack opportunities. Don't let the screen become overrun with White Ninjas, and attempt to find the chance to slip inside his defense and slash him repeatedly with your sword. He will drop a red orb when defeated, which you must slash to continue.
Green Castle Lord

The Green Castle Lord is a master of illusion. He can create three fake clone images of himself, but they all attack by whipping flames at Takamaru. Not only must you avoid these flames, you must determine which image is the true Daimyo and attack it to deal damage to him. After he appears and lobs flames at you, he only hangs around for a split moment before disappearing, and reappears with three fresh clones. You must be quick a decisive over which image to attack, and be prepared to slash repeatedly if you choose the correct image. Upon defeat, he will drop the green orb.
Pink Castle Lord

The final Castle Lord is naturally one of the most difficult. She's not particularly fast, but she attacks with a deadly weapon which she throws at you. Upon reaching the place where you stood when she threw it, the projectile explodes, sending shrapnel in eight different directions. In addition to that, she teleports around the room, so even if you get close enough to strike her, she will disappear and return some distance away. It can be difficult to lure the projectile away from where you need to stand in order to attack her. The further you stand from her, the more time you have to prepare for the explosion, but if you take to long to move away, you will have little time to attack. There are two strategies to employ. One is slow and patient, and the other is fast and reckless. Either attack from a distance, and move as much as possible to avoid the shrapnel, or allow the shrapnel to hit you so that you can stand back up and slash her during your limited invisibility. She is very likely to teleport away when you do this, but if you are fast enough, you can damage her enough the first time to destroy her on the second attempt before you run out of life.
Murasame
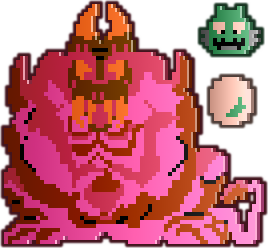
The Murasame statue awaits your arrival at the very end of the final castle. It sits motionless at the back of the room, but it has two very powerful weapons at its disposal. It can send an orb forth which will bounce around the room at a high speed and it can send a little demonic face in your direction. The face is a double threat because it can hurt you as it flies by, and when it reaches one of the walls, it explodes into three pieces which bounce back in your direction. The pieces are very small and usually easy to dodge, but it takes some time to determine their trajectory and move into a safe position. As soon as the face or ball disappears, they are immediately replaced by the statue, appearing from the middle of the statues hands. The statue is vulnerable to your attack, but it relies on overwhelming you with its own attacks to keep you occupied. After you damage the statue enough times, it will die, and the center of the statue will hollow out. You must then travel inside the statue to attack the life force that controlled it from the inside.


