| Battenberg Targets | ||||
|---|---|---|---|---|
| 800 | $750,000 | 70 | 750 | $250,000 |

| ||||
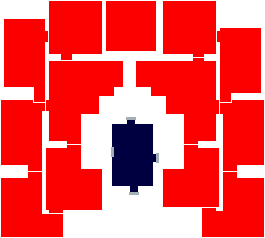
Battenberg is the final level of the game. All rooms are (eventually) available. The helicopter pad is positioned just below and to the right of the middle area that is open at the beginning of the game.
Strategy
It is possible to comfortably beat this level without buying any of the outer 9 buildings. Ignoring the entrances to these outer buildings allows you to build rooms across entrances, blocking them. Unlike described in the briefing at the start of the level, the player doesn't need to buy all of the buildings to win the level. Reaching the hospital value of 250,000 is enough.
The central building should, eventually, be used solely for reception, waiting area, toilets, and initial GP rooms. To begin, these should be placed here, but other spaces can be filled with a staff room and research or training. These will be moved further away as the requirement for initial GP rooms, increases. The 6 deep corners of this building are suitable for small 4x4 GP rooms, with 4 inward facing chairs in front. Compartmentalising waiting areas helps minimise epidemic spread.
The two buildings immediately to the side of the central room can be used primarily for clinics as these buildings are the closest to the helicopter pad. Diagnostic rooms can be placed in the large triangular buildings, farther away. The two triangular buildings, being diagnostic areas, should each have one GP room to avoid the return of patients to the intial GP area.
Initial contruction can be focused on only one side, minimising intial cost of building purchase. As more rooms are researched, the opposite two buildings can be purchased, and rooms moved across.
It's important to build a research room during intial construction, and focus research on clincs. Most turnaways are due to not having the required clinic.
While the common tactic is to build a toilet in every building, space can be saved by building one at the bottom of each triangular building. These, plus one in the initial area, are placed sufficiently close to all waiting areas.
If you wish to double up on all clinics then additional buildings will have to be bought. There should be space for two or three clincs to be doubled up in the existing building areas.
As with recent missions, after the first few months of hiring doctors, the majority of new doctors available will be junior's, so it is important to start training at a reasonably early stage. After your income can afford the added wages.
Particularly in this level the player is well adviced to spend money and take loans carefully to avoid going to bankrupt. During the first two years, there aren't enough patients to fund aggressive growth. After that time there will be a sudden increase on the amount of patients. The resulting long queues, patients dying while queuing and epidemic spreads can be tough to handle. It is recommended to slow the game speed down here to gain control of the situation - the whole hospital might need to be reorganized.
Unlike in other levels, the winning letter can appear only at the end of a year.