There are three places of interest on the Isle of the Avatar. On the north bay you can visit the Shrine of Humility (useless in this game). The west bay is the traditional pirates cove (since Ultima 4). From the south shore you can access the Shrine of the Codex (as in Ultima 5).
Pirates bay[edit]
On the in-game map, it is the promonent bay in the center of the Isle of the Avatar.
This area is optional. If you played Ultima 6 only or if you forgot Ultima 5, you might think that this is where you will find the entrance to Dungeon Hythloth. Alas, all you will find here are hostile pirates and loot.
The captain of the pirates is on the upper floor of the wooden building. He is the toughest opponent around.
- Loot:
- Hut: 5+6+7 food, 34 gold coins.
- Guards hut: 5 food portions.
- Curtained hut: 12 gold coins.
- Wooden building, ground floor: 4 powder kegs, 98 gold coins, great dagger, poison dagger.
- Wooden building, upper floor: 3 gold bars, 18 gold coins, spiked shield, 2 powder kegs.
Shrine of the Codex[edit]
You need Hook's key to open the gates.
A scroll explains where is the actual Codex of Ultimate Wisdom. In other words, it resumes the ending of Ultima 6.
West of the Shrine is the entrance of the actual Dungeon Hythloth. You will need Hook's key again.
Dungeon Hythloth[edit]
At this point of the game, more gold and further loot are unnecessary.
- The first room is the Guardian's future throne room. To the south are the quarters of some hostile Fellowship staff. The metal gate to the north is closed. The hint to open it is some blue water in a corner.
- The next door can only be opened with a specific key. Go north past the automatic metal walls. A small room has three levers. The middle one opens a cell, the other two change which cell can be opened. The woman's corpse hold the key to progress. Move the barrel and reveal the lever that opens the exit.
- Now comes a labyrinth of switches and metal walls. Operate the first one you see, skip the second and operate the third one, then come back for the previous one. Now get to either the north or the south switch: they do the same, simmetrically. Similarly, operate either switch in the north-south corridor. Use the skeleton key to unlock the north cell. Now you can access the lever in the middle, that opens the secret doors at the two ends of the north-south corridor. The swith in the south-east cell is protected by a poison trap: cast Telekinesis, and you can go to the south exit.
- You have two choices now:
- If you go south, you will eventually meet a heavily armed and armored paladin, who holds the key for the nearby door. Beyond it, a dead-end room with a teleporter.
- If you go north-west, your path will cross a red dragon, then a lake, and eventually a teleporter connected to the previous one. There are two small side-rooms on the way, but they are both trapped. The first one lures you in with a lever, but the latter just fills the room with fire fields. The second one has a magic mirror that sends you back outside, where the Guardian will laugh at you.
- Activate the switch next to the teleporter and proceed north. After the battle in the Fellowship hall, continue north through the curtain, then in a secret passage beyond a statue. The "Disarm Trap" spell will be useful in th next room. Eventually, you will reach two teleporters: the purple one is a sender, the green one a receiver to and from the same area.
- A long and twisty corridor ends on another purple receiver, but a lich is in your way.
- A blue room with one more purple teleporter: just step on it and ignore anything else in and around this room.
- Follow the corridor east and walk through the false wall. You are now at the Throne of Many Changes. It is actually a special teleporter. It could be useful to leave an unwanted item next to the throne to distinguish the locations.
- Sit on it once, then explore a secret passage to the south-east. Pick a blue key and a regeneration ring. Another secret passage is to the north-west. Defeat the mage and take the key to open his chest.
- Sit on the throne again and take a walk around. A secret passage to the south-east lead to a teleporter back to the blue room. Instead, a secret passage to the north-east is the way to go! Use the blue key and sit on the Throne of Virtue.
- Go back and sit once more on the Throne of Change. The secret passage is now to the north-west, protected by another lich. The last teleporter sends you to the final battle.
BOSS: the Inner Circle[edit]
-
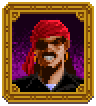
Hook
(killer) -
Forskis
(henchman) -
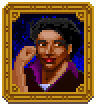
Elizabeth (E as in
"Electronic arts") -
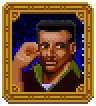
Abraham (A as in
"electronic Arts)


Five powerful opponents at the same time: Batlin, Hook, Forksis, Elizabeth and Abraham. Still, it is a combat almost like any other.
When the Inner Circle is defeated, put the three solids (sphere, cube and tetrahedron) on the pedestals. Then, use Rudyom's wand and destroy the black gate. Enjoy the ending and prepare for Ultima 7.2: Serpent Isle.