Warcraft III: Reign of Chaos/The Spirits of Ashenvale
Two days later, along the borderlands of Ashenvale forest....
Mission Objectives[edit]
- Main Quest - Slash and Burn
- Amass 15 000 lumber
- Optional Quest - Furbolg Chieftain
- Slay the Furbolg Chieftain
- Optional Quest - Destroy the Trees of Life
- Destroy the Trees of Life
Overview[edit]
This scenario is quite easy, so you should be able to win with any reasonable approach. However, you should run through the first few minutes a couple of times so that you can get a good start. This walkthrough describes a cautious, analytical approach, but at some point, you will realize that there isn't much room for finesse here. Due in large measure to the fact that you can't heal your troops, you may simply decide to use brute force. Just produce a large army, smash part of the enemy position, rinse and repeat. Your casualties will be horrendous, but that's part of life as an Orc.
Shaman spells[edit]
It may be a bit tricky to figure out just exactly what Shamans do.
- The Purge spell doesn't seem to be terribly useful here. It can't be auto-cast, so it requires a lot of micromanagement to use it at all. It is good against summoned units, which doesn't apply here. It can remove positive buffs from enemy units, which doesn't seem to apply here. It can slow the MOVEMENT of enemy units, which is almost irrelevant to missile troops. It can remove negative buffs from your own units, but the only time that seems to matter is if your entire army is fleeing, so you may save a unit or two, at the cost of losing the Shaman. Overall, don't expect to use this much, or at all, in this scenario. However, if you decide to send Grom alone to fight Forest Spirits, take along some Shamans, otherwise he will be asleep a lot.
- Despite the name, Lightning Shield is actually an offensive spell. DO NOT CAST THIS ON YOUR OWN UNITS. This can be useful if there are a bunch of enemy units clumped together. Again, this cannot be auto-cast.
Even if you know exactly how to use these spells, you may find that in any important fight, you are so busy trying to wipe out the enemy artillery that you can't do anything else.
A significant bug[edit]
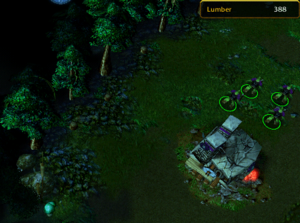
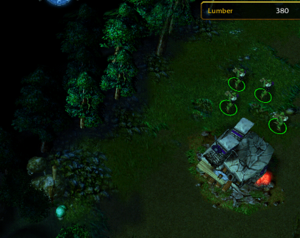
It turns out that certain game functions proceed in the background while the initial cinematic is playing. Normally, this doesn’t matter, but it has an important effect here. Specifically, there is a thin screen of trees that isolates your initial base from the rest of the map, and some Peons are busily cutting through it while the cinematic plays. If you watch the entire cinematic, then there will be a hole in the forest barrier a few seconds later. On the other hand, if you use Esc to bypass the cinematic, then your Peons don’t manage to harvest any wood before you can give them direct orders. However, the amount of wood in your initial stockpile is the same in either case.
The difference can be seen clearly in the two screenshots included here. One is taken after the cinematic ends; the other is taken after bypassing the cinematic. In the first case, three trees have already been chopped down, with two more about to follow. In the second case, the Peons have harvested two wood each. Note that trees in this area provide only 25 wood, while the standard amount is 50.


You need to decide which way you’re going to play it, but in either case, don’t let your Peons chop a large hole in the screen. Also, don’t move through the hole yet!
Strategy[edit]
The first thing to note is that there is no gold mine hiding anywhere in your base! The consequence is that you can only afford to build two Towers until you have a source of gold, because you need to retain 450 for a Great Hall, and something for repairs. The second thing you should realize is that you still don’t have any healing options. Only buildings and mechanical units can be repaired, and only Trolls and Grom have a high healing rate.
As soon as you have a small exit from your base, pull all of your Peons off wood harvesting. Two of them should continue harvesting in the SE corner, two will build Towers, and two will hide in Burrows to give you some preliminary air defense. One Tower should be built near the exit, and the other should be in the NW corner, so that you have some attempt at comprehensive air defense.
Send Grom around your base to harvest all the Spirits and collect 60 experience points. Assign control groups to all your units. This is critical for the Raiders, because Ensnare cannot be auto-cast. It is a really good idea to save the game as soon as your Towers are finished.
It is time to leave your base. Send only Grom, due to his high survivability. This action triggers a small attack from dark blue, and later attacks follow this one. Get a Mirror Image and kill them off. Note that Images can explore as well as Grom himself, and they are going to "die" anyway, and your enemies won't get any useful experience by killing them, and creeps don't get experience, so when you are done with an Image, just send it running off into the wild black yonder. You will detect a small gold mine a short distance outside your base, and a Goblin camp to the right of that. This activates the “Furbolg quest”.

Scout around the mine. The coast is clear, but keep harvesting Sprites with Grom. Send a Peon to build a Great Hall near the mine. Send your Raiders over there for local defense. About this time, you will be attacked by two Hippogryph Riders. Your initial base can defend itself, but if they attack your expansion, you will need to commit your Raiders. Send any wounded Raiders back into your initial base, and send healthy units forward if necessary. You will have to deal with a second ground attack before your Great Hall is finished.
As soon as your Great Hall is finished, send three Peons to mine gold. Send a fourth Peon to build, first, a Burrow to give your miners a place to hide, and then three Towers across the NW approach to your expansion. As gold becomes available, produce 4 Trolls and then 2 Grunts. This puts you at 36 food, where you will hold for the time being. Upgrade everything as rapidly as possible. Meanwhile, scout with Grom and any Images left over from combat. You should quickly locate a dark blue base just SW of your initial base. If Grom can kill some isolated units, he should do so, but he should run away from tough fights at this time. His major spells make him an excellent raider.
Research the "Pillage" ability before attacking enemy buildings, because it will give you additional gold. You also get a bit of wood this way, but that turns out to be entirely irrelevant.
Save the game just before attacking the dark blue base just SW of your initial base. You should have no difficulty eliminating this position, which turns out to be only an outpost. Surprise! You just got 3,000 wood! You will get 3,000 wood for every Tree of Life that you chop down, you dastardly Orc! Don't forget to pillage, i.e. when only buildings are left, attack them with only Grunts or Raiders.
Take the Boots of Speed away from the Forest Spirits just south of this outpost. If Grom is going to be raiding alone all over the map, it would be useful to increase his movement rate.
With your huge new wood stockpile, build 3 more Towers at the western exit from your expansion, and then 3 more at the northern exit. Your position is now secure. LOL. This is a good time to do some exploring. However, avoid exploring at night, because the Elves can hide at night, as can some creeps, and the creeps don't necessarily sleep at night, and your sight range is reduced.
The mass casualty phase[edit]
Most of the rest of the scenario will be a huge battle of attrition. Every time you send your army out to attack something, it seems, your base gets attacked. One of the factions attacks with big batches of Hippogryph Riders, which can do some serious damage by themselves. However, the big problem is the attacks that include artillery; these can erase big chunks of your base and big chunks of your army. Despite the large amount of forest, there really aren't any good choke points, so you have to defend the entire perimeter all the time. Hopefully, you realize sooner rather than later that the strong enemy attacks arrive quite frequently. It helps a lot if you set the minimap colours to red/white/orange.
The first big problem that you face in this phase is that you have very little gold, so you absolutely must secure a second expansion immediately. The only realistic possibility is the mine in the south of the map, which is guarded by a camp of Trolls. Go there and clear them out. You will acquire a Potion of Greater Healing and, in a hut, a Crystal Ball. There are two subsidiary problems. One is that your second expansion is very close to a strong enemy base. The other one is that you now need to protect two widely separated locations.
By the time that your first mine is used up, Grom should be level 6. Make sure that you get Bladestorm! If you should happen to click the wrong button, you might want to restart from your last save file. Bladestorm is an awesome spell. Note, however, that magic-immune units are not affected by it, and several units in this scenario have that property. Increase your army size to 40 food.
Now eliminate the enemy base in the SW area of the map. It should take at least two tries. When resistance is finished, pull your army out and pillage. Remember, the next enemy attack is probably arriving soon, so keep your troops at home as much as you can. You should have enough gold to keep your army at the zero-upkeep limit during this operation. Add a couple of Towers to cover the gap at the north of your first expansion.
Send a Peon to start your second expansion, and a second one to build a Burrow nearby for Peons to hide in. When your new mine is online, build a line of Towers connecting your two expansions and extending around the second expansion. After this, your entire position should be nearly immune from air attack. The only thing you will nead to worry about is the ground attacks with artillery. However, if you can assassinate the artillery, your Towers can handle the rest.
Grind away at the Furbolgs. Eventually, they will all die. You will get a Health Stone. Pick a time when your army is depleted to collect the reward, which is two free Shredders (8 food) plus access to the Goblin merchants.
At this point, you can finally heal your troops, although it costs 250 gold per 150 HP. Only use Healing Scrolls on large numbers of wounded units, because you can get a fresh Grunt for 235 gold.
Keep exploring. You can take a Tome of Agility away from some Forest Spirits near the middle of the map, and you can eliminate an Elf outpost north of the Goblin camp.
Eliminate the Elf base in the NE part of the map. Again, it will take several tries. Follow the standard process, pillaging at the end.
The end[edit]
Next, eliminate the Elf position to the north of your first expansion. Once you have done that, Elf resistance collapses. This region is the assembly area for their final productive base, and you can pretty much spawn camp them. When you are ready, eliminate the last Elf base in the NW of the map.
You should be close to having 15,000 wood stockpiled. If necessary, stop harvesting until you have dealt with the odds and ends. There is one more group of Forest Spirits guarding a Potion of Restoration north of the Furbolg camp. Grom has 5 items now, and he should probably keep them all, but definitely buy at least one more Healing Scroll before you end the scenario. It is essentially free at this point.
Get one or more Shredders to end the scenario. A Shredder can carry 200 wood, and it harvests about 10x as fast as a Peon.
As an alternative approach, consider just defending your base and harvesting wood until you reach the target.
Treasures[edit]
- Boots of Speed guarded by Forest Spirits south of the first small Elf Base.
- Potion of Greater Healing from the Dark Troll Warlord.
- Crystal Ball is hidden in one of the huts in the Forest Troll camp.
- Health Stone from the Furbolg Chieftain. His location is revealed upon picking up optional quest.
- Tome of Agility right in the middle of the map.
- Potion of Restoration north of the Furbolg camp.