Wizardry: Proving Grounds of the Mad Overlord/Floor 4


The fourth floor is a very important floor for the progress of your party. An event here will serve as the mechanism that will make the next five floors immediately available to you. But first you must visit the "Monster Allocation Center."
There are two different routes that you can take to reach this floor. You might arrive by stairs in the corridor along the top of the floor. By taking this route, you must have the STATUE of BEAR to get further in to areas like the stairs down to Floor 5. If you don't have it, you'll need to execute the steps from the first two floors to claim it.
You might also arrive in the center of the floor if you came down via the Elevator. If you head directly south, you can gain access to a second elevator that goes deeper into the maze, but only if you possess the BLUE RIBBON, which must be collected north of the first elevator. By the time you wind up on this floor, the Mage spell MAKANITO becomes extremely useful, so you should try to be above level 9 before you arrive.
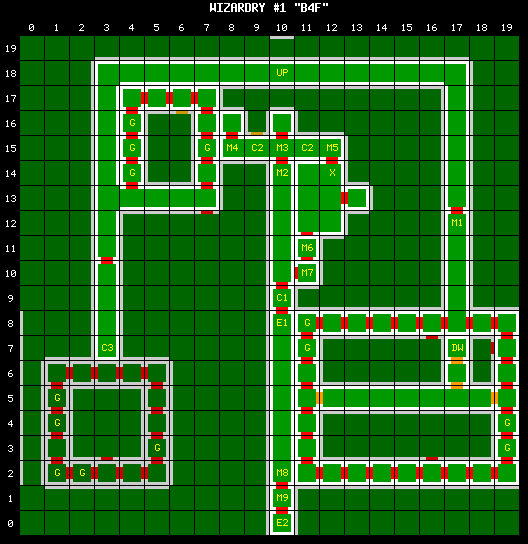
Up Stairs (E10-N18)[edit]
The stairs from Floor 3 place you in the middle of the top corridor of the floor.
Message 1 (E17-N12)[edit]
A LARGE SLIDING WALL WITH THE IMAGE OF A BEAR UPON IT BLOCKS YOUR PATH AND FORCES YOU OUT OF THE ROOM.
Possession of the STATUE of BEAR is required to pass through this section.
Down Stairs (E17-N7)[edit]
You'll have to be perceptive enough to find the stairs down to Floor 5 behind to secret doors.
Elevator 1 (E10-N8)[edit]
This is the first elevator which you can ride along the first, second, third, and fourth floors. Your direction is maintained as facing north if you entered from the first floor.
Comment 1 (E10-N9)[edit]
An isolated room lies to the north of the elevator which seems to have no known purpose. There are a few rumors as to why this room might be here. One is that this room was originally supposed to be the elevator, and that it was put here by mistake, but not corrected. The other is that it might have required the KEY of GOLD, but it was never programmed in. Since it existed in the original game, it's been transplanted to every version ever since.
Message 2 (E10-N14)[edit]
A SIGN ON THE DOOR READS:
*** TESTING GROUNDS CONTROL CENTER ***
AUTHORIZED PERSONNEL ONLY!
*** DO NOT ENTER ***
Naturally, you should not necessarily follow the message's advice.
Message 3 (E10-N15)[edit]
SUDDENLY, A LOUD ALARM BELL CAN BE HEARD.
THEN THE BELLS STOP, AND ARE REPLACED BY THE SOUNDS OF GUARDIAN MONSTERS!
You will hear the sound of an alarm, and you will be forced into a fight with enemies.
Comment 2 (E9-N15, E11-N15)[edit]
Every time you ring the alarm at M3, you will also encounter a group of monsters on either side. You can, in this way, force encounters that will greatly increase your chances of earning experience points, provided you are strong enough to survive the battles.
Message 4 (E8-N15)[edit]
A SIGN ON THE DOOR READS: "TREASURE REPOSITORY."
Any greedy party member's reaction to this sign will be to rush in to find the treasure, but all you'll find in the room to the north is monsters.
Message 5 (E12-N15)[edit]
A SIGN ON THE DOOR READ: "MONSTER ALLOCATION CENTER."
Unlike the previous message, this message is a lot more accurate.
Event (E12-N14)[edit]
Of all the upper floors (first through fourth), this encounter will be the hardest part. A party of fighters will appear before you in the following group: Two Lvl 7 Fighters, two Lvl 7 Mages, two High Priests, and one High Ninja. (The WonderSwan version features two High Ninjas.) They will not be friendly, and it will be impossible to run away. (In the Ultimate Wizardry Archives version, this encounter is friendly about half the time.)
In the first turn, you should have a Mage cast MAKANITO in an attempt to immediately kill any of the opponents who might succumb to this spell. Have a Priest cast MONTINO to silence the High Priests among the opponents. Everyone else should make the Ninja their top priority, as his instant-kill ability makes him the most dangerous target. You should then target any Mages still alive.
When you win the battle, you will discover a treasure chest which will always contain a POTION of LATUMOFIS, a ROD of FLAME, and the RING of DEATH. Under no circumstances should you equip the ring because it will do exactly what it says. However, hold on to it because you can sell it for 250000 gold, which will immediately solve any money problems you were having. However, the owner of the ring will sustain 5 points of damage for every step he or she takes, so you must try to find the shortest path back to the castle, switch the owner around from time to time, and heal the wounded. (In the Ultimate Wizardry Archives version, the store will not buy unidentified items, and charges the full selling price to identify them. If you don't have a Bishop in your party, you cannot profit from found items.)
While most versions will not let you re-experience the encounter with this enemy party, there are some versions (like the WonderSwan) that allow you to do this fight as many times as you like. And you will earn the same three treasures over and over again each time.
Message 6 (E11-N11)[edit]
IN THIS ROOM, THERE IS A LARGE DESK.
ON IT ARE THE REMAINS OF CRYSTAL BALLS AND OTHER MAGICAL ARTIGACTS ALL NOW BROKEN.
AS YOU ENTERD THE ROOM, A PANEL ON THE DOOR SLAMMED SHUT.
THEN IT GLOWED A PALE BLUE. NO ONE CAN PRY IT OPEN.
NEXT, THE DOOR ON THE OTHER SIDE OF THE ROOM STARTS TO GLOW BRIGHT ORANGE, INVITING THE PARTY TO USE IT.
Pass through the door below to find the key artifact that you are seeking to obtain on this floor.
Message 7 (E11-N10)[edit]
AS THE PARTY ENETRS THE ROOM, THE DOOR SLAMS SHUT, GLOWS ORANGE AND VANISHES!
A DOOR APPEARS TO THE RIGHT, A VOICE, COMING FROM THE CEILING ADDRESSES YOU:
"CONGRATULATIONS, BRAVE ADVENTURERS!
TODAY YOU HAVE PROVED YOURSELF TO ME AND ARE NOW READY TO START YOU QUEST!
YEARS AGO, MY AMULET WAS STOLEN BY THE EVIL WIZARD WERDNA.
WERDNA HIDES INT THE MAZE SOMEWHERE BELLOW US.
FIND HIM SLAY HIM AND RETURN TO ME THE AMULET!
TO AID YOU IN YOUR QUEST, I WILL GIVE YOU A BLUE RIBBON,
WHICH MAY BE USED TO ENTER THE ELEVATOR ON THIS FLOOR.
GO NOW - AND MAY THE GODS GUIDE YOU! "
This is the first time in the game where your mission is truly spelled out in its entirety. In addition, you will receive the BLUE RIBBON, an important item which makes the elevator to the lower levels of the Maze accessible to your party. You will then exit out into the corridor which leads back to the first elevator.
Message 8 (E10-N2)[edit]
A SIGN OF THE DOOR READS:
PRIVATE EXPRESS SERVICE ELEVATOR!
AUTHORIZED USERS ONLY!
Naturally, this is a warning to all those who would attempt to use the second elevator, one which is not under the control of the overlord Trebor, but rather the evil wizard Werdna.
Message 9 (E10-N1)[edit]
YOU ALL FALL ASLEEP! LATER, EVERYONE WAKES UP, FEELING SICK AND WEAK.
YOU ARE BACK OUTSIDE THE DOOR YOU TRIED TO ENTER.
You will receive this message if you attempt to enter this room without the Blue Ribbon. Instead, you may have a random encounter in this room.
Elevator 2 (E10-N0)[edit]
Through this elevator, you can reach this floor and five floors below, all the way down to Floor 9. Unlike the previous elevator, it is actually useful if you would like to use it to visit all of the floors in between.
Comment 3 (E3-N7)[edit]
While this hallway leads to a dead-end, you can see that, on the map, there are a sequence of rooms with some encounters. Perhaps a door was unintentionally left out. The only way to truly reach them is to use MALOR.
Note that if a triggered Teleporter trap sends you to one of the "negative zones", there are one-way doors to let you back into the mapped areas. You may experience random encounters while searching for the door.