Wizardry: Proving Grounds of the Mad Overlord/Floor 7


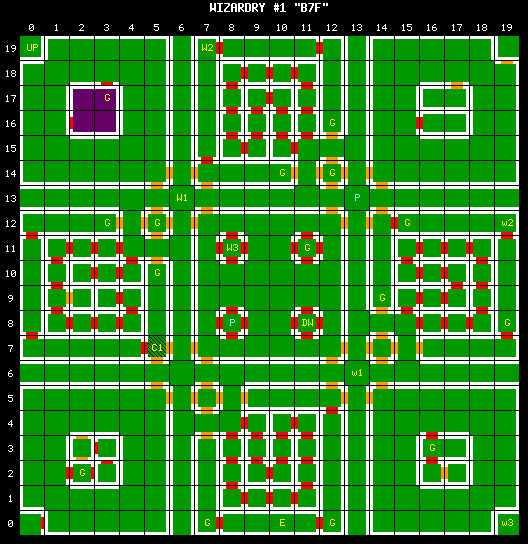
This floor features two pairs of criss-crossing corridors, effectively dividing the level up into nine blocks. Combat is quite likely to occur whenever a door is kicked in, and considering the number of doors on this level, you will engage in plenty of fights. A single tile on the map at C1 (E5-N7) is sealed off to magic. It will hardly present a huge danger, but it's good to be aware of.

Note that the NES/Famicom versions has an entirely different map layout, shown to the right. This version contains a much more difficult arrangement, forcing you to teleport if you wish to map out the entire floor, and if you wish to find the stairs leading down. None of the notes shown below apply to the NES map.
Up Stairs (E0-N19)[edit]
The stairs which arrive on the floor from Floor 6 are oddly placed in the connected corners of the map. A one-way door leads out, while a secret one way-door on the opposite side of the floor leads back in.
Down Stairs (E11-N8)[edit]
These are the stairs that lead down to Floor 8. However, be aware that this is a one-way trip that deposits you in a section of the map loaded with Rotating Floors known as the "Dance Hall."
Elevator (E10-N0)[edit]
This is the second elevator which requires the BLUE RIBBON to make use of it. You can use it to visit floors 4 through 9.
Pitfalls (E8-N8, E13-N13)[edit]
Two pitfalls are placed in locations where new visitors to the floor are very likely to unintentionally encounter them.
Warp Zone 1 (E6-N13) ⇒ w1 (E13-N6)[edit]
Warp Zone 2 (E7-N19) ⇒ w2 (E19-N12)[edit]
Warp Zone 3 (E8-N11) ⇒ w3 (E19-N0)[edit]
These warp zones will unfortunately confuse many new adventurers. If an area suddenly looks unfamiliar, be sure to cast DUMAPIC to get a better idea of where you presently stand.
Comment 1 Silence Zone (E5-N7)[edit]
Once again, a single tile of sealed magic is found in this location. If you encounter an enemy here, be sure to adjust your strategy accordingly. In the Ultimate Wizardry Archives version, this effect will last until you leave the floor, making it a significant challenge rather than a minor inconvenience.