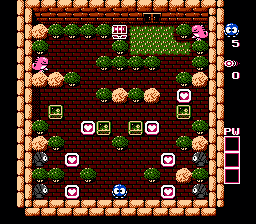
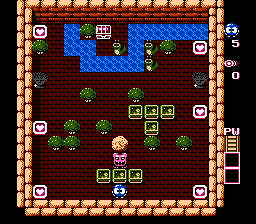
Lolo can start by collecting the three Hearts in the middle. The top-right one holds two shots.
The four Emeralds should replace the four remaining Hearts. Push one Emerald north/above one Heart. Quickly take that Heart and shoot the Alma once; walk around and push south the Emerald, so to block Alma. Repeat for all the four Armadillos.
Dodging the fireballs from the west Gol is easy. In order to dodge the fireball from the second one, Lolo shoud be positioned on the south-west corner of the grass, then quickly move and grab the jewel. Alternatively, let a fireball pass above Lolo, then dash for the jewel. Then, exit from the nearby door.
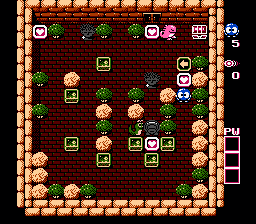
First, you can move the Emerald south of the southmost Heart. Push it left, then up until it is aligned west of the Medusa.
Now move the currently southmost Emerald: one tile west, then all the way north against the other Medusa. From that spot, push the two nearby Emeralds against the east Medusa, so to block her sightline to the west and to the north.
The Heart in the north-west corner is now easily accessible: just push one of the west Emeralds around the westmost stone and between the north Medusa and a tree. You have now two magic shots. Similarly, push the other west Emerald north and east repeatedly, and position it between the two trees against the north wall.
Shoot the Snakey once and push it, so to trap Alma. Shoot Gol and push it in front of the door (when Lolo collects the jewel, all enemies disappear).
Push around the Emerald south-west of Snakey (west, north, east) until it is north of the arrow. Walk around it and push it west and south, on the east side of Medusa. Be careful: leave the last heart where it is! Instead, push the other Emerald near of Snakey west, north, east, until it is north of the arrow, and then push it west and north in front of Gol. Now you can grab the last Heart, the jewel, and exit the room.
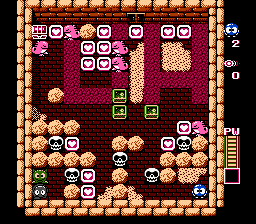
First of all, collect all the Hearts near the Skulls. The first Bridge power will get activated.
Collect the Heart next to the jewel box for two Magic Shots. If this Heart is left as the last one, Gol will burn Lolo.
Push the rightmost Emerald one tile right, one down, half tile left, and one down. Similarly, push the lower-left Emerald to the right, then down, then to the left leaving it half-tile away from the rock, and eventually push it down.
Use the first Bridge on the single lava tile between the last Emerald and the Gols. Cross, quickly collect the five Hearts, then push the Emerald down. Then, push the Emerald right so to trap the rightmost Skull. In the meanwhile, the second Bridge power was activated.
Collect the top Heart, make a bridge next to that tile, collect the last two hearts, get back on the "mainland".
Use now the two magic shots (step n.2): turn the two leftmost Gols into eggs, then race to the jewel box. Collect the gem and exit.
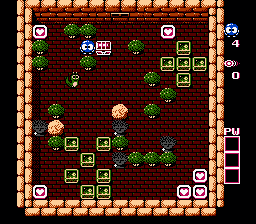
First of all, take the north-east Heart for two magic shots.
Push south one tile the "arms" of the nearby Emerald cross. Push the former center of the cross west, next to Snakey. Enemy hole: shoot Snakey twice and cover its spot with the Emerald, until the monster reappears next to a Medusa. Now you can push the same Emerald against the west wall and grab the north-west Heart.
Go back to the former Emerald cross, and push the top Emerald west and south repeatedly until it is west of a Medusa, in particular, aligned to the north with Snakey: now you can access the group of Emeralds to the south.
Push south the Emerald to the side of Snakey. Push the Emerald to Lolo's north-west to the south and east, so that he can grab the Heart in the south-west corner.
There is one nearby Emerald left to be pushed: north, east, then south to the side of a Medusa.
Back to the former Emerald cross, push the middle Emerald south until it blocks the sightline of two Medusas at the same time. Grab the last three Hearts, then the jewel, then leave.
"Dance" with Don Medusa and grab the two Hearts against the south wall: when Don Medusa gets back above the three Emeralds, dash in the opposite direction, grab one Heart, and rush back to safety. Repeat on the other side.
Don Medusa must be trapped to the east. Push one of the three "starting" Emeralds north one tile, then east. Push the lower Emerald in the "T" to the east, against the wall. Push the middle Emerald in the (former) "T" north against the Snakey. Push the east Emerald north one tile, then east against the wall. Grab the Heart and get two magic shots.
Push the last Emerald of the "T" all the way against the west wall, and grab the nearby Heart.
Back to the Emeralds near the starting point. Push one north and east so that it is on one side of the eastern Medusa. Push the Emerald below the Snakeys all the way against the other Medusa.
Double enemy hole: push the last Emerald in the south to the north and east repeatedly, until it is under the two Snakeys. Shoot one Snakey and push it into the water. When the egg sinks, shoot the other Snakey, push it into the water, then push the Emerald north so that it is across the two original tiles of the Snakeys. They will reappear above the two Medusas, thus allowing Lolo to grab the last two Hearts. The bridge power is now active.
Creat a bridge just south of the jewel box, grab the jewel, and leave the room.