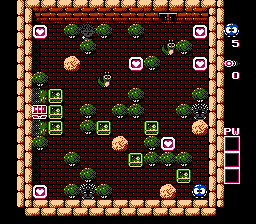
First of all, push the Emerald next to Lolo to the left (it is impossible to use it in an useful way). Push the Emerald below Snakey one tile up, then walk right and push the next Emerald one tile right. Walk around, collect the lower-right Heart, and push the Emerald up, so to block Medusa's view to the left.
Walk up and collect the Heart between the two Snakey. Position Lolo between the left Snakey and the Emerald, and use them to block the two Medusas lines of sight. Push the latter Emerald down and left, then shoot the former Snakey once and push it up and left.
Notice the Emerald to the right, close to a boulder. Push it in various directions and position it to the right of the topmost Medusa. Collect the Heart in the top-right corner.
Now act quickly: position Lolo between the door and the Snakey. Shoot Snakey, push it down and right (between Medusa and the Heart), collect the Heart and shoot the egg away. The Heart has two Magic Shots.
While you wait for Snakey to reappear, let us move the Emeralds near the jewel box. Push the upper and lower against the wall, and the middle one all the way down. Collect the Heart.
Go back between the door and the Snakey. Shoot Snakey once, push the egg two tiles down, then all the way left and up. Collect the last Heart, then the jewel, then exit.
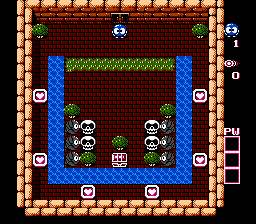
Simply run along the outside and collect all of the Heart Frames except one, earning a total of eight egg shots. The two extra Almas make it extremely difficult to try the tactic of shooting enemies until an opening appears. Instead, go back to the top, shoot a skull twice, then try to isolate one egg very close to the water, push it into the water, and ride on top of it. The current of the water will take you all the way to the last Heart and to the spot right below the chest, where you can hop off and collect the key.
First of all, collect all the Hearts near the Skulls. The first Bridge power will get activated.
Collect the Heart next to the jewel box for two Magic Shots. If this Heart is left as the last one, Gol will burn Lolo.
Push the rightmost Emerald one tile right, one down, half tile left, and one down. Similarly, push the lower-left Emerald to the right, then down, then to the left leaving it half-tile away from the rock, and eventually push it down.
Use the first Bridge on the single lava tile between the last Emerald and the Gols. Cross, quickly collect the five Hearts, then push the Emerald down. Then, push the Emerald right so to trap the rightmost Skull. In the meanwhile, the second Bridge power was activated.
Collect the top Heart, make a bridge next to that tile, collect the last two hearts, get back on the "mainland".
Use now the two magic shots (step n.2): turn the two leftmost Gols into eggs, then race to the jewel box. Collect the gem and exit.
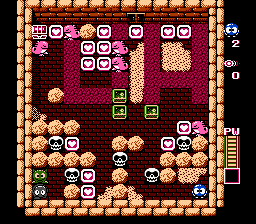
Start out by pushing the two Emerald Frames near the top down, then one to the left walls and the other one between the left Medusa and the heart. Now you can safely collect the two Heart Frames to the left. They will both give you two egg shots.
Shoot the right-hand Snakey, push it right, collect the Heart in the lower corner (NOTE: unlike the original, the lower-right Heart contains no magic shots.), then shoot away the egg before it hatches.
Wait for Snakey to reappear in its original position. Shoot it once and push it up, between the right Medusa and the Heart. Collect the Heart Frame at the top, which also gives you two egg shots each. You should also have one hammer power activated.
On one side of the boulders, use the hammer and destroy the boulder that is one row below the final Heart Frame. Then shoot the nearby Snakey and slide it between the Heart Frame and the Medusa. Collect the Heart Frame for two more magic shots and the final hammer power up. Shoot away Snakey and wait for it to reappear in its original position
On the same side of the boulder you destroyed, use the hammer on the boulder that is one row above the chest. Then shoot Snakey, slide it between the Medusa and the key, and collect the key.
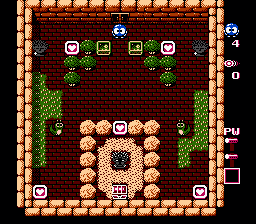
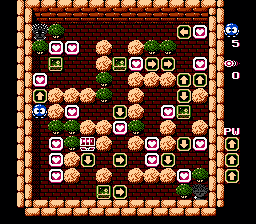
Collect the trio of Heart Frames right near the entrance to get your first Arrow Tile power-up. Then push the bottom Emerald Frame in only so far until you are standing on top of the right arrow tile. If you push any further, Lolo will become stuck.
Walk straight up to collect another Heart Frame and earn another Arrow Tile power-up. Then walk back down to the right arrow tile, and walk to the right. Collect the two nearby Heart Frames to activate the third and final Arrow Tile power-up. Walk through the down arrow tile, and collect the Heart Frame nestled in the trees.
Then walk back through the tile, and walk up to the next Heart Frame. Collect it, and then stand above the nearby Emerald Frame. Push it down until you are standing on top of another down arrow tile, and go no farther. Walk around to the left side of the Emerald Frame, and push it against the wall above the Medusa. Walk back around the boulders on more time to approach the Heart Frame above the Emerald Frame from the top, collect it, and walk back across the down arrow tile.
Return to the right arrow tile near the treasure chest. Use an Arrow Tile power-up on it to turn it down. Then walk across it and walk up to the down arrow tile above it. Use another Arrow Tile power-up on that tile to turn it left. Walk vertically through it, and push the Emerald Frame above all the way up to the wall (if you get the Heart to the left now, Lolo will become stuck).
Come down a space, collect the Heart Frame to the right, and walk through the double arrow tiles to the right. Collect the Heart Frames near this corner of the room, and then walk through the left arrow tile along the top wall. Push the Emerald Frame all the way to the left.
Collect the two Heart Frames near the tree, then push the nearby Emerald Frame to the left against the wall. Collect the Heart Frame beneath that. Then walk down the channel of boulder and collect the last Heart Frame.
Use your final Arrow Tile power-up on the arrow tile that now has you blocked in (this is the same tile that you used the second Arrow Tile power-up on) in order to escape. Then walk down, walk through the arrow tiles that are on the way to the key, and collect the key.