This chapter discusses the solutions to level 11. One thing to take a note of: Every room in level 11 has at least one Medusa in it.
11-1[edit]
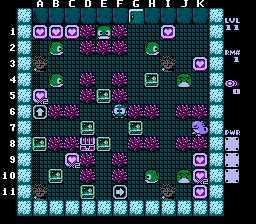
This is the first level to feature mobies. It is a good demonstration of how troublesome they can be.
- Push the G7 EF to I7, the E8 EF down one, the D7 EF up one, and the E5 EF all the way up.
- Push the A8 EF down two, collect the C9 Heart, and push the B10 EF down. Move the D11 EF all the way right, then push the H10 Moby right one.
- Move the J10 Moby down one and collect the 3 hearts to the right. Quickly move the I7 EF all the way up and push the J4 moby up one, before the bottom moby hatches. Get the K3 heart.
- Move the E9 EF to J7 to block off the Gol. Move the H4 EF to H3 to block the left side of Medusa. Move the E3 EF all the way left. Push the B4 Moby to the left wall and get the A5 heart.
- This is similar to the third step. Push the B2 moby left and collect the 3 hearts above. Quickly get the H2 Moby above the I3 Medusa, before the left one hatches. Get the final heart.
- Travel around the medusa along the K column, and go through J7 to get to the treasure chest to account for the top moby pulling you up. Get the treasure.
11-2[edit]
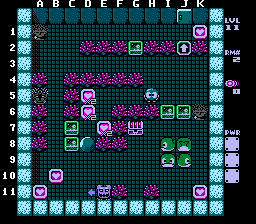
A significant portion of this level involves dodging the Don's line of sight. Otherwise it's a standard EF and egg pushing level.
- Go to E6. When the Don at the bottom is out of the way, quickly grab the heart below you and move the C7 EF left.
- Move the C8 EF down one and the B7 EF up two, blocking the A5 medusa. Collect the hearts at D5 and D6.
- Push the C9 EF down one. When the Don comes under the EF from the right, go right to H9.
- Shoot the I9 Moby twice to blow it away. Quickly push the I8 Moby to the bottom, then move the J9 Moby to K7. Get the bottom-right heart.
- Push the I6 EF above the Medusa at right. Move the G2 EF up one and get the top-right heart. To get out, move the top EF left one and go down.
- The I9 Moby will have respawned by now. Move it to E10 and hide above it.
- When the Don is moving left and one space ahead of you, go left two spaces, above the EF. Push it down when the Don is to your right and use it to trap him at E11, getting the B10 heart in the process.
- Move the J8 Moby to A9. Get the bottom-left heart and the treasure, and finish the level.
11-3[edit]
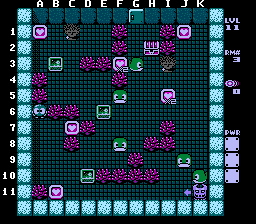
Another EF and egg pushing level. The Mobies won't bother you much and the Don's threat can be neutralized immediately.
- Push the D10 EF down to block the Don to the right. Get the B11 heart (move up and left to account for the far right moby). Push the EF all the way right to trap the Don in the corner.
- Carefully move the E6 EF to I4 (up one, down one, right 3, up 2, right one). Get the I5 heart.
- Move the F8 Moby to H3. Push the G3 Moby to the top and get the F3 heart.
- Move the F5 Moby to C4 (push it up further if you like, but it isn't necessary). Push the B3 EF to the top and get the top-left heart. Then get the C7 heart.
- Push the J9 Moby up to J3. Get the final heart and the treasure.
11-4[edit]
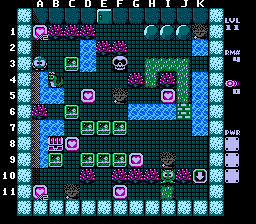
This level requires speed at the beginning and end. As with most Medusa-centric levels, you will need to move EFs carefully.
- Get the top-left heart.
- Quickly, Push the snakey down into the water, and cross to B6. Push the EF right one, and get the C3 EF to F4 before the Snakey respawns.
- Push the D6 EF all the way right, the E7 EF down, and the D7 EF left.
- Push the E8 EF right 4 spaces, above the I9 Medusa, then push the F7 EF all the way right.
- Push the E9 EF to the bottom. Push the D9 EF left then down, getting the C8 heart.
- Push the B9 EF to the bottom and get the bottom-left heart. Move the C7 EF to H9 (push it down and stand in the chest to move it right), get the G9 heart, and push the F9 EF left one space to E9. Go around the heart to E3.
- Push the F3 Skull all the way right and quickly get to the bottom-right corner (under the arrow). Before the skull hatches, turn up, then shoot and immediately go left as far as you can, to E11.
- Push the E9 EF up 4 spaces and get the D5 heart. Wait for the skull to respawn.
- Move the skull to H5, being careful not to push it into the water, then quickly go around the bush at I4, grab the heart and cross the bridge to the treasure!
11-5[edit]
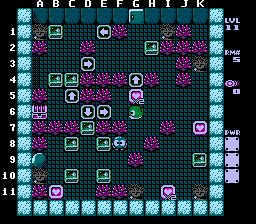
There are six Medusas in this level, the most of any level in the game. The single Moby has the potential to make the level unwinnable if not placed properly.
- Move the D7 EF up (into the arrow at D6) and the C10 EF left, then push the E10 EF right 2 spaces.
- Get the G5 heart. Move the G6 Moby to I3.5 (right 1, up 1, right 1, up 1.5). Putting it all the way up to I3 will cause a lot of hassle.
- Push the H2 EF up, the C4 EF down (into the up arrow at c5), and the B4 EF left.
- Move the D6 EF to J9, then get it to H11 (left, down, left, down), pushing the K9 EF down in the process.
- Move the E8 EF up into the arrow at D6, then move the C8 EF right one space.
- Loop around and move the D6 EF to J11. Get the heart at I11.

- Go to C3.5 and shoot the Moby twice. The coral "trees" won't block your shots since they aren't lined up with your center. Likewise, you're safe from the Medusa at the right since you're only halfway in its sight.
- Move the C5 EF (up through the arrow) to I3. Push the D8 EF to the Bottom and get the B11 heart.
- Move the Moby to K5 (not up to K4 or K6!) and get the final heart. Go up and around to the treasure chest and finish the level.
Level 11 boss[edit]
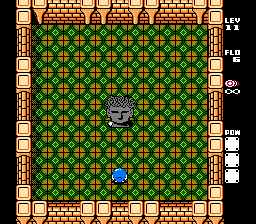
The level ends with a fight against a giant Medusa. The Medusa will teleport to random locations around the room. While it's flashing, it cannot be harmed. After it teleports somewhere, it will stay still for a brief moment and then shoot fast shots out up, then right, then down, then left. It'll pause and then shoot out shots in all four directions at once then teleport again. The best strategy is to stand on its left side as it teleports in and shoot from there as that's where the last shot comes out. Just keep shooting and move out of the way after you see the downwards shot. You can usually score an extra hit or two before the 4-way shot comes out. The Medusa will explode when defeated.