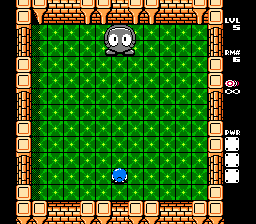
This chapter discusses the solutions to level 5. One thing to take a note of: Every room in level 5 has at least one Alma in it.
5-1[edit]

The first Alma level actually will have the Almas confined the whole time.
- Get both hearts and cross up. Move the H7 EF all the way right. Move the D7 EF all the way left.
- Get the A10 heart. Move the B8 Alma up two spaces. Get the A8 heart. Do a similar process with the J8 Alma.
- Cross up on F6. Move the E5 EF all the way left. Get the B4 heart. Move the G5 EF all the way right. Get the J4 heart.
- Move the E3 EF all the way left and go around and move it up one. Shoot the A3 Alma and get the A4 heart. Do a similar procedure to the right Alma.
- Get the top 2 hearts and the chest.
5-2[edit]

The lone Alma will stay where it is almost the whole time. The EF positioning is lengthy.
- Move the H9 EF to F4. Move the E9 EF to D2. Move the E3 EF to H3. Move the F4 EF to G4. Move the C5 EF to C1. Get the A1 heart. Move the C8 EF to F1.
- Carefully get the H8 heart and shoot the Alma. Move it all the way up and put the I8 EF below the egg on H6.
- Move the G8 EF left and up to I2. Get the H1 heart.
- Quickly: Move the Gol one space right and push the EF below you all the way down. Get the J4 heart and get the chest while the Gol is still egged.
5-3[edit]

A lot more confining of Almas and a lot of EF positioning here.
- Ignore the closest EFs. Move the E7 and G7 EFs both up one.Move the F7 EF to I7. Move the E6 EF left one. Move the G6 EF right one. You'll get the F6 heart.
- Move the E5 and G5 EFs up one. Move the F5 EF left one. Move the E4 EF to C3. Move the G4 EF right one.
- Move the G3 and E3 EFs up one. Move the F3 EF to I3. Get the F2 heart.
- Move the H4 EF to J6. Move the E5 EF to B6. Move the D6 EF to A5. Carefully get the A4 heart. Move the H6 EF to K5. Carefully get the K4 heart.
- Move the I7 EF all the way right. Move the F9 EF to A7. Move the E9 EF to B8. Get the A8 heart. Move the G9 EF to J8. Get the last heart and the chest.
5-4[edit]

Lots of Almas wandering in their areas.
- Get the H2 heart and shoot the nearby Alma when you can. Move the egg aside and get the J1 and K4 hearts.
- Get the H10 heart and shoot the Alma. Get the 2 hearts. Do a similar process for the top and bottom left Almas.
- Get the D6 heart and shoot the Alma. Move it left and get the 2 hearts.
- Get the H6 heart and stand on the grass. The Alma will run out and mindlessly walk back and forth in the upper area. Get the last 2 hearts and the chest.
5-5[edit]

An Alma with lots of area to roam will be your shield.
- Get the heart and wait on B7. When the Alma comes close, shoot it and put it on B5. Move the B2 EF to C4. Wait on H4.
- When the Alma comes by, shoot it and put it on I4. Move the J2 EF to J5. Wait on the chest.
- When the Alma comes by, shoot it and put it on F11. Move the F8 EF left one. Collect the last 5 hearts from left to right. The Alma should run up to you. If the Alma starts running right to the outer area, try to lure it back by having it roll at you when it's on the right side. The 8th row is a good spot to do this. Once it comes back in, stand on F7, shoot it and move it down to F11. Get the chest.
Level 5 boss[edit]

The level ends with a fight against a giant Alma. It will move left and right and once you are in view, it will roll down and then move left and right again and roll up at you when you are in view, thus repeating the process. While rolling, the Alma is invincible, so you must shoot from the sides or shoot at where it's going to be if you're above or below it. If you shoot from the sides, be sure to give yourself some time to move away. Once you get it into the giant egg, shoot the egg a bunch of times to get rid of it.