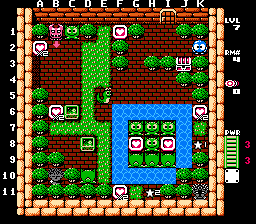
There are a total of 17 levels in the game, most of which contain 5 rooms while some contain 10. The solutions are structured in a format of displaying a picture of the room, a brief synopsis, and finally a list of the steps to take in order to solve the room.
In the pictures, the reader will notice some slight modifications to the screenshots. An example is depicted to the left. There is now a grid consisting of letters and numbers. In the screenshot to the right, Lolo is standing on K2, the chest is on J3, etc. The intent of the grid coordinates is to better-demonstrate which squares in the room are being referred to. In some cases, where one needs to use half spaces, there may be a reference such as B3.5, which would mean in-between B3 and B4.
Some other icons are present in the rooms as well. These include:
- A "x2" on hearts which contain shots.
- Arrows on water indicating a current and the direction it flows.
- A star with a number indicating a warp hole (i.e. a spot where a monster can reappear if its original starting point is covered and it is in the process of reappearing). The warp holes are numbered in the order they can occur.
- If the level has powers to use, the number of hearts needed to use a particular power will be next to it (see screenshot; in this case, 3 hearts are needed to use both bridges).
- If Don Medusas are in a level, small arrows next to them show the direction they will move at the beginning of the level. For instance, the one in the screenshot has an arrow below him to show that he moves vertically.