14-1[edit]
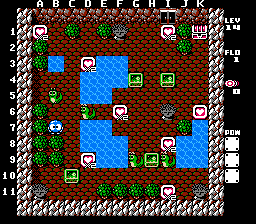
The first level of the underworld isn't overly tough. You'll use the D6 Snakey quite a bit.
- Get the 2 hearts on D3 and D9. Push the EF on C10 all the way left. Push the EF on H9 up three. Push the EF on G4 to F2. Get the heart on F6.
- Shoot the Snakey on G9 and push it all the way up to the wall. Get the heart on I1.
- Move the Snakey on D6 to C2. Move the Snakey on B5 straight up to cross the water upwards. Quickly shoot the Snakey on C2 and move it to D1. Get the corner heart and shoot the egg again.
- When the B5 Snakey returns, move it down to B11.
- When the Snakey on D6 returns, move it down to G10.
- Quickly: Move the same Snakey right to J10. Use the I9 Snakey to cross the water and move the egg down. Get the nearby heart and shoot the egg again. Wait on D6 for the Snakey to return.
- Quickly: Move the D6 Snakey to I7. Move the I9 one to K10. Go back left and when clear, shoot the egg on I7 again.
- When the D6 Snakey returns, move it to I5. Move the EF on I4 to J6. Get the last heart and the chest.
14-2[edit]
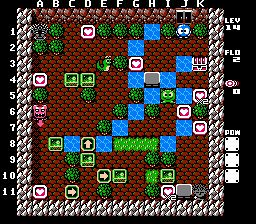
This one's also not too hard. There's only one speedy sequence to worry about.
- Get the heart on K5. Make your way back up. Wait for Rocky to walk around row 2. Push him to H2, get the nearby heart, then cross left.
- Maneuver the EF on C4 to B7. Move the one on D4 to B6.
- Very quickly: Shoot the Snakey and move it down to C7. When Don is coming up, push the egg down into the water, move the adjacent EF on B8 left one space to keep Don confined. Get the heart on A11.
- Head right past the 2 EFs. Stand halfway between F8 and G8 and wait for the Leeper to touch you. Go in and get the heart.
- When the Rocky's away, move the EF on I10 2 spaces right. Wait on J10 for the Rocky to charge down at you and move left. Slowly move down and get the heart. The Rocky will walk alongside and defend you.
- Wait for the Rocky to clear and go get the heart on K7. Lure the Rocky to the upper area and head down then lure it back to the lower area like you did before. It will walk in an endless square pattern.
- Move the EF on D9 to C1. Get the heart. Move the EF on B6 left one to fully trap Don.
- Use the Snakey to cross back into the lower area again like before only go right this time (to D8).
- Eyeball the Rocky on the right, and when he's walking and covering the Medusa, go down and push the F10 EF up and move it to A3. Get the last heart.
- Use the Snakey to cross back right. Wait for the Rocky to clear if you must. Get the chest.
14-3[edit]
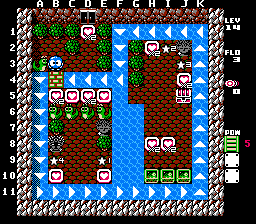
This is a hard one. This level features a big water current going around the room. It is a little tedious having to wait for an egg to go all the way around, but at the same time some events need to be timed right while using the egg in the water. There's also one strange exploit that is needed to solve the room.
- Get the heart on D1 and shoot the Snakey down into the water and ride the egg down a little. Disembark and get the 4 hearts. You'll receive a bridge, which you'll want to immediately use to the right of where you got the 4th heart.
- Before the egg in the water gets too far, shoot the Snakey on D6 and move it down a half space and then put the C6 one down 2.5 spaces so you can walk down.
- Get onto the egg when it comes by and ride to the right. Push the first 2 EFs up one space each. Quickly push the third one up to J7 and get the 2 nearby hearts.
- Get back on the egg in the water and push the EF on J7 left one space. Go down and push the EF on H9 up next to it. Push the EF now on I7 up two.
- The next events require you to wait for the right timing of the egg on the water. A good time to start it is when the egg is over the heart that's left of the top right medusa.
- From across the water, shoot the Snakey on E6 twice.
- This is a funky trick you have to do now: Move a half space down and shoot the Snakey twice. Your shot will actually pass the tree and hit it.
- Push the EF on I5 left across the bridge and put it in-between D5 and E5.
- If you timed the egg right, it should be close enough now so you can quickly get on and push the EF down so it covers both spaces of the Snakeys.
- When the Snakeys appear on E9 and I2, move the EF on I9 to J3 and get the 2 hearts. Move the in-between EF to E6. Shoot the Snakey on C8.5 twice.
- Move the B6 Snakey into the water and wait for the egg to go all the way around.
- When the egg sinks, wait about 6 seconds. Push the Snakey on C6 left one space. When the other Snakey appears below on B9, push this egg into the water.
- Wait for the egg to go around. Go right and move the Snakey over there up into the water.
- The 2 Snakeys will return to the left area. Just repeat the same process from the beginning to get to the lower area with the Snakeys. Get the 2 hearts and get the chest.
14-4[edit]
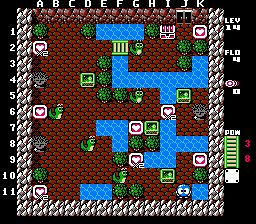
This one's quite a bit complex in positioning things. You'll need to use the D8 Snakey quite a bit.
- Get the heart on G9. Move the nearby Snakey to A9 and get the corner heart. Move the EF on I10 to B8. Get the heart on G7. You'll get a bridge.
- Quickly: Move the D8 Snakey down and right to the water on J8. Quickly cross up, face left, use your bridge, then cross back down. Move the EF on H7 two spaces right.
- Using the same Snakey, once again cross on J8, moving the EF up one in the process. Get the nearby heart.
- Move the Snakey on B6 up to B4. Move the one on G2 right one and then back left to A3. Get the heart.
- Move the D8 Snakey into the water on I5. Cross right, moving the EF with you and cross back. Get the K1 heart.
- Move the same Snakey to A7. Maneuver the EF on D4 over to A5. Get the heart for a bridge. Go up and use the bridge on G4.
- Quickly: Move the Snakey below you down one, go around and move it to K7. Get the last heart and head to the chest.
14-5[edit]
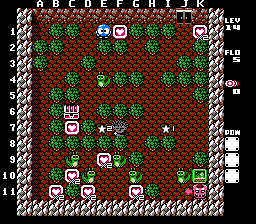
This level is pretty tough as it needs quite a bit of speed and remembering where some of the Snakeys originally started. There is a long series of events that need to be done quickly and you cannot stop once you start, so be sure to familiarize yourself with the sequence.
- Get the heart on B11.
- The series of events begins:
- Assume the Snakeys are numbered 1-5, left to right.
- Face the Snakey #1, shoot it and push it one space right.
- Go down, you'll get the heart, shoot and push the Snakey #2 two spaces right.
- Get the heart above you, shoot Snakey #3 under the Medusa twice.
- Go back left, get the D11 heart, push the egg with Snakey #1 all the way right to F9.
- Shoot the egg containing Snakey #2 again, which is now on F10.
- Shoot and push Snakey #4 two spaces right.
- Shoot Snakey #5 and push it down to block Don in the corner.
- Push the egg containing Snakey #4 five spaces to the left (to cover snakey #2's original spot on D10).
- Get the G11 heart, go back right and shoot the egg containing Snakey #5 a second time, then move left and away from the Don.
- By now, both Snakeys shot off from earlier should have appeared at the holes. Snakey #4 should be hatched.
- Go back left and shoot Snakey #4 and push it all the way right to J10 and then down a half while trapping Don in the corner and covering Snakey #5's spot.
- Go up and shoot the Snakey on I7 and push it all the way left. This spot needs to be empty for the Snakey that'll appear on I7 shortly. That's the end of the sequence.
- Get the heart on K1. Shoot the Snakey on I7 and put it up on F5.
- Go all the way out and up to get that heart on the top, come back down, move the Snakey blocking your path down and get the last heart under the treasure chest and then the chest.