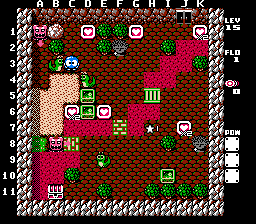
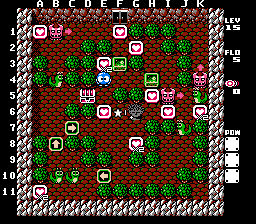
The first level of 15 is a little tricky. Make sure to keep your eye on the Don at the bottom.
Move the D5 EF to the left and trap the Don in the top left corner. Get the heart on C6. Move the Snakey on B3 to F3
Go right across the regular bridge and get the heart on J7. Go back and get the heart on E6.
Move the D6 EF to F8 so it confines Don between it and the rock. Going over the F7 bridge is easier to do.
Go back up and around across the other breaking bridge and move the same EF right one.
Quickly: Move the E9 Snakey to 2.5 spaces right. Move the nearby EF half space right then go around and move it to F10. Shoot the egg again when clear. Move the same EF to E9.
When Snakey appears over Don, move the same EF up and over to K5.
Quickly: Move the D4 Snakey to G2. Get the 2 hearts and shoot the egg again when clear.
When Snakey returns, move him to D2. Get the last heart and the chest.
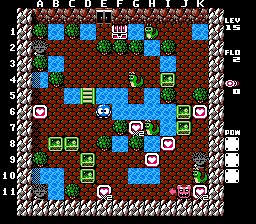
This is a tricky one. There's one point where you need to carefully time the Don's movements too.
Go down to the EF cluster. You'll need to move them as follows: Push B8 one down one. Push the C8 one right one. Push the D10 one right two then down one. Push the D9 one left one. Push the D8 one up to B2. Move the C9 one to D11. Get the heart.
These steps need to be done very quickly and carefully:
Stand on G3. Watch the Don on the bottom and when it touches the K11 heart, shoot the Snakey and push it down into the water and get the heart. The Don will just miss you.
Move the Snakey right of you into the water. Push the EF right, get back on the egg so Don will pass, and quickly move back right. Move the J6 EF up one, get the heart on K6, then move the same EF up two more.
Before the G4 Snakey returns, you need to move the I4 EF to D4.
Move the EF on J3 to J9. Get the heart on I8. Move the EF on D4 to D9. Carefully get the heart on H9. Carefully move the EF on D9 to I9. Move the EF on F11 right one. Go around and move the EF on I9 down one to trap the Don.
Move the G4 Snakey down to the water on B10. Move the adjacent EF up to B5.
When Snakey returns, move him to the water on C5. Move the same EF left one.
When Snakey returns, move him over to A7. Get the last heart.
Use the H1 Snakey to cross to get the treasure chest.
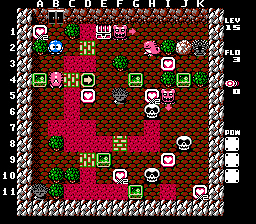
This one's pretty tough. You'll need to watch the Dons and do some things quickly.
Carefully move the EF on A4 to A10. Move the one on E9 to F6. You'll get the heart.
Quickly and carefully move the H10 Skull to K5. Get the K11 heart.
Very quickly: Move the J8 Skull up one and left one so it's under the Don. Get the I9 heart and head left to A7. Shoot the egg again from there.
Move the B4 Gol four spaces right. Carefully move the G4 EF down one. Get the H5 heart.
Move the H2 Gol to trap the upper Don in the top right corner. Get the heart on A2. Cross back on the C4 bridge.
This is tricky: Shoot the H6 Skull twice and wait. When you see the box indicating its return appear, quickly go back down and left of it. The best way to do this is wait for the Don to tap the tree on I5 then fire your second shot.
Move the same Skull so it's above Don right one then all the way down to trap it in the lower area. Get the heart on I3.
Maneuver the J4 EF to E5. Go around and get the last heart. Then just go straight to the chest. The breaking bridge is your ticket to the exit door.
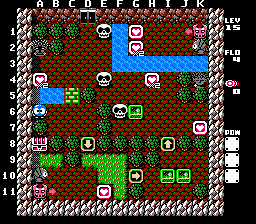
This is a hard one. The main trick is to keep the Almas synched with running alongside the Dons, since that's your shield from them. Remember how to time the Almas' rolling.
Head down to F9. When the lower Don and Alma are moving right, go down and over to I11. Wait for them to tap the left wall as that'll give you the most time.
When they are moving right again, move the EF on I10 up to I4. Get the heart on H4. Move the EF on G6 to G4.
Very, very quickly: Move the E4 Skull left two. Move the G4 EF left two and up one. Move the egg back right and up into the water on F3 (it'll be extremely close to hatching). Move the adjacent EF left to A3. Get the heart. Go back and wait on E5.
When the Skull returns, move it up one. Move the Skull on F6 straight up into the water and move the other egg to C2.
This is the hardest part of the room: You need to unbalance the upper Alma and Don and get it in a way so the Alma runs mostly left of the Don as the Don's moving right. A good way to time this is wait for them to be running right and about when Alma enters J2, move up so it rolls.
This is difficult to explain: You need to cross the water on G3, get the 2 hearts, and quickly cross back down. You need to use the Skull on F6. Move the Skull to G4. Wait and watch the Alma before crossing and time this carefully. Be sure that the Alma is left of the Don, but at the same time the two need to be far enough to your right so the Alma will roll at you and not hit you.
After you cross back, try to rebalance the Alma and Don at the top as best you can so they run alongside each other again. Even if the Alma is a half space ahead, that's good enough.
Move the F6 Skull to K6. Get the heart.
Head back to the lower left area. Like before, wait for the lower Alma and Don to be moving right before proceeding to the lower right area.
Maneuver the EF on J10 up and over to D9. Be sure to watch the Alma and Don as you do. When clear, move the EF down to D11. Get the last heart.
Shoot the Alma. Move the D11 EF to B11 and move the egg to A10. Get the chest.
The last level is mainly hard at the beginning. You'll need to carefully evade the Don Medusa in the top left.
Carefully work your way down to the lower left and get the heart on A11.
Carefully move the B10 Snakey to G7. Get the G8 heart.
These steps need to be done quickly and carefully:
Move the B4 Snakey straight up. Get the A1 heart. Go on B7 and face up.
When Don enters D1, shoot the egg again. Don should bounce off it right before the shot hits it. Quicly move right and head downto E10.
Wait about 3 seconds. Carefully move the C10 Snakey to B4. When you see the other Snakey appearing on F6, move the egg up to trap the Don in the top left corner.
Carefully get the heart on F1. Move the F3 EF down one. Get the heart. Move the same EF right one. Get the heart on E6.
Head down and to the right. Move the J7 Snakey up so Don is trapped by the hearts. Move the other Snakey to trap the other Don in the top right corner. Go back down and when clear, shoot the egg on J5 and move away.
When the J7 Snakey returns, move him up to trap the Don on the right wall.
Go the long way and get the heart on H5. Move the EF on H4 down two. Get the last heart. Get the chest.