8-1[edit]
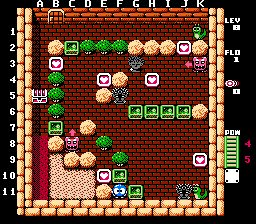
The first level is actually not too hard. Especially compared to some of the previous ones.
- Move the EF to your right all the way right. Make your way up to H7. Eye the Don on the left.
- From here, push the EF on H6 up one, push the one on I6 up two, push the one on H5 left one, and push the one on G6 left one. Get the heart on H4 when you can and push the EF on I4 to trap the Don next to the Medusa.
- Push the EF on J6 straight down and get the heart. Go up and get the J2 heart.
- Push the EF on C2 down one. Get the heart on B3. When Don passes, walk down to A7 and when he's near, trap him on C8 with the EF.
- Move back up and push the EF on C3 all the way right and get the heart. You'll have 2 bridge powers by now. Use those to cross the lava and get the heart. Don't bother going back. The sand will slow you and the bridges will burn down.
- Push the EF on F10 to H8 and go the long way around to the chest.
8-2[edit]
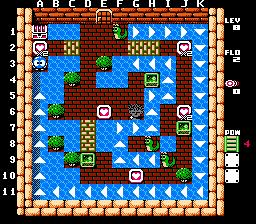
A large amount of directional water is in here. It takes a while for the egg to go around the outer edge, but as always: Be patient.
- Get the heart above you and shoot the Snakey on F1 and put it into the water. Go down and push the EF on D9 down one. Wait for the egg to come around, get on and when you're under the EF push it up and over the Medusa.
- When the Snakey is back, push it into the water, but this time ride the egg. Get the heart on J2 and get back on the egg.
- When the egg gets down to K7, move the EF left one and get back on. When it comes around to J11, disembark and wait for the egg to sink. You must wait for it to sink first.
- Shoot the Snakey on H8 and then the one on I9. Push the egg up into the water and move the adjacent egg and EF left and up, respectively. Get the 2 nearby hearts. You'll get a bridge.
- Use the bridge on F4. You'll go across the breaking bridges and destroy them on the way back. Head down to J9. When the Snakey is back, push it left into the water. Go up to J4 and wait for the egg to come. When it does, move the EF onto the bridge you built. Get on the egg and when it comes above the EF, push it down next to the Medusa. Get the last heart.
- Do not cross the breaking bridge to get the chest. Use the F1 Snakey and take the long ride around to get it.
8-3[edit]
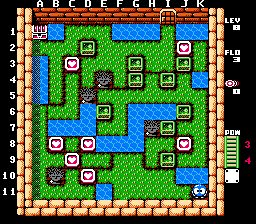
Unusually grassy here... This level is a needs careful EF distribution, especially on half spaces.
- Move the EF on I9 to H8. Get the heart. Go over and get the heart on C9 too.
- Move the EF on J6 to H5. Move the one on I4 up one. Get the J2 heart.
- Move the EF on G4 left one and tap it down a half space. Move the EF on G3 2.5 spaces left. Get the C3 heart. You should have 2 bridge powers now.
- Move the EF on D2 down to C4.5. Build a bridge on D6 and one on G6.
- Cross the bridge on G6 and tap the EF on E6 a half space left.
- Move the EF on J3 down to C10. Get the guarded heart. Move the EF on I3 down to B9. Get the last heart and take the long way to the chest.
8-4[edit]
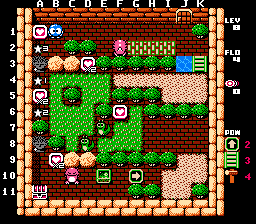
This level uses one of each power and will make you move an EF over long stretches of land. It's not too hard, however.
- Go down and get the heart on D3. Shoot the Snakey on D8 and the one on E7. Move the one on E7 right one, the one on D8 left one, and move the egg now on F7 up and over to A4. Get the F6 heart.
- Use your arrow turn and get the B9 heart. Push the EF up and over to J4. Use your bridge on the water and shoot the Gol on F2 twice. Move the EF up and over the 3 breaking bridges onto its spot. It'll appear on A6.
- When it does, move the EF back down and over to D4. Get the A5 heart. Use your hammer to break the rock on C3 and maneuver the EF down to D10. Shoot the nearby Gol twice and move the EF over its spot.
- When the Gol appears on A2, get the last heart. Go back down, move the EF over to the left wall and get the chest.
8-5[edit]
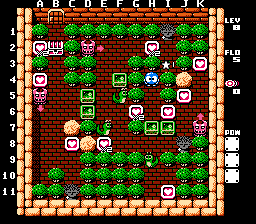
The last level is a little bit tougher. A lot of points where you need to be speedy.
- First move the EFs on H7 and I7 to I8 and J7, respectively. Get the 2 hearts on G6 and E8. Watch the Don above.
- This needs to be done quickly. Shoot the Snakey on F5 twice. Shoot the Snakey on E7 and push it up so it traps Don on D2. Get the heart on H2 and go back out. Move the EF on F4 down one, move to the left and down, and hit the egg again when you're able to take cover. Snakey will reappear on I3.
- When it does, move the EF on F5 up and trap Don all the way to the right on I2.
- Move the EF on D6 two spaces left. Get the heart on A2.
- Move the EF on D5 to H6. Eye the Don on the left. Get the heart on I6 and use the EF to trap Don on K7. Go and get the 2 hearts.
- Move the EF on B6 all the way down and move out. A good trick is to wait for Don to tap the heart so you can trail him safely.
- This needs to be done very quickly: Shoot the Snakey on E7 and put him so he's under Don on A6. Go down, move the EF right one and get the heart. Go up and when you're clear, hit the egg again.
- Shoot the Snakey on H9 and push it down. Get the heart.
- Shoot the Snakey on E7 and block Don from below. Get the last heart and the chest.
With level 8 complete, just head over to the boat and watch a cutscene. You'll be heading underwater for levels 9-12. These can be done in any order, though all 4 need to be completed before you can proceed to level 13.