Note: every room in this level has at least one Skull in it.
9-1[edit]
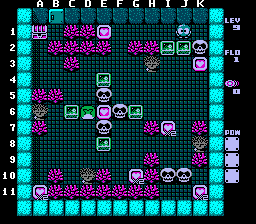
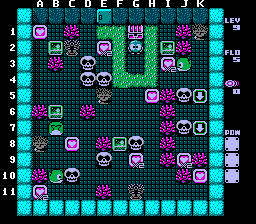
This first level has one main trick to it which you'll see at the very end. The rest is not too tough. If you play the levels in order, you'll also be introduced to the new monster Moby here.
- Push the EF on I2 down one and the one on J2 down to J8. Get the heart.
- Shoot the Skull on I10 and push it down. Shoot the one next to it and push it right. Get the heart. Shoot the egg left of you again. Wait on I11 for the Skull to return.
- When it does, shoot it and put it up on H4. Move the EF on G6 down to F10. Get the heart.
- Move the EF on E8 left one, shoot the Skull that was over it and push it over to B6. Move the EF now on D8 down one.
- Even though it's now available, do NOT get the heart on E6. You will want to save that for last.
- Move the EF on E4 left two spaces. You will be sucked down by the Moby, which is fine. Move the EF on C6 all the way down.
- Shoot the Skull on F6 and move it to A8. Get the heart in the corner.
- You'll want to move that EF on C4 all the way left. Walk a half space over the row it's on and let the Moby suck you down so you will be able to push it left.
- Shoot the Skull on E5 and move it all the way right. Get the heart.
- This last step is the real trick to the level: Shoot the Moby and move it so it's in-between G3 and G4. This will block the Medusa and delay the Skull under it. If you don't, the Skull will get you. Go up and get the heart on E1. Get the last heart and run straight to the chest.
9-2[edit]
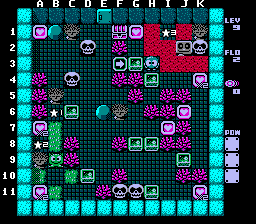
This one isn't quite as tough. No real tough tricks with using the holes.
- Move the G3 EF left one and the H4 EF down one. Get the heart on K4.
- Go down and push the EF on J9 left to F9. Push the EF on G8 up two then push the EF on H8 to F7. Get the heart on I7 and the one on K11.
- Shoot both Skulls on G11 and F11 twice and use the nearby EF to cover both their spots. Just move it 1.5 spaces left. They will reappear on B6 and A8.
- Move the EF on F9 left two. Go up and stand on B8 so the Leeper will touch you and sleep. Get the A7 heart. Push the EF on C6 up one. Put the EF on D10 on A10 get the heart.
- Go up and put the D2 Skull left one and the C4 Skull left one. Get the top left heart.
- Go down and push the EF on D9 all the way up to D1.
- Go down and back right and get the heart on J6 if you haven't yet. Stand on K6 and shoot the Skull on K2 twice and quickly move one space left. When the Rocky stops above, move back right into the K column and wait. The Rocky will follow and guard you.
- When the Skull appears up top, get the last heart and the chest.
9-3[edit]
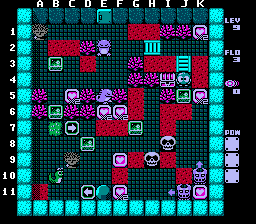
A little bit harder. Timing the Dons' movement is the main difficulty.
- Put the EF on B3 on A2 and put the EF on B6 on C8. Get the heart on C5.
- Shoot the Gol on E5 twice, go down and get the first heart, then shoot the Gol on E2 and put it up on D1. Go back to E6 and wait.
- When the Gol returns, push it down to B9. Go up and get the heart on K1 then get the heart on F6. Watch the Don on the right.
- Go down and shoot the Snakey and push it right one. Go around and push the EF on D8 down one. Go over to the 2 Skulls. Do NOT get the heart on F9. Save it for last.
- Here's the harder part of the level: When the Don on the right is clear, shoot the Skull on H9 and push it straight down so it blocks the lower Don on the right. Get the heart on F11, go back up to H8 and shoot the egg again. Move away to the left. Also: Try NOT to get the Dons to move in sync. (i.e. if they are both moving and touching the K11 heart at the same time, you will not be able to beat the level)
- When the Skull returns, shoot the other one and push it right to block the right Don from below. Get the heart on K5. Go back to H8 and shoot the egg again. Run up to H5 and wait.
- When the Skull returns, shoot it again and this time trap Don up on K5.
- Shoot the other Skull and trap Don against the rock. Get the K11 heart. Go up to G8 and shoot the egg again. Move left and get the last heart. Quickly take the lower path around and left. Make your way up. Watch the Don on the right as there are some vulnerable spots.
- To get past the Gol, just walk halfway in, walk back and wait for its fire to pass. Then move over.
- Keep watching the Don on the bottom and make your way right when it's safe. Get the chest.
9-4[edit]
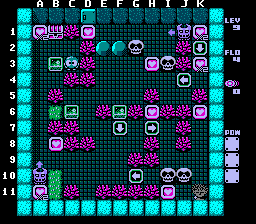
This one's not quite as tough. Only one part you need to be speedy.
- Push the EF left one, get the heart, and then push it down to A7.
- Move the C6 EF right one and move the F6 EF to E9.
- This needs to be done quickly: Go over to I9 and when the top Don is away, shoot the Skull on J10 and move it down and shoot the left Skull move it left, get the heart, then keep moving it all the way left under Don. Get the heart and move back right. When you can take cover behind the EF, shoot the egg again and run up, left, trap Don in the lower left corner and quickly get back to H10. The Skull should just finish reappearing.
- When it does, shoot it and move it all the way right, get the heart on K6.
- From here, you can get the heart on H6 though leave the one on B8 for last.
- Push the EF on D6 up to F3. Go over to and get the hearts on K3 and H3.
- Shoot the Skull on G2 and trap Don to the left. Get the heart on K1 and when you're clear shoot the egg again.
- Shoot the Skull on I3 and trap Don in the corner. Move the EF on F3 to I1. Get the heart on D1.
- Get the heart on B8 and get the chest.
9-5[edit]
This last level is pretty tricky. One thing to remember is the heart on H5 is the one you want to save for last, so you'll need to maneuver around it.
- Get the heart in I3. Shoot the Moby and put it on K2. Move the EF on I2 a half space up.
- Go under the Skull on J5 and put it over on F5. Go down and push the EF on F8 all the way down.
- Get the heart on J9. This needs to be done very quickly: Shoot the Skull on J7 and put it on G7, then shoot the other Skull under the egg and move it left one. Push the first egg to E6. Put the second egg on G10. Get the heart on G9.
- Put the Moby on B10 to A9. Get the corner heart.
- Shoot the Skull on D3 and move it left one. Shoot the one on D4 and move it down one. Shoot the Moby on B7 and move it left one. Get the heart on A1.
- Maneuver the EF on B6 to D2. Get the heart.
- Shoot the Skull on C10 and push it to B8.5 and get the heart.
- Shoot the Skull on E9 and put it on H11. Get the corner heart.
- Get the last heart and move up to the right of the chest. Skulls will be moving all over. When there's one over the lower Medusa, get the chest.
Level 9 boss[edit]
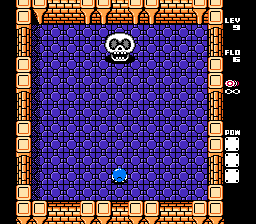
The level ends with a fight against a giant Skull. The Skull will move around the room quickly in a simple zig-zag pattern. It's not too tough due to the pattern. Just stay out of its way and shoot it from the sides when you're clear. Once you get it into the giant egg, shoot the egg a bunch of times to get rid of it.