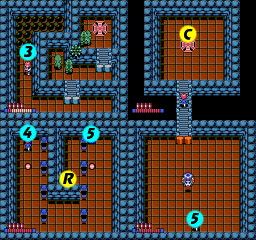
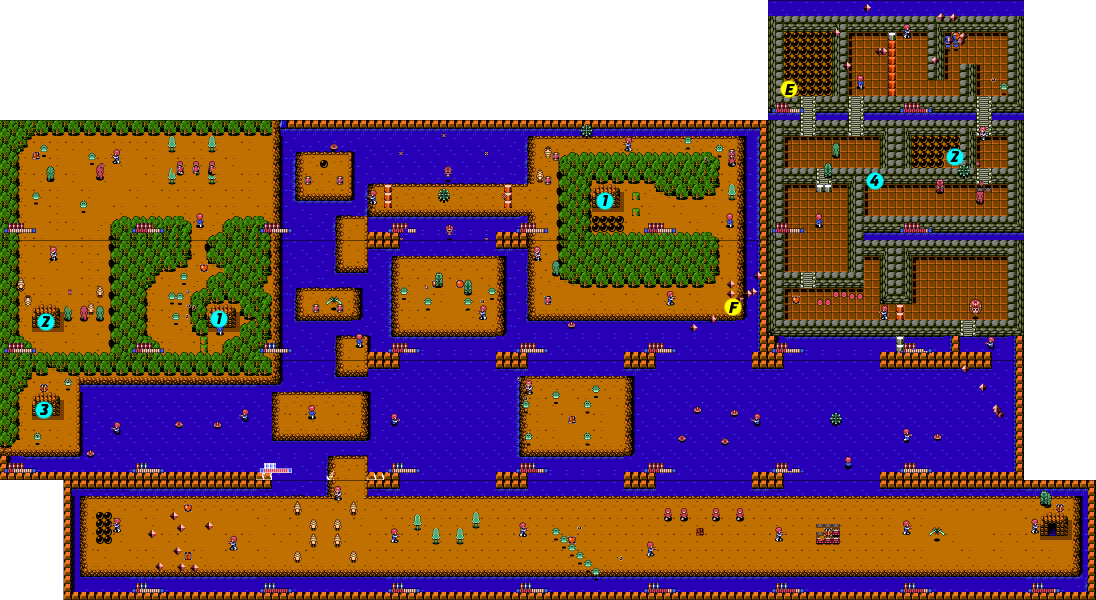
Maps[edit]
Use the scroll bar below the map to see more of it if your browser width is too small.
Walkthrough[edit]

The fourth level is primarily composed of large expanses of water and island. The entire upper left and upper center portions of the stage can be ignored if you know where to go. There are only two boss enemies, the Satan Heads, which you will have to face at some point along your quest to collect the crystal diamonds. The other nice thing about this stage is that there are no gaps to fall into, so there is no underground section to this stage.
First Crystal[edit]
You begin on an island on the left side of the stage, near the bottom. As it turns out, to get the first crystal diamond, all you have to do is head due west. Cross the water stage, being sure to jump as you do to avoid taking too much damage, or running out of Astro Pants. Watch out for the Piranians as you go. Continue to the next screen, deal with the enemies if you like, and duck inside the steps. This will take you to a solitary room with four Kokonagons and a Hotchkiss. If you have already upgraded your weapon to the third and final level, you can shoot through the walls to attack and destroy these enemies before you have to face them. Once the room is cleared, shoot the Crystal Diamond Guard until it breaks and collect the first crystal.
Second Crystal[edit]
The next crystal can be found in the lower right corner of the stage. However, you'll want to take a brief detour to the north if you have not found all three Fire Rate Up enhancements in stages 1, 2 and 4. If you have collected all of them, then collecting this one will have no effect. However, if you missed one, you may wish to travel out of your way to collect it. Travel east back to your starting location. Then continue moving east through a water screen, an island screen (where you can collect Power Shoes), and to one more water screen. From this water screen, head north to the screen above. On this screen, shoot the lower right corner of the island that you come to, to find the Fire Rate Up tile.
Once you have it, or if you choose to skip collecting it, head down to the southern portion of the stage, which is composed of one long land mass that stretches along the entire stage. Continue walking east as far as you can go until you reach a set of stairs by a doorway. This screen actually straddles the left and right sides of the map, but the map above is presented to make it easier to follow. Head down the staircase, and you will find the second Crystal Diamond Guard dome waiting below. Destroy it and collect the second crystal.
Third Crystal[edit]
From the stairs to the second crystal, head left until you are able to travel north. Once you can, go to the screen above, and then back to the right. Watch out for the purple diamonds that erupt from the right wall and make your way through the opening in the upper right corner. Once you do, you will encounter the first Satan Head boss. They will fly around in circles, occasionally stopping to scream and shoot at you. Fight it from a distance, and keep moving to avoid taking too much damage. Once you defeat it, the barrier to the left screen will be removed. Collect the flashing apple and continue to the left.
Avoid the red flash bombs (there is a hidden Astro Wear in the dead end on the right), and climb up the steps to the screen above. You'll want to clear out the two Kokonagons that you find before approaching either set of stairs. You're not required to, but it's a good idea to explore the left steps first. It will take you to a small enclosure full of black blocks that you can shoot. Only one contains a hidden item, but that hidden item is an Energy Tank, and it can be found in the lower left corner. Don't miss it.
Then climb back down to the previous screen, destroy the Kokonagons that have returned, and climb up the right stairs. It will appear as though you are trapped in by the barrier blocks, and it's impossible to destroy all of the erupting diamonds. However, if you look closely, you may notice that the highest block is a different color. You can shoot at and destroy this block. This will allow you to proceed on to the right screen. From there, you will have to travel up and around through the path, dealing with two barbarians, an Opopo and more erupting diamonds. Make your way to the exit in the lower right corner and head down.
Shoot or avoid the enemies that you encounter on this screen, and head to the left. You will now arrive at the stairwell that you could see earlier. Head inside. You will arrive in a room with eight Barbarians, and two red flash bombs. Try not to disturb the flash bombs while you take out the Barbarians. Before you walk around to the stairs on the other side and leave the room, examine the small corner created by the inner wall. If you do, you will find a Range Increase enhancement.
Once you head through the stairs, you will encounter the second Satan Head boss. This fight will be no different than the previous one, except that you have a little more room to maneuver in. Destroy it, collect the flashing apple, and head north. Here you will find the third and final Crystal Diamond Guard dome. Start shooting at it, but if you're weapon has not been upgraded to the highest level yet, don't be in such a rush to leave the stage. Collect the third crystal, and shoot the space where the crystal lay. You will reveal another Cannon Shot upgrade. If you already found the two in stages 1 and 4, you won't gain any enhancement, but if you missed one, this is an easy opportunity to upgrade. Then take the transport to the next stage.


