The stage begins with a two series of wave enemies, first high then low.
You will then meet the enemies which look like spinning lug-wrenches. They home in on your position every once in a while and fly there, correcting themselves every so often.
After four barriers, you will begin to see energy and bomb items. Many of them are positioned rather close to walls and obstacles. Collect them carefully while avoiding the terrain around them.
After three more barriers, hatch enemies will rise up and fly towards you.
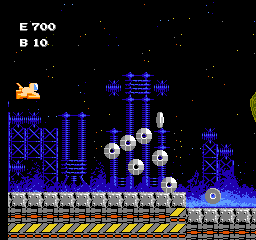
Next will come a wave of ships that are difficult to hit, as they begin to fly towards the top and bottom of the screen when they reach your horizontal level.
Following them are round ships that are even more difficult to hit. Simply move up and down to chase them off the screen.
Lug-wrench enemies will attack followed by fire barriers positioned around and behind obstacles.
After two energy items, more of the hard-to-hit round enemies will appear before you land outside the entrance.
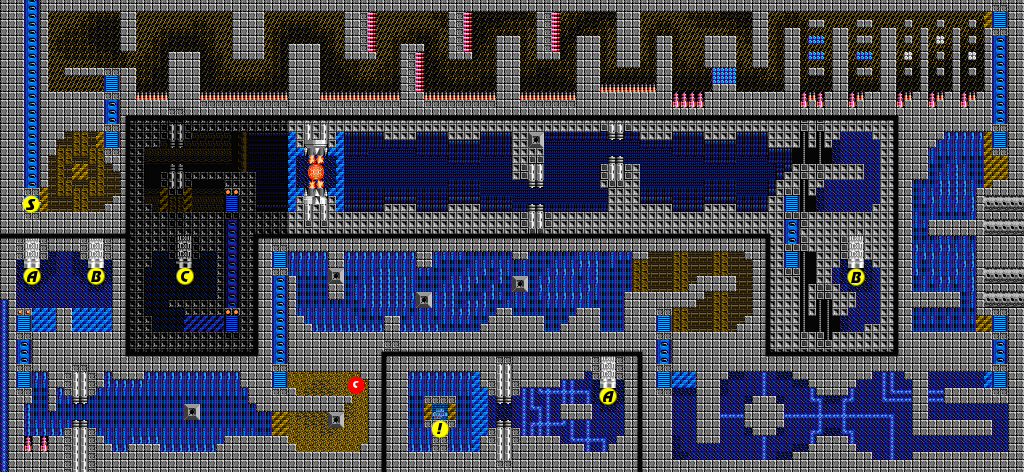
Quick Navigation: Start → Chute B → Core → Chute C → Chute A → Lightspeeder
Despite being quite large, the second fortress is not too difficult. Start by flying up to the elevator across the room and riding it up to the room above.
Cross this very long room to the right, shooting the enemies but being sure to avoid the red spikes which can drain a lot of energy. Be sure to clear away each enemy before you proceed.
A little more than half-way in, you will begin to encounter magnets that pull you down as you fly over them. Continue to move forward as they do to escape their influence. The blue blocks that you see on the other side can be shot out with your gun so that you can pass through them to safety.
The gray blocks, on the other hand, can only be destroyed with bombs. While they can help you get through the room a little quicker, it's not recommended that you use bombs to destroy them unless you happen to have more than 10 stocked up. Instead, push right as you drop down to avoid touching the floor.
Take the elevator down, destroy the six red robots and two blue robots as your drop to the floor below, and take the elevator down to the next room.
Wind your way through the corridors, destroying the two blue robots, and then head left and destroy more of the robots as you encounter them on your way to the next elevator.
Ride the elevator up, destroy the two enemies, and climb up and around to the left. In this next corridor, in addition to enemies, you will find squares with cannons in the middle which fire heat seeking orbs. The cannons can be destroyed with bombs, but only when they're exposed. Judge the situation to determine if you really need to or not. The orbs can be mislead into walls and gotten rid of that way. Ride the elevator on the left down.
Destroy the robots in your way to the right, and drop down to fly to the left. Continue until you reach a mini-core, and destroy it with one bomb. The continue left and avoid the magnets on the bottom to reach the elevator at the top.
After you ride the elevator to the room above, you will face your first branch. You will see two chutes, chute A and chute B. One leads to the core, while the other leads to the escape Lightspeeder. Since you need to destroy the core first, you'll want to take chute B on the right.
When you arrive, carefully maneuver through the cylinders to reach the elevator in the upper right corner. Ride it up to the next room.
Safely pass beneath three more cylinders as you make your way to the left. Destroy the two enemies on the floor and ceiling, and then be prepared to shoot a butterfly that appears. Next, take out the two mini-core bombs. Beyond them, you will face some blue robots, but also a clone of yourself. Do your best to destroy the clone as quickly as possible with bombs as they can be quite dangerous.
Beyond the clone you will reach the fortress core. Destroy it, with bombs if you have them, and then fly beyond it to the left. Take out the next mini-core and drop down to reach the elevator in the back. Ride it down to the room below and take chute C.
Chute C will actually deposit you in the room just below the branching path. Since you should have cleared most of it out already, you should easily reach the elevator to the left, ride it up to the room above, and this time take chute A on the left.
After leaving chute A, you will see two blue robots. Just beyond them is another mini-core. Destroy it with a bomb, and continue left to reach the escape Lightspeeder.
This fortress has a large addition of blue robots as well. The first room, which was once empty, now contains two of them.
When you travel through the long large room in step 2, you will actually encounter clones and flame orbs along the way. Be prepared to bomb them when they appear. Flame orbs can be tricky to lure out into the open.
When you reach the room is step 6, there is an extra hopping sentry. Be sure to clear it out the first time because if you don't, you'll have to deal with it while you're trying to escape.
Be careful of the white butterfly that appears before the main core, and the flame orb that shows up after it.