Reminder: The screenshots below are taken from the graphically enhanced X68000 versions. The floor setup and solutions are identical to the Famicom and Game Boy Color versions.
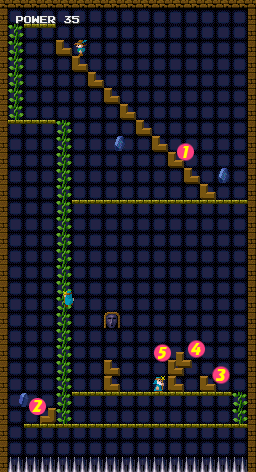
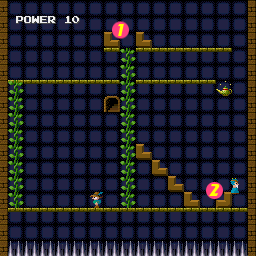
Start out by plucking block 1 from the staircase, and place it to your right so that you can collect the right crystal. The remaining blocks will fall into place such that you can collect the left crystal. Then climb down to the bottom.
Move block 2 so that you can collect the last crystal. Now all that you need to do is build a staircase up to the door.
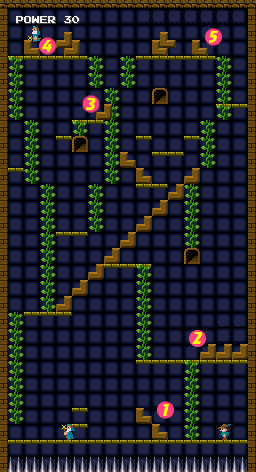
Walk over to the vine on the right, and use block 3 in order to get to blocks 4 and 5. Move the bottom block over one square to the left and building building up to the door from there.
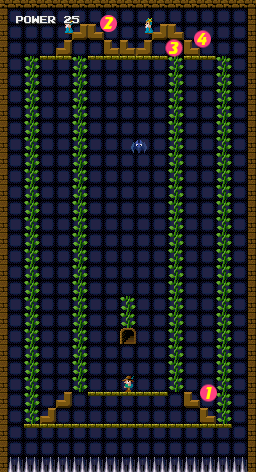
Move the pair of block at position 1 closer to the center platform, beneath the second vine from the right. This will help you catch blocks and lock the priests in the bottom as well. The bat may still pose a threat depending on where it ends up bouncing around.
Walk and climb across to the left. Climb up the left-most vine and walk over to block 2. Lift it up and place it above location 3.
At this point, there are a number of ways for you to complete the stage. You need only drop three blocks from location 4 down to the floor below, via either vine, and set them up as a staircase stacked on top of the one you started with block 1.
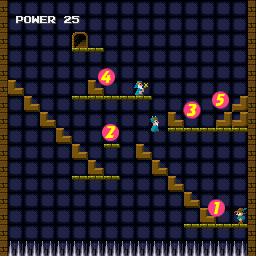
Lift block 1, and carry it to the top of the stairs once the staircase settles down. Stack it on top so you can reach the platform at location 2.
Lift the block at the bottom of the next staircase, and use it to build a staircase off to the right to the high platform beneath the door platform. You will need the block at the top of the left staircase to finish the new staircase.
Once your up there, pick up block 4, and stack it on top of block 3 to make a staircase down to location 5. Now simply use the trhee blocks at location 5 to make a staircase up to the door.
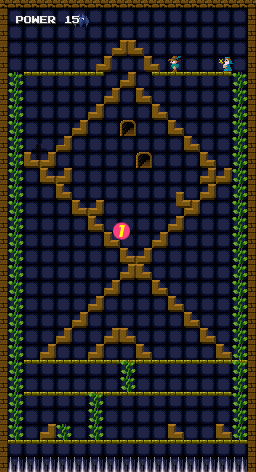
This stage is surprisingly easy. All you need to do is safely make it inside the inner diamond (watch out for all of the settling blocks) and pluck out block 1. The blocks that fall along the left will create a nice staircase to the top door, allowing you to exit.
Once you pluck block 1 out, wait for the blocks to settle, and the find a safe way to exit through the remainder of the blocks. You will typically find that the safest path is to go down and to the left until you can reach the left vine.
Between the two halves of this stage, you will only occupy the lower half long enough to collect the first crystal. Lift block 1 and fall beneath it to collect the crystal. Then climb up as high as you can on the vine to the right, and fall off the platform to the cloud below. Use it to transfer to the middle cloud and reach crystal number 2.
To collect crystal 3, you need to do a little set up with with the blocks. Move the blocks at location 5 aside so that you can access the vine to blocks 3 and 4. Turn block 3 around and place it on the inside of block 3. Then climb back and and drop one of the blocks on top of block 3. Drop another one on top of that (make sure it's an L and not a J).
Now traverse to the right and wait for the middle cloud to help you hop across from the left platform to the right. Climb up to the highest platform and cross over the vines. Drop off the middle vine, and move the top block off of the tall pile by depositing it to the right.
Reposition the block underneath that one to start a staircase. Use the block you just removed to complete the staircase to the third crystal. Now you can reach the door and escape.
This floor is another surprisingly simple puzzle to solve, but the problem comes in the form of a Priest of Ur that can ruin the solution. If the Priest of Ur takes a dive to the right, and ends up stuck behind block 2 and you will be forced to deal with him in order to escape.
Try to get the priest to climb over the block to the right of block 1 and chase you down the vine. Then proceed to block 1. Lift it from the right side, and you will slip and fall back down to the vine. Climb back up and climb over the block and lift it from the left side. Drop it down the vine, and it will stack on the rest of the staircase.
Now pick up block 2 and stack it at the top so that you can reach the door. If the priest is there waiting for you, instead bring block 1 down with you and stack it on top of block 2. Then, lift the other high block twice to deposit it on top of the stairs (it will stack, so you won't get crushed under it). Finally, retrieve block 1 to reach the goal.
You need to do a lot of prep work to get off the ground before you can reach one of the doors. Start by moving the staircase at location 1 to the platforms on the left. Once you've made a staircase to climb over, climb up the vine and start dropping the blocks near location 2 off the left side, one at a time.
With each block that you drop, create a reverse staircase on the other side. You will likely crush one of the priests in the process, but it will be quickly replace. When you have all three blocks on the other side, you can use two of the to set up a staircase to the vine that also keeps the priests trapped in the lower left corner.
Climb up to block 3, lift it up and slide it over a little to the left so that you can land beside it on the right. Then climb up to location 4, turn the blocks around so that you can climb over them, and drop down to the left of block 3. Drop it to the right so that it stacks up with the staircase below you.
Now drop down to that staircase, climb down, travel across the platform to the right, and back up the other side to the right-most vines. Climb up to location 5. Begin to drop each of these blocks down one by one as J blocks. As you drop each one, begin building a staircase up to the door. Once the three blocks are down, you can escape.