A succinct summary of multiplayer gameplay of Battlefield: Bad Company 2.
The following lists are a few things you should know about starting in multiplayer.
Servers & Game Modes[edit]
Upon gathering enough courage to create an account, and then to look at the server browser, a new user will be presented with a multitude of options. Just what does one look for in a server? The following two items are perhaps the most important things when looking for a server:
- Low Ping: Ping represents the amount of time it takes for your computer to communicate to the server. A server with high ping, therefore, makes navigating maps and shooting enemies very difficult.
- Good Sportsmanship: A server full of sore losers or sore winners is not fun to play on. You won't win every game; deal with it. Also be aware of clan stackers: if you choose to play on a server operated by a clan and notice that the clan members are consistently on the same team together, chances are they're just doing it to win and stroke their own egos as clan members.
Most importantly, have fun: if you're not having fun, then the game isn't worth playing. Although some will call you a ragequitter, it's generally better to ragequit than to play pointlessly. There are hundreds of other servers out there; some will be better than others, but most change in quality as people enter and leave.
It's also best to be aware of the five different game modes you can be getting yourself into when you enter the server. After all, in-game players won't be as patient as the writers of this guide to explain what to do. On the other hand, unless you do something intentionally bad, chances are you'll be simply regarded as "another player" and not be singled out for being an idiot.
Unlike earlier Battlefield series, the Americans and the Russians are the only two playable factions. Aside from vehicles, helicopters, emplacements, and character appearances, the two sides are identical. Players on the American side can spawn with SVD Dragunovs just as easily as the Russians can utilize the M16. The five available game modes are:
Rush[edit]
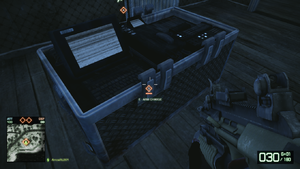
Rush is a relatively new game mode to the series. Players are split into an attacking and defending team; which team attacks and which defends depends on the map. The attacking team must disable two satellite uplinks called M-COMs (or "crates", after their Bad Company 1 equivalent), while the defenders obviously must prevent the M-COMs from falling to the enemy. The attacking team has three ways of destroying the M-COMs:
- Picking away at the M-COM's rather large health bar via tank shells, C-4 charges, or other explosives.
- Running up to the M-COM and holding down the action button to set a charge. After approximately 30 seconds, the M-COM explodes. The defending team may disable the charge in the same manner you set it.
- Burying the M-COM in a pile of rubble by collapsing the building it is in around it. This can be easily accomplished by destroying the outer walls of the building the M-COM is in (the interior walls are invincible).
The attacking team has a limited number of tickets, with each ticket representing a new life. When the ticket count reaches zero, the defending team wins. The defending team, on the other hand, can die as many times as they'd like, with the only penalty being the respawn timer. The attacking team starts with approximately 75 tickets and receive more when both M-COMs are destroyed. When both are destroyed, the attackers conquer the defender's base and are allowed to spawn there instead of their usual spawn. The defenders are forced to fall back to protect the next set of M-COMs. The number of fall back points the defenders have depends on the map.
Conquest[edit]
The game mode that has been with the Battlefield series since the beginning, Conquest has changed very little from the previous games. Conquest gameplay focuses around a series of flags that must be captured. Capturing a flag allows friendlies to spawn from it. Capturing more than half of the flags causes the opposing team's ticket count to start falling on its own, even if no one is dying. The first team who has their ticket count reach zero loses.
Flags have a relatively small capture radius, but they can be captured by vehicles just as easily as by infantry. However, the capture process is accelerated the more people that are capturing the flag.
Squad Deathmatch[edit]
Unlike the other two listed modes, squad deathmatch has a fixed number of total players. The sixteen players are split into four squads of four players each. The four squads then fight each other for kills, the winning team being the first team to reach 50 kills. Due to there being only three friendlies on the map, this game mode requires far more cooperation than other game modes to be victorious.
Squad Rush[edit]
Squad rush has the smallest number of players, with a maximum of only eight. Like the standard rush mode, the attacking team must destroy an M-COM station in order to proceed, while the defenders must protect their M-COM station and kill the attackers until they run out of tickets. The key differences from standard Rush to Squad rush are:
- 1 M-COM Station per base.
- Maps are much smaller than on Rush.
- Only 20 reinforcement tickets for attackers.
- Exclusion of any vehicles
Onslaught[edit]
Onslaught is a console-exclusive co-op mode. Rather than fight other players, Onslaught has four players, all on a single side, fighting for survival against a never-ending wave of enemy AI. Each map has a dedicated gameplay focus: for example Atacama Desert tests players' ability to use vehicles while Nelson Bay is centered around infantry action.
Attempts to port this game mode to PC players have ended, and this mode is unavailable for those playing the PC version of this game.
Squads[edit]
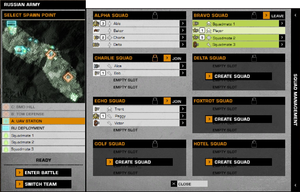
As mentioned above, players are also separated into squads as well as sides. A squad is a small team of four players who work closer together with each other than other players. One of the biggest boons of joining a squad is the ability to spawn on top of any of your squadmates. This makes getting to the action far easier and eliminates almost all spawn camping.
Squad members are encouraged greatly to assist each other: repairing a vehicle a squadmate is in nets 30 points instead of the usual 20. Joining a squad and then helping them can net you far more points than another player on a killing spree; reviving a squadmate actually yields more points than killing an enemy.
Joining a squad isn't necessary, but there are no disadvantages for joining one. Also, in most pick-up games, squad members don't communicate to each other at all. Instead, they read each other's movements and extrapolate what is happening; if a teammate is setting a charge on an M-COM, for example, spawning on top of him and throwing a medpack on the ground can mean the difference between an intact and a destroyed objective.
Note that if a teammate is in a vehicle, it is impossible to spawn on him if the vehicle is full.
Working as a Team[edit]
Battlefield: Bad Company 2 is very much a team game. Unlike previous iterations and other similar games, Bad Company 2 makes it a necessity to work together with people you've never met for a common goal. It has been described by some as "more like the electric slide (a four-wall line dance) than a break-dance", so do as much as you can to help your team and especially your squad. This section outlines just a few of the many ways you can cooperate with your team and help you win.
There are many other ways of helping your team out, and for those who find these explanations to be long winded, please simply refer to the scoring tables below.
Note that the following points are either extremely important concepts or items not listed in the video above.
Spotting Enemies[edit]
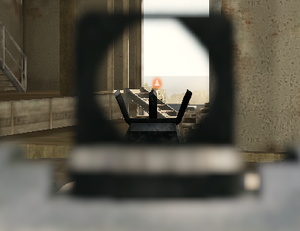
One of the refined features of the Battlefield series is the new ability to spot enemies. This feature existed as far back as the first Battlefield game, but in Bad Company 2 it is one of the most powerful abilities you have. By looking down the scope of your rifle and pressing the socialize button (see the controls), you'll be able to reveal an enemy. Revealing the enemy makes a large bright red arrow appear above the enemy's head and, as you get closer to your target, reveal exactly who it is. This effectively allows your team to know an enemy is hiding behind a wall or behind a building, and catch the target off-guard.
Spotting an enemy who is then killed by your team will net you a free 20 points for a spot assist.
Vehicles also do a good job at spotting enemies, but they generally lack the peripheral vision of infantry, making them less effective. UAVs, however, are great at spotting enemies from the air.
It is also possible to spot vehicles, UAVs, and helicopters. The 20 points for a spot assist apply to these as well as to enemy infantry.
Since in general it's hard to spot and shoot at the same time (unless you're a recon player and have the spotting scope attachment to your weapon), trying to spot an enemy leaves you rather vulnerable. Therefore try to spot enemies you can't kill quickly before opening fire on them. Also be sure to spot enemies who are attempting to flank your team's position, so that everyone knows right away to expect a few guys creeping up from behind.
Note that it is impossible to spot any enemy who is in smoke, deployed either from vehicles with the smoke countermeasures package or from smoke grenades launched from assault classes. Spotting also is multiplayer exclusive; it isn't possible to spot enemies in single player.
Use Tracer Darts[edit]
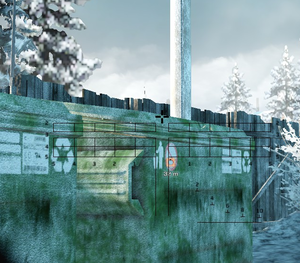
Although you won't receive the ability to plant your own tracer darts after many hours of playing, you can still use any tracer darts planted by friendlies to guide your shoulder-launched weapons to the target. Only one type of shoulder-launched missile doesn't track these darts, and that weapon won't be available until much later. To lock onto a tracer dart, use the scope on your launcher and look for a small red square. Keep your sights on it until the square becomes bright red and the distance appears.
Once the lock is obtained, you can aim and fire your launcher from any direction and the missile will loop around to track the tracer. In this sense, it is entirely possible to destroy an enemy tank from around a corner, or a fast-moving helicopter that you otherwise would have problems hitting.
Set Objectives & Calling for Help[edit]

The socialize button is context-sensitive; spotting enemies is just one of the three major points the button can do. By default it is either , ![]() , or
, or ![]() .
.
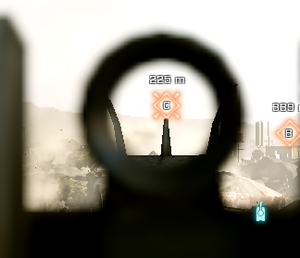
If you put your sights over an objective marker and hit the socialize button, you'll be able to set objectives for your squad. Other squadmates can set the objective as well, so don't worry about setting the objective up incorrectly. When an objective is set, 30 additional points are awarded to players who accomplish certain actions (see the points table below) within the vicinity of the objective.
The socialize button is now also tied to other commands, such as calling for pickups (aim at a friendly vehicle and press socialize), calling for a medic (aim at a medic) and calling for ammo (aim at an assault player). Be aware, however, that the notices are almost entirely vocal: although you can be sure that the other player will hear it, chances are they'll dismiss it as either ambient noise or as not directed to them. In the event you hear it, look at your minimap for a flashing icon: an arrow for a pickup, for example. You'll then be able to recognize where the person calling for a pickup is, and you'll be able to help them get to the fight faster.
A few examples of using the socialize button are listed below.
-
As a medic, aim at a wounded friendly player and hit the socialize button to let them know you have health.
-
Aim at a friendly vehicle and hit the socialize button to request a pickup.
-
Aim at a friendly Assault class and hit the socialize button to request ammo.
Multiplayer Scoring[edit]
Scoring in Bad Company 2 rewards teamwork. Even if you only manage to kill every fourth enemy that engages you, you can still help considerably by doing a lot of other things, which are listed below.
Additionally, there are many other things players can do which help their team, but don't score points. Examples include suppressing enemies using a machine gun, shelling enemy positions from afar using tanks, and destroying trees and bushes to increase line of sight.
Global[edit]
| Action | Description | Experience |
|---|---|---|
| Kill | Kill an enemy. | 50 |
| Kill Assist | Damage an enemy player who is then killed by a teammate. | 10 |
| Squad Kill Assist | Damage an enemy player who is then killed by a member of your squad. | 20 |
| Critical Kill Assist | Critically wound an enemy who is then killed by a teammate. | 30 |
| Critical Squad Kill Assist | Critically wound an enemy who is then killed by a member of your squad. | 40 |
| Spot Assist | Spot an enemy who is then killed by a teammate. | 20 |
| Parachute Kill | Kill an enemy whilst parachuting. | 30 |
| Headshot Kill | Kill an enemy with a headshot. | 10 |
| Marksman Headshot | Kill an enemy farther than 100 metres away. Bonus points are awarded for every additional metre. | 30 + |
| Double Kill | Kill two enemies simultaneously. Bonus points awarded to both kills (50 + 50 + 30) for a total of 130 points. | 30 |
| Triple Kill | Kill three enemies simultaneously. Bonus points awarded to all three kills (50 + 50 + 50 + 50) for a total of 200 points. | 50 |
| Multi Kill | Kill more than four enemies simultaneously. Bonus points awarded to all kills (50 + 50 + 50 + 50 + 100) for a minimum of 300 points, plus 50 more points for every other kill. | 100 + |
| Avenger Kill | Kill an enemy who has recently killed a teammate. | 50 |
| Saviour Kill | Kill an enemy who was damaging a teammate. | 50 |
| Suicide | Kill yourself in any way. | -10 |
Vehicles[edit]
| Action | Description | Experience |
|---|---|---|
| Driver Kill Assist | While a passenger, the driver kills an enemy. | 30 |
| Driver Squad Kill Assist | While a passenger, your squadmate (who is driving the vehicle you are in) kills an enemy. | 50 |
| Passenger Kill Assist | While driving a vehicle, one of your passengers kills an enemy. | 30 |
| Passenger Squad Kill Assist | While driving, your squadmate (who is a passenger in your vehicle) kills an enemy. | 50 |
| Vehicle Damage | Deal a certain amount of damage to an enemy vehicle. | 30 |
| Vehicle Destroy | Destroy an occupied or recently occupied enemy vehicle. | 100 |
| Vehicle Destroy Assist | Assist in the destruction of an occupied or recently occupied enemy vehicle. | 30 |
| Tracer Dart Plant | Hit an enemy vehicle using the tracer dart pistol. | 30 |
| Tracer Dart Assist | A teammate damages an enemy vehicle you've hit with the tracer dart pistol. | 10 |
| Tracer Dart Kill Assist | A teammate destroys an enemy vehicle you've hit with the tracer dart pistol. | 20 |
| Squad Tracer Dart Assist | A squadmate damages an enemy vehicle you've hit with the tracer dart pistol. | 20 |
| Squad Tracer Dart Kill Assist | A squadmate destroys an enemy vehicle you've hit with the tracer dart pistol. | 40 |
Kit Support[edit]
| Action | Description | Experience |
|---|---|---|
| Resupply | A teammate receives ammunition from your deployed ammo box. | 10 |
| Squad Resupply | A squadmate receives ammunition from your deployed ammo box. | 20 |
| Repair Vehicle | Repair a friendly vehicle. | 20 |
| Squad Repair | Repair a squadmate's vehicle. | 30 |
| Heal | A teammate receives health from your deployed medkit. | 10 |
| Squad Heal | A squadmate receives health from your deployed medkit. | 20 |
| Revive | Revive a downed teammate with the defibrillator. | 50 |
| Squad Revive | Revive a downed squadmate with the defibrillator. | 80 |
| Motion Sensor Assist | A teammate kills an enemy within your motion sensor's tracking radius. | 20 |
| Squad Motion Sensor Assist | A squadmate kills an enemy within your motion sensor's tracking radius. | 30 |
Squad[edit]
| Action | Description | Experience |
|---|---|---|
| Squad Kill Order | An active action (kill, etc) within an attack order radius. | 30 |
| Squad Defend Order | An active action (kill, etc) within a defend order radius. | 30 |
Conquest[edit]
| Action | Description | Experience |
|---|---|---|
| Flag Capture | Capture an enemy or neutral flag. | 150 |
| Flag Capture Assist | Assist in the capture of an enemy or neutral flag. | 75 |
| Flag Defence | Kill an enemy while they are attempting to capture your flag. | 30 |
Rush/Squad Rush[edit]
| Action | Description | Experience |
|---|---|---|
| Objective Damage | Damage an enemy M-COM station. | 50 |
| Team Objective Damage | Damage your own M-COM station. | -100 |
| Objective Destroyed | Destroy an enemy M-COM station. | 250 |
| Team Objective Destroyed | Destroy your own M-COM station. | -250 |
| Objective Arm | Set a charge on an enemy M-COM station. | 50 |
| Objective Disarm | Defuse a charge set on a friendly M-COM station. | 30 |
| Defence Kill | Kill an enemy player close to your M-COM station. | 30 |
| M-COM Defend Kill | Kill an enemy player attempting to set a charge on a friendly M-COM station. | 30 |
| M-COM Attack Kill | Kill an enemy player attempting to defuse a charge set on an enemy M-COM station. | 30 |
Multiplayer Maps[edit]
As with all of the Battlefield games, the multiplayer gameplay is where the game truly shines. Due to the complexity of multiplayer, it is virtually impossible to create reliably winning strategies in public games. The best this guide can do, therefore, is provide what little information about each of the maps that remain constant.
There are four game modes - Rush, Conquest, Squad Rush, and Squad Deathmatch.
The following table outlines which maps are available in which game modes.
| Name | Conquest | Rush | Squad Deathmatch | Squad Rush |
|---|---|---|---|---|
| Panama Canal | Yes | No | Yes | Yes |
| Valparaiso | No | Yes | No | Yes |
| Isla Inocentes | No | Yes | No | Yes |
| Atacama Desert | Yes | Yes | No | Yes |
| Arica Harbour | Yes | Yes | Yes | No |
| White Pass | Yes | Yes | Yes | No |
| Laguna Presa | Yes | Yes | Yes | Yes |
| Port Valdez | Yes | Yes | No | Yes |
| Nelson Bay | Yes | Yes | Yes | No |
| Laguna Alta | Yes | No | No | Yes |
| Oasis | Yes | Yes | Yes | Yes |
| Harvest Day | Yes | Yes | Yes | Yes |
| Cold War | No | Yes | Yes | Yes |
| Heavy Metal | Yes | No | Yes | Yes |
Multiplayer Classes[edit]
As with nearly every other first person shooter out there, players can choose to become one of several distinct classes. Each aids the team in a different way, though it's possible to change the strengths and weaknesses of each class considerably by changing weapons. For more details, see the weapon comparison.
Assault[edit]
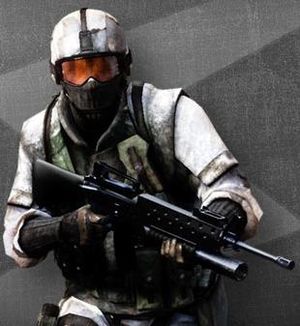
For reliability at all ranges, look no further than the Assault class. Assault-class weapons consist of automatic or semiautomatic assault rifles. These weapons are highly effective at all but the longest of ranges. Assault weapons are best fired in bursts, and some weapons - like the AN-94 and the M16 - fire in bursts for you. That said, going all automatic can be quite effective in close quarters, as assault rifles are generally quite accurate unscoped, unlike the medic's machine guns or the recon's sniper rifles.
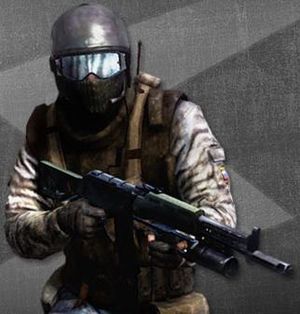
All assault-specific weapons have an under-barrel munitions launcher. A new player will only have access to the 40mm grenade launcher, but the launcher is quite effective. Its most common use is to destroy buildings and other obstructions for various purposes; for example, to clear a sight line for a machine gun, or to remove a sniper's cover. It can also fire smoke grenades effective at providing cover for players tending to an objective and to remove tracer darts from friendly vehicles. The smoke grenade can also kill enemies on a direct hit. Finally, it can also be used as an under-barrel shotgun, providing a single dose of lethal close-range firepower.
When equipping a weapon unequipped with a 40mm attachment such as a shotgun, the G3, the M14, or the M1 Garand, the Assault class equips the same C4 charges as the recon class. This gives them additional anti-armour capability up close.
Official Description: The tip of the spear in any offensive, Assault grunts typically carry heavy combat rifles and grenade launchers to quickly clear a path.
Strengths: Well rounded kit; ammo resupply
Weaknesses: Limited anti-armour capability
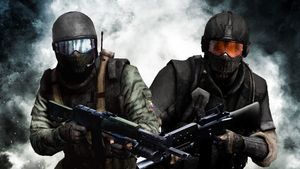
Players who have purchased the SPECACT DLC may choose to use the ordinary assault class, as seen above, or they may opt to use the SPECACT version of the kit, shown left. Although appearance is the only difference, the US SPECACT's darker tan sleeves and black vest make the player slightly less visible on desert maps. It does, however, make the player stand out on winter maps.
Russia's SPECACT green sleeves provide slightly better concealment on forest maps. The vest doesn't change much and the visor's colour remains the same.
Players who use the SPECACT version of the Assault class are not limited to the M16A2 SPECACT. Assault SPECACT players may select any weapon available to the ordinary Assault class. Similarly, the M16A2 SPECACT may be equipped by the standard Assault class as well.
Engineer[edit]
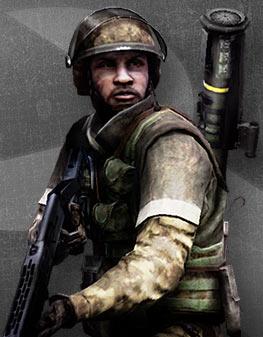
The Engineer class isn't the greatest in a fight, but they can definitely hold their own. Submachine guns are generally on the weaker side when compared to assault rifles and their high rate of fire precludes effectiveness at long range, but SMGs are about even with assault rifles in closer quarters. The Engineer class generally specializes with vehicles - either bringing them up to the fight or taking them down when they arrive. This class doesn't help the team directly as is the case with the recon's motion sensors or the health and ammo packs brought to the table by the medic and assault classes, but instead helps the team be secure against armoured and aerial threats.
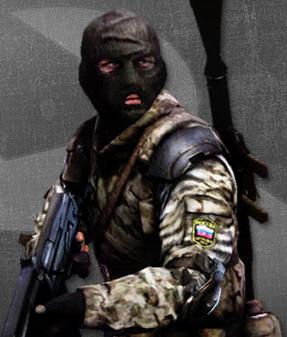
For taking down vehicles from a distance, look no further than the Engineer's RPG-7. The RPG-7 fires a rocket that can be dodged relatively easily by infantry, but it packs quite a wallop when it hits. To make aiming easier, it is compatible with tracer darts. Once a target (vehicle or a human) is hit with the tracer dart pistol, the RPG-7 can lock onto it. Once locked the launcher can be aimed in any direction and the rocket will loop around to acquire the painted target. The M2 Carl Gustav is similar in almost all aspects to the RPG-7, but its rocket flies faster, has a larger splash radius, and causes less damage. For times when tracer darts are unavailable, the M136 AT4's missile flies where the player is looking. It causes about as much damage as an RPG-7, but can't lock onto tracer darts since it uses its own homing system.
The engineer class can also equip landmines instead of the aforementioned rocket launchers. Mines are extremely powerful, and only one or two is enough to destroy a tank. Mines are also effective when placed at side entrances to destroy flanking quad bikes. Mines can be "defused" by either side by shooting them. Mines are capable of distinguishing friend from foe, and can therefore be placed on friendly vehicles without consequence.
The engineer is obviously also tasked at keeping friendly vehicles in good health. Repairing a friendly vehicle is possible with the repair tool. Using it on a vehicle gives it health for a good six seconds before overheating. On the other hand, however, it can also be used to damage and destroy enemy vehicles at close range. It can even be used on enemy infantry in place of the knife. The knife, however, is far more practical and the repair tool is often used for humiliation kills.
Official Description: Combat mechanics who are equally adept at repairing friendly vehicles and destroying enemy armor. Engineers pack SMGs for human targets.
Strengths: Anti-armour specialist; vehicle repair
Weaknesses: Limited anti-infantry capability
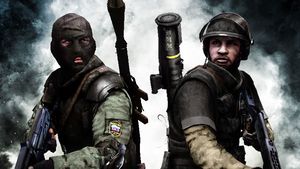
Players who have purchased the SPECACT DLC may choose to use the ordinary Engineer class, as seen above, or they may opt to use the SPECACT version of the kit, shown left. Although appearance is the only difference, the US SPECACT's darker tan sleeves and black vest make the player slightly less visible on desert maps. It does, however, make the player stand out on winter maps.
Russia's SPECACT green sleeves provide slightly better concealment on forest maps. Neither the vest nor the balaclava change considerably from the standard kit.
Players who use the SPECACT version of the Engineer class are not limited to the UMP-45 SPECACT. Engineer SPECACT players may select any weapon available to the ordinary Engineer class. Similarly, the UMP-45 SPECACT may be equipped by the standard Engineer class as well.
Medic[edit]
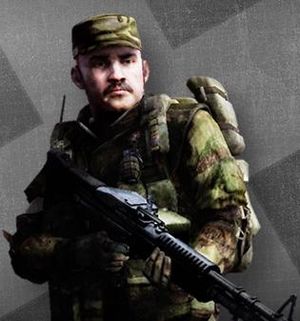
Medics are similar in a few ways to the Medic class in that their weapons are best used at medium to long distances. Instead of carrying an assault rifle or a submachine gun, however, medics carry machine guns and squad assault weapons. A medic's machine gun is unique in that it is designed to be fired at full auto; it is said that the weapon gains accuracy the longer you shoot it. Firing a machine gun in close quarters, however, is not recommended; its accuracy is even worse than that of the assault class' assault rifles. The medic is best played as a mobile machine gun, always using the scope to engage enemies at longer ranges. As such, scopes are often a good idea.
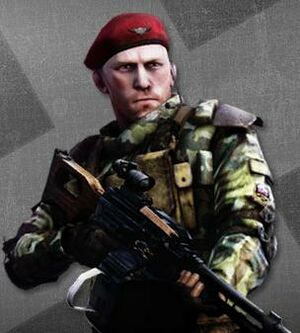
Aside from a few quirks the machine gun has, the medic plays rather similarly to the assault class. The similarities stop, however, at where the medic class obtains its name. Instead of throwing down ammunition for friendlies, the medic throws down health packs that heal 200 health before disappearing. These packs are often best thrown behind cover, where players are often heavily wounded and can take a break before fighting again. These health packs can easily turn the tide of a fight.
The defibrillator is the medic's primary gadget. By using it on a downed ally with a lightning bolt figure, a medic is able to bring a teammate back to life. Not only does this interrupt the respawn queue (having to wait considerably less time to get back in the fight) but it also gives back the team's reinforcement tickets. Reviving teammates brings in a lot of points; resurrecting a player who is on your squad is worth more points than killing an enemy.
Unfortunately, Medics are the least threatening player class to enemy armoured vehicles. Medics have no explosive weapons aside from their grenades and cannot equip the C4 charges the Assault and Recon classes have.
Official Description: The Hippocratic Oath takes a back seat to these field medics, who carry pills and defibrillators for friendlies and a light machine gun for all others.
Strengths: Solid anti-infantry kit; heal and revive
Weaknesses: Limited anti-armour capability
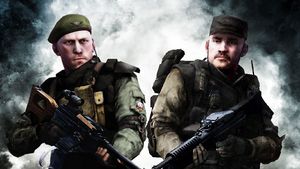
Players who have purchased the SPECACT DLC may choose to use the ordinary assault class, as seen above, or they may opt to use the SPECACT version of the kit, shown left. Although appearance is the only difference, the US SPECACT's darker tan sleeves and black vest make the player slightly less visible on desert maps. It does, however, make the player stand out on winter maps.
Russia's SPECACT green sleeves provide slightly better concealment on forest maps. The vest doesn't change much and the visor's colour remains the same. The Medic's hat, however, is changed from an obvious red to a considerably less obvious green. A lot of players choose to obtain the SPECACT kit just to remove the Russian Medic's red hat.
Players who use the SPECACT version of the Medic class are not limited to the MG3 SPECACT. Medic SPECACT players may select any weapon available to the ordinary Medic class. Similarly, the MG3 SPECACT may be equipped by the standard Medic class as well.
Recon[edit]
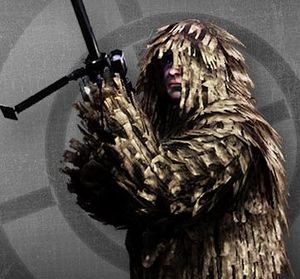
Most players play the recon class as a dedicated sniper. However, the recon class is also needed up on the front lines as well as in the back. The semiautomatic sniper rifles, such as the Type 88, have weaker zooms and are used as a designated marksman role; that is, to shoot accurately at shorter distances than a dedicated sniper would usually. The designated marksman is also a part of a squad, unlike a sniper who usually works alone or with a spotter. The recon class can be both. Although the stated weakness of the recon class is close-quarters combat, recon players become considerably more dangerous up-close if they choose a shotgun as a weapon.
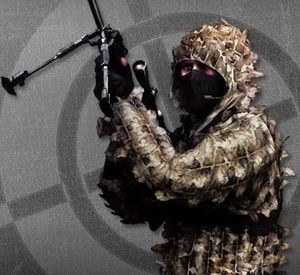
The most commonly used recon gadget is the motion sensor. The small sphere broadcasts the location of enemies close to it, allowing a player to be prepared for them. On the other hand, the device also makes a very distinctive beeping sound, so it is easy for a player to know he is being tracked. The motion sensor does not perform spotting, and it will not give an exact position of the enemy visually; the enemy is revealed only on the map. Naturally, the motion sensor spots tanks as well as other players.
The other piece of equipment that recon players carry is situational in nature. Starting players begin with C4 charges, which are the strongest explosive in the game. They are easily laid by "firing" them at terrain or enemy players, either of which the explosive will adhere to. They can then be remotely detonated to put a major dent into whatever is near it. A single strip of C4 is enough to destroy any vehicle; two will eliminate a T-90 or an Abrams.
Alternatively, recon players can forgo the power of C4 and choose the range of the mortar strike. The specially-issued binoculars allow a recon player to call a mortar strike on whatever the player is observing. It takes roughly three seconds to trigger the strike, however, leaving the recon player open to sniper fire. Additionally, the mortar strike only is triggered when things are completely still. If the binoculars are aimed at a stationary tank that moves, the lock is broken and the three-second countdown is reset. Mortar strikes are therefore best aimed at the terrain close to the target, or at a tank whose driver is more occupied at aiming at a distant target than driving around. The mortars themselves don't have too much splash damage and only eight mortars are called in per strike, but mortars drop down at 90 degree angles, allowing you to aim at the enemy's cover and have a few mortars hit behind it. Additionally, the binoculars are completely silent and do not leave a vapour trail, unlike most sniper rifles.
Official Description: Masters of stealth, Recon specializes in sniping tangos, sabotaging vehicles with C4, or calling in mortar strikes via special binoculars.
Strengths: Long range/Explosives specialist
Weaknesses: Slow-firing; vulnerable in close quarters
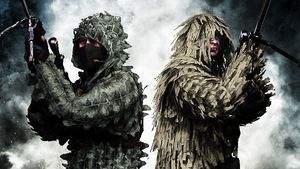
Players who have purchased the SPECACT DLC may choose to use the ordinary Recon class, as seen above, or they may opt to use the SPECACT version of the kit, shown left. Although appearance is the only difference, the US SPECACT's darker tan suit makes the player slightly less visible on desert maps. It does, however, make the player stand out on winter maps.
Russia's SPECACT green suit provide slightly better concealment on forest maps. The shade of green, however, does stand out in a winter map.
Players who use the SPECACT version of the Recon class are not limited to the M95 SPECACT. Recon SPECACT players may select any weapon available to the ordinary Recon class. Similarly, the M95 SPECACT may be equipped by the standard Recon class as well.


