Vehicles have separated the Battlefield series from other games. Since the beginning, players have been able to enter tanks, planes, and ships at will and use them to play the game considerably differently each time. Bad Company 2 has continued that tradition, though not to the same extent. Air vehicles are restricted to rotary-winged aircraft. Although F/A-18s, A-10s, and the occasional transport plane appear, none of them are flyable.
Vehicles, just like weapons, gain stars. Unlike weapons, however, stars are awarded by category - obtaining 7 kills with a Humvee and 3 kills with a Vodnik will earn the bronze star for all vehicles in the light vehicle category. The number of kills required for each category is listed to the right of each vehicle category.
Light[edit]
 |
 |
 |

|
10 |
25 |
50 |
500
|
Light Vehicles are perhaps one of the hardest vehicles to manage, primarily due to their lack of health and the vulnerability of machine gunners to sniper attacks.
Light vehicles are all extremely fast and are difficult to aim at. As such, the largest vehicles can be used to try and obtain the Wheels of Hazard pin.
Light vehicles come in two main flavours. Armoured cars consist of the US Humvee and the Russian Vodnik and Cobra. The Cobra is the more common of the two Russian cars and appear on desert maps. The Vodnik replaces the Cobra for arctic maps. There is very little difference between the three armoured cars and are virtually interchangeable.
HMMWV 4WD[edit]
 | |
| Health | 500 |
|---|---|
| Weapon | XM312 Machine gun |
| Weapon Stats | 16.7 to 25 damage at 550 rpm |
| Capacity | 4 (driver, gunner, passengers) |
| Speed | Fast |
| Manoeuvrability | High |
| Appearances | Laguna Presa (Rush) Arica Harbour (Rush) Atacama Desert (Conquest) Oasis (Conquest) Atacama Desert (Onslaught) |
The HMMWV (High Mobility Multipurpose Wheeled Vehicle), more colloquially known as the Humvee, is a vehicle often underused due to its many vulnerabilities. It is equipped with an XM312 machine gun, effective against infantry. Although a variant which contains a BGM-71 TOW missile launcher is seen in single player, it is unavailable to the player outside of the console-specific Onslaught mode.
Humvees are often ignored by players for two major reasons. The first is the vulnerability of the gunner to sniping weapons. Since the Humvee drives at such a considerable speed, it can prove difficult to aim its machine gun at passing infantry, all the while providing enemy snipers a clear view on the gunner. Even the driver can be killed if a lucky shot is scored.
The other reason humvees are ignored are due to their fragility. Only a single shot from a tank is enough to destroy a humvee, and these lightly-skinned vehicles only appear on vehicle-centric maps where main battle tanks dominate. Even without the tanks, however, a well-aimed M2 Carl Gustav shot or an RPG-7 will be more than enough to eliminate a Humvee, and their speed can be negated via a tracer dart.
Humvees seat four players - a driver, a gunner, and two passengers: one of whom sits in the back and can use standard weapons and the other sits in the passenger's seat of the Humvee and can use nothing.
The multiplayer map Laguna Presea can prove effective for players wanting to safely use a Humvee - if positioned close to the bridge leading toward the Russian spawn point, it can effectively support friendlies from this position. It is, however, quite vulnerable to rockets from this position. Arica Harbour can also be effective for Humvees, where they can exploit the up-close vulnerability of snipers after using their speed to run past the tanks.
Official Description: High Mobility Multipurpose Wheeled Vehicle (HMMWV or Humvee) with 4WD capability is used as a personnel and light transport truck by all branches of the U.S. Military. It seats four and is armed with a .50 caliber Heavy Machine Gun (HMG) in a 360-degree weapons ring mount.
Cobra 4WD[edit]
 | |
| Health | 500 |
|---|---|
| Weapon | KORD Machine gun |
| Weapon Stats | 16.7 to 25 damage at 550 rpm |
| Capacity | 4 (driver, gunner, passengers) |
| Speed | Fast |
| Manoeuvrability | High |
| Appearances | Atacama Desert (Rush) Oasis (Conquest) Atacama Desert (Conquest) |
The Cobra is more or less identical to the American Humvee, and appears on desert maps. Like the Humvee, it is extremely thin-skinned, and cannot take much of a beating. It can be used as a mobile emplacement to try and take down helicopters, but this leaves the gunner vulnerable to sniper fire. The Cobra's speed and large size make it an appealing target, and therefore can be often used as a distraction to enemies attempting to leave their spawn point.
The high capacity of the Cobra allows it to act as a troop transport. It can carry a lot more players than the Quad Bike and has a lower centre of gravity, making it far more stable in hilly terrain. Since the Cobra can seat 4, an entire squad can spawn inside it. By flanking the enemy similar to a quad bike, the Cobra can allow for easy flanking attacks by allowing the squad to spawn inside it and then hop out to attack the enemy base.
Using the vehicular armour specialization can prove effective for Cobras, Humvees, and Vodniks, as it allows them to withstand a single rocket or tank shell. The specialization isn't enough to deter mines and C4, however, which will still destroy the vehicle in a single hit.
Note that although in-game the Cobra appears to be able to seat 5 players, it can only seat 4.
Official Description: A light armored 4WD vehicle utilizing Humvee components, the hull is designed to increase protection against small arms fire and indirect artillery bursts. It is armed with a .50 caliber Heavy Machine Gun and configured to seat 4.
Vodnik 4WD[edit]
 | |
| Health | 500 |
|---|---|
| Weapon | KORD Machine gun |
| Weapon Stats | 16.7 to 25 damage at 550 rpm |
| Capacity | 4 (driver, gunner, passengers) |
| Speed | Fast |
| Manoeuvrability | High |
| Appearances | Port Valdez (Rush) Valpariso (Onslaught) |
Though commonly found in single player, the Vodnik is almost never found in multiplayer. It is identical except aesthetically to the HMMWV and the Cobra. Follow standard tactics when using the Vodnik. As its main appearance is in Port Valdez, special care must be taken to avoid the Bradley IFV and enemy engineers. The armour specialization can help considerably with this vehicle given its main appearance in a vehicle-centric map.
Official Description: High Mobility Multipurpose Combat Vehicle with 4WD. It seats 4 and is armed with a 12.7mm caliber HMG in a 360 degree turret.
Quad Bike[edit]
 | |
| Health | 250 |
|---|---|
| Weapon | Passenger's weapon |
| Capacity | 2 (driver, passenger) |
| Speed | Fast |
| Manoeuvrability | Medium |
| Appearances | Nearly all maps |
The Quad Bike is a disposable vehicle designed to traverse a lot of distance quickly. It has the least amount of health of all the major vehicles and only carries two people. The passenger, who sits on the back, can use his or her weapon while the driver is delegated to driving the vehicle.
Obviously not a combat vehicle in any way, the Quad Bike is mostly used to flank opponents during Rush games. As most will be focused on an attack from the front, it can be relatively easy to get in around the back. A simple two-man team can, with enough teamwork, set a charge on an M-COM and force the defenders closer to their objectives, allowing the rest of the team to take ground.
Because Quads are so fast, their manoeuvrability is not the best. They fly off of the smallest hills and have a relatively high centre of gravity, making them difficult to control. Their small size makes them poor roadkillers.
Since empty vehicles leave icons on the minimap, it can be prudent to destroy your vehicle when you can, or at least drive it off the map so it can't be easily spotted on the enemy's minimap. Defenders often observe their maps and locate vehicles that appear to be out of place.
Official Description: An Ultra-light Tactical Vehicle used in combat, reconnaissance and logistic support. It allows 2 individuals to increase their mission effectiveness by assisting in moving over any terrain, in all weather and at any altitude.
CAV[edit]
 | |
| Health | 500 |
|---|---|
| Weapon | XM307 Auto Grenade Launcher XM312 Machine Gun |
| Weapon Stats | Grenade Launcher: 30-60 damage at 200 rpm Machine Gun: 25-16.7 damage at 550 rpm |
| Capacity | 4 (driver, 2 gunners, 1 passenger) |
| Speed | Fast |
| Manoeuvrability | Medium |
| Appearances | Port Valdez (Conquest) Heavy Metal (Conquest) Harvest Day (Conquest) Nelson Bay (Onslaught) |
The CAV is basically a heavier Quad Bike; it accelerates slower but does have a higher total speed and a considerably lower centre of gravity, making it far more manoeuvrable and responsive. The grenade launcher can turn to face any direction, but the speed of the CAV prevents its effective use against enemies to the side. The machine gunner has very little arc, and anything it can hit can also be roadkilled by the driver.
Because of Harvest Day's wide open terrain, this vehicle is ideal for zipping around and running circles around tanks. It can also roadkill any enemy snipers, making this a great vehicle to get both the Car Warfare pin and the Wheels of Hazard pin.
Outside of Harvest Day, however, the CAV is less useful. Its speed is its only defence, and in the far tighter quarters of Port Valdez and the vehicle-centric Heavy Metal it often comes under fire too often to survive.
M939 Truck[edit]
 | |
| Health | Unknown |
|---|---|
| Weapon | Passengers' weapons |
| Capacity | 4 (driver, passengers) |
| Speed | Medium |
| Manoeuvrability | Medium |
| Appearances | Cold War (Rush) |
Most likely added for consistency's sake on the multiplayer version of Cold War, the truck is next to useless on this map as it has very little armour and has no inherent weapons. It is also extremely slow and can be easily destroyed in the cramped close-quarters combat that is Cold War. It spawns close to the Russian team's spawn. To access it, the Russians must simply follow the path from their spawn. It is to the left just before a sharp right turn into the town.
Heavy[edit]
|
|
|
|
10 |
25 |
50 |
500
|
Heavy vehicles are by far the most common vehicle and will be the source of most of your vehicular kills throughout multiplayer gameplay. Heavy vehicles come in two major flavours - infantry fighting vehicles and main battle tanks.
The former, often abbreviated to IFV, are notable for their high capacities and their autocannons. Autocannons fire considerably faster than a tank's main gun, but it causes considerably less damage. IFVs are also bristling with machine guns; one remotely operated on a 360 degree mount, and two gun ports to the sides. A fully-loaded IFV is next to impossible to attack stealthily and must be destroyed with long-ranged anti-tank weapons. Because all the guns on an IFV are remotely operated (or heavily armoured in the case of the side machine gunners), the gunners are immune to sniper fire.
A subcategory of IFVs are self-propelled anti-aircraft guns. Mobile AA guns are equipped with grenade launchers instead of autocannons, and the main gunner has an anti-aircraft weapon instead of a machine gun. Needless to say, mobile AA is effective against enemy helicopters.
Main battle tanks, by default, have only a remote machine gunner (and thus, as aforementioned, is immune to sniper fire) and a main gunner who also drives the tank. Unlike previous games, the driver does not have a coaxial machine gun; the driver must equip the Alternate Weapons specialization in order to obtain one. Tanks are best operated from a safe distance, as with only a single gunner and usually no coaxial weapon, are vulnerable in close quarters to C4. An anti-tank mine or two will also destroy a tank.
There are three unused vehicles shown in the game's graphics fankit. They are the American ACV-S anti-aircraft vehicle and two MEC vehicles from the first game. They do not appear at all during the game and no other information is available on them. Though they could appear at some point in the future, this seems unlikely.
-

US ACV-S anti-aircraft infantry fighting vehicle
-
MEC Stalker infantry fighting vehicle
-
MEC Black Eagle main battle tank


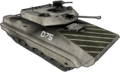
BMD-3 Bakhcha[edit]
 | |
| Health | 1250 |
|---|---|
| Weapon | Driver: Autocannon Passenger: Machine gun Side Gunners: Machine gun ports |
| Weapon Stats | Autocannon: 30-60 damage at 200 rpm Gunner: 16.7 to 25 damage at 550 rpm Side Gunner: 11.5 to 12.5 damage at 750 rpm Alternate Weapon: 100 (525 damage vs vehicles) per rocket |
| Capacity | 4 (driver, gunner, side gunners) |
| Speed | Medium |
| Manoeuvrability | Medium |
| Appearances | Panama Canal (Conquest) White Pass (Conquest) Laguna Presa (Conquest) Laguna Alta (Conquest) Valparaiso (Onslaught) Atacama Desert (Onslaught) Nelson Bay (Onslaught) Isla Inocentes (Onslaught) |
The BMD-3 is a powerful and flexible vehicle primarily effective against infantry. Its armour isn't the best and it takes considerable damage from anti-tank infantry and stationary AT weapons, but its high elevation allows it to act as an anti-aircraft emplacement in the event of an aerial attack.
Choosing the alternate weapon package specialization will equip this vehicle with a KORNET anti-tank missile launcher, giving it an added punch against enemy armour. This missile is quite powerful and often means the difference between victory and defeat in a fight against an Abrams.
The gunner gains control of a remotely operated rooftop machine gun. Since the machine gun is operated from inside the tank, it is impossible for snipers to snipe the gunner. The 360 degree arc the machine gun has allows a BMD to attack several enemies at once. However, the 360 gunner cannot angle the gun low to strike enemies close to the tank, allowing it to be easily flanked.
This flanking weakness is mitigated by the introduction of side gunners, who can use built-in machine guns to the left and right sides of the tank to prevent flanking attacks. The side gunners don't cause as much damage as the 360 degree machine gun, but the difference is negligible.
M3A3 Bradley[edit]
 | |
| Health | 1250 |
|---|---|
| Weapon | Driver: Autocannon Passenger: Machine gun Side Gunners: Machine gun ports |
| Weapon Stats | Autocannon: 30-60 damage at 200 rpm Gunner: 16.7 to 25 damage at 550 rpm Side Gunner: 11.5 to 12.5 damage at 750 rpm Alternate Weapon: 100 (525 damage vs vehicles) per rocket |
| Capacity | 4 (driver, gunner, side gunners) |
| Speed | Medium |
| Manoeuvrability | Medium |
| Appearances | Laguna Presa (Rush) Isla Inocentes (Rush) Valparaiso (Rush) Port Valdez (Rush) Laguna Alta (Conquest) White Pass (Conquest) Panama Canal (Conquest) All maps (Squad Deathmatch) |
The Bradley is identical in all respects to the BMD, the only difference being the green crosshairs that are generally less obtrusive as the BMD's. Like the BMD, the Bradley can be equipped with a TOW launcher capable of putting considerable dents in enemy armour. Since the Bradley appears in non-vehicular maps such as Valparaiso Rush, this specialization's use is far more situational.
As with the BMD, the Bradley's autocannon causes considerable damage to infantry, but not as much against a tank. A fight between a Bradley and a T-90 generally leans toward the T-90. Tactical use of specializations, as well as a missile upgrade, can help even the odds or even tilt them in the Bradley's favour.
The Bradley appears in Squad Deathmatch games as a neutral vehicle, able to be claimed by any of the four squads.
BMD-3 Bakhcha AA[edit]
 | |
| Health | 1250 |
|---|---|
| Weapon | Driver: Grenade Launcher Passenger: ZU-23 AA Gun Side Gunners: Machine gun ports |
| Weapon Stats | Grenade Launcher: 30-60 damage at 200 rpm (6 grenades per volley) Gunner: 25-16.7 damage at 550 rpm Alternate Weapon: 12.5-11.2 damage at 750 rpm |
| Capacity | 4 (driver, gunner, side gunners) |
| Speed | Medium |
| Manoeuvrability | Medium |
| Appearances | Port Valdez (Rush) |
An anti-aircraft variant of the BMD-3, this vehicle makes only one appearance at Port Valdez. It isn't particularly powerful, as its main weapon is passenger controlled and doesn't cause a lot of damage against vehicles. Its main power, as its appearance suggests, is against the AH-64 Apache and UH-60 Blackhawk helicopters the Americans have. The ZU-23 mounted on the roof has a full 360 degree arc and has very high elevation, allowing it to easily shoot down helicopters. A skilled helicopter gunner, however, can critically damage it and possibly kill the gunner before he can shoot the heli down.
The solution, therefore, is to attempt to hide it in a position so that it is able to cause damage to the heli after it makes a pass over the advancing armoured column. If spotted early by the helicopter, it can be easily destroyed. Although a helicopter can take many shots before it goes down, it is by far the most reliable way of clipping the wings of a helicopter. KORNETs, TOWs, and AT4 missile launchers require extreme skill and luck to score a hit and tracer darts can be removed by the oft-equipped smoke countermeasures specialization. Stationary machine guns, while effective, are generally either vulnerable to sniper fire or have a very limited arc. The BMD-3's AA abilities, therefore, are second to none.
Against ground threats, this anti-aircraft vehicle isn't a slouch. Its grenade launcher is identical in terms of damage to a standard BMD's autocannon. The grenade launcher, however, does not have a wide arc, making it far more vulnerable to flanking attacks if on its own. The side gunners help against flanking attacks considerably, but most players do not put enough importance on this vehicle to protect it.
If equipped with the alternate weapon specialization, this vehicle gains a light machine gun effective against infantry. This is generally overkill, however, as the grenade launcher already causes considerable damage and has considerable splash radius.
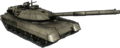
M1A2 Abrams[edit]
 | |
| Health | 1250 |
|---|---|
| Weapon | Driver: Main Cannon Passenger: Roof-mounted machine gun |
| Weapon Stats | Main Cannon: 250-875 damage at 15 rpm Gunner: 25-16.7 damage at 550 rpm Alternate Weapon: 12.5-11.2 damage at 750 rpm |
| Capacity | 2 (driver, gunner) |
| Speed | Medium |
| Manoeuvrability | Low |
| Appearances | Arica Harbour (Rush, Conquest) Atacama Desert (Rush, Conquest) Oasis (Rush, Conquest) Harvest Day (Rush, Conquest) Panama Canal (Conquest) Heavy Metal (Conquest) |
The Abrams squares off against the T-90 for vehicle dominance in the game. Both tanks are identical in terms of performance, the only difference being aesthetics and the crosshair views for both driver and gunner positions.
The Abrams is heavily armoured and packs a powerful wallop against other vehicles, assuming it can score a hit. The tank is equally at home shelling enemy positions from afar, creating confusion in the process. Its slow rate of fire and small splash radius precludes its use against enemy infantry, but it can be used to take down structures relatively easily. Its long range and powerful gun make it useful against enemy M-COMs, assuming you can score a hit.
Tanks are relatively vulnerable to flank attacks, as its driver is often fixated on his or her target to watch the sides or back. The gunner helps considerably in this respect, but it can only look in one spot at a time. Tanks are thus quite weak against C4 attacks from the side.
Most players equip the Alternate Weapon specialization for the tanks, as equipping it and getting in a tank grants it the use of a coaxial machine gun that helps considerably against enemy infantry. However, a lot of players fail to realize that this negates a lot of the tank's attacking power against another tank, should the two engage each other. A coaxial machine gun, naturally, is of limited use when engaging an enemy tank equipped with a damage boost, reload bonus, or other specialization. Enhanced optics in this tank work very well for players who want to shell enemy positions from afar.
T-90[edit]
 | |
| Health | 1250 |
|---|---|
| Weapon | Driver: Main Cannon Passenger: Roof-mounted machine gun |
| Weapon Stats | Main Cannon: 250-875 damage at 15 rpm Gunner: 25-16.7 damage at 550 rpm Alternate Weapon: 12.5-11.2 damage at 750 rpm |
| Capacity | 2 (driver, gunner) |
| Speed | Medium |
| Manoeuvrability | Low |
| Appearances | Arica Harbour (Rush, Conquest) Atacama Desert (Rush, Conquest) Oasis (Rush, Conquest) Harvest Day (Rush, Conquest) Panama Canal (Conquest) Heavy Metal (Conquest) |
The T-90 is heavily armoured and packs a powerful wallop against other vehicles, assuming it can score a hit. The tank is equally at home shelling enemy positions from afar, creating confusion in the process. Its slow rate of fire and small splash radius precludes its use against enemy infantry, but it can be used to take down structures relatively easily. Its long range and powerful gun make it useful against enemy M-COMs, assuming you can score a hit.
Tanks are relatively vulnerable to flank attacks, as its driver is often fixated on his or her target to watch the sides or back. The gunner helps considerably in this respect, but it can only look in one spot at a time. Tanks are thus quite weak against C4 attacks from the side.
Most players equip the Alternate Weapon specialization for the tanks, as equipping it and getting in a tank grants it the use of a coaxial machine gun that helps considerably against enemy infantry. However, a lot of players fail to realize that this negates a lot of the tank's attacking power against another tank, should the two engage each other. A coaxial machine gun, naturally, is of limited use when engaging an enemy tank equipped with a damage boost, reload bonus, or other specialization. Enhanced optics in this tank work very well for players who want to shell enemy positions from afar.
Water[edit]
|
|
|
|
10 |
25 |
50 |
500
|
Water vehicles are few and far between, and obtaining even the bronze star in this category is something to be proud of. Only one of the two water vehicles inherently has weapons, and it is sub-par to work with as well.
Personal Watercraft[edit]
 | |
| Health | 250 |
|---|---|
| Weapon | Passenger's weapon |
| Capacity | 2 (driver, passenger) |
| Speed | High |
| Manoeuvrability | High |
| Appearances | Laguna Presa (Rush, Conquest) Islan Inocentes (Rush) Oasis (Conquest) |
The Personal Watercraft (abbreviated to PWC) or the Jetski is essentially a Quad Bike on water. A swift disposable sea-going vessel, the PWC is capable of inserting a pair of players on an enemy shore quickly. Unfortunately the vehicle is completely defenceless, and has no windshield to protect the driver from enemy fire. Fortunately its speed plays to its advantage, and it can even roadkill careless enemies near a beach or on a rock.
Patrol Boat Light[edit]
 | |
| Health | 500 |
|---|---|
| Weapon | XM302 grenade launchers |
| Weapon Stats | Grenade Launcher: 30-40 damage at 200 rpm |
| Capacity | 4 (driver, gunners, passengers) |
| Speed | High |
| Manoeuvrability | High |
| Appearances | Laguna Presa (Rush) Islan Inocentes (Rush) Oasis (Rush) |
The light patrol boat is generally not that great of a vehicle. Although it's armed with a pair of grenade launchers that cause considerable damage to any enemies that appear, it is a large target that can be easily hit by a rocket. The drivers and gunners are very vulnerable to snipers as well. The fourth player can use whatever weapons are available to him, but most players simply use the patrol boat as a landing craft.
That said, however, not a lot of players expect the PBL to be a threat, and will often forget about its presence, especially in Oasis. This enables players to attempt to sneak through the river and potentially get the bronze star this way.
Air[edit]
|
|
|
|
10 |
25 |
50 |
500
|
Unlike land and sea vehicles, which are identical to regardless whichever side you're playing as, helicopters perform differently; a UH-60 Blackhawk performs far differently than the Mil-24 Hind, its Russian counterpart. Helicopters come in two flavours - gunship helicopters (also known as transports) and attack helicopters. Though the UH-60 and the Hind are commonly referred to as transports, they are rarely used as such, and can often be found being used in the role of a ground-attack helicopter instead.
The final helicopter is the UAV-1, or alternatively by its real life counterpart, the MQ-8 Fire Scout.
Helicopters are extremely powerful, but are difficult to fly. As such a lot of players simply use transport helicopters in the manner of a one-way transport, crashing it into the ground at first opportunity. Unfortunately this also enables it to be picked up by the enemy. For details on how to fly helicopters, please see the dedicated page.
Helicopters can be shot down in many ways, though only four will guarantee its destruction in a reasonable amount of time.
- Use a dedicated anti-aircraft weapon. The VADS, ZU-23, and the AA Bakhcha are all extremely effective at shooting down enemy helicopters; they cause a lot of damage, do not alert the pilot to being shot at. On the other hand, these stationary emplacements are often memorized by competent helicopter pilots, and will destroy these first.
- Fire a tracer dart at the helicopter to remove its mobility advantage, then use an RPG-7 or M2 Carl Gustav to destroy it. This is the easiest and most reliable way to destroy an enemy helicopter. However, most helicopter pilots - especially those flying the Blackhawk, where other vehicle specializations do not apply to the gunners - will fly their helicopters with the Smoke specialization, which will remove tracer darts.
- Use a BGM-71 TOW, KORNET, or M136 AT4 missile to destroy the helicopter. Smoke countermeasures won't help the pilot here, as these missiles are guided manually by the player. However, the pilot still receives a missile warning, and leading the target is extremely difficult since missiles fly much slower than bullets, and fly forward in addition to turning in the direction of the sight.
- Use a machine gun, found either on stationary emplacements or on top of one of many vehicles. Since helicopters are always on the move, however, this can prove to be impractically time-consuming.
Helicopters can also be shot down a number of other ways as well, though most of these are impractically situational or require a lot of luck. These include sniping the pilot of the helicopter using a M90 sniper rifle, shooting the helicopter with the main cannon of a tank, or ramming the helicopter with a UAV.
There is one unused helicopter listed in the game's graphics fankit - the Ka-52. No other information is available about it, and chances are low that it will appear in the future. Some downed Ka-52s appear as wreckage in various maps.
-
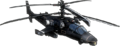
The Ka-52, an unused Russian helicopter.
UH-60 Blackhawk[edit]
 | |
| Health | 500 |
|---|---|
| Weapon | Door-mounted miniguns |
| Weapon Stats | 20 or less damage at 200 rpm (0.6 sec spin-up) |
| Capacity | 5 (pilot, gunners, passengers) |
| Speed | High |
| Manoeuvrability | High |
| Appearances | Port Valdez Isla Inocentes Valparaiso Heavy Metal |
The Blackhawk is one of the most common helicopters in the game, and is a flexible helicopter gunship. Armed with a pair of door-mounted miniguns, the Blackhawk is unlike any other helicopter in that it attacks from the side rather than the front. This plays to its advantage, however, as all it has to do is fly in a circle above the target area and spray bullets down on any enemies that the gunners can see.
The passenger positions are quite difficult to use offensively, but team players can select the engineer class and use the passenger weapons to repair the Blackhawk as it flies. This makes it nigh immune to stationary machine gun fire.
AH-64 Apache[edit]
 | |
| Health | 500 |
|---|---|
| Weapon | Driver: Rockets Gunner: Chaingun Alternate Weapon: Guided missile, tracer dart launcher |
| Weapon Stats | Rockets: 60 to 100 damage at 600 rpm (6 rockets per volley) Alternate Weapon: 100 to 600 damage at 6 rpm Chaingun: 16.7 to 30 damage at 600 rpm (6 round burst) |
| Capacity | 2 (pilot, gunner) |
| Speed | High |
| Manoeuvrability | High |
| Appearances | Atacama Desert (Conquest) Port Valdez (Conquest, Rush) Heavy Metal (Conquest) Oasis (Rush) |
The AH-64 is an attack helicopter with two positions. The driver is armed with a pair of rocket pods that are effective against vehicles, while the gunner is armed with a Apache's chin-mounted chaingun which is effective against lighter vehicles and infantry.
Unlike the Blackhawk, the Apache must fly over the target, and with the pilot fixated on the target, he or she can often forget to pull up to avoid a crash. Since vehicles are few and far between compared to enemy infantry, most of the power in this helicopter comes from the gunner. Thus, it is highly unwise for a helicopter pilot to take off without one.
If the Alternate Weapon specialization is equipped, the gunner will obtain the ability to launch tracer darts while the pilot can launch missiles. These missiles can lock onto the tracer darts and hit for a reasonable amount of damage. However, it is often better to attack the tank using infantry weapons rather than fly this helicopter using this specialization with the express purpose of tank hunting.
Note that the gunner's weapon is effective mainly against soft-skinned vehicles. Do not attempt to destroy tanks with it.
Mi-28 Havoc[edit]
 | |
| Health | 500 |
|---|---|
| Weapon | Driver: Rockets Gunner: Chaingun Alternate Weapon: Guided missile, tracer dart launcher |
| Weapon Stats | Rockets: 60 to 100 damage at 600 rpm (6 rockets per volley) Alternate Weapon: 100 to 600 damage at 6 rpm Chaingun: 16.7 to 30 damage at 600 rpm (6 round burst) |
| Capacity | 2 (pilot, gunner) |
| Speed | High |
| Manoeuvrability | High |
| Appearances | Atacama Desert (Conquest) Port Valdez (Conquest) Heavy Metal (Conquest) Oasis (Rush) |
The Mi-28 is an attack helicopter with two positions. The driver is armed with a pair of rocket pods that are effective against vehicles, while the gunner is armed with a Havoc's chin-mounted chaingun which is effective against lighter vehicles and infantry.
The Mi-24 is essentially a small-capacity version of the Hind.
If the Alternate Weapon specialization is equipped, the gunner will obtain the ability to launch tracer darts while the pilot can launch missiles. These missiles can lock onto the tracer darts and hit for a reasonable amount of damage. However, it is often better to attack the tank using infantry weapons rather than fly this helicopter using this specialization with the express purpose of tank hunting.
Note that the gunner's weapon is effective mainly against soft-skinned vehicles. Do not attempt to destroy tanks with it.
Mi-24 Hind[edit]
 | |
| Health | 500 |
|---|---|
| Weapon | Chaingun |
| Weapon Stats | 16.7 to 30 damage at 600 rpm (6 round burst) |
| Capacity | 4 (pilot, gunner, passengers) |
| Speed | High |
| Manoeuvrability | High |
| Appearances | Atacama Desert (Rush) Isla Inocentes (Rush) Heavy Metal (Conquest) |
The rarest helicopter in the game, the Hind is a combination of the UH-60 and an AH-64. This helicopter is equipped with the passenger carrying ability of the former and the chaingun of the latter, though the pilot does not have access to rockets.
Since the Hind plays very similarly to the Havoc and the Apache, it is often used as one instead of flying with its side to the enemy as is the case with the Blackhawk.
UAV (MQ-8 Fire Scout)[edit]
 | |
| Health | 50 |
|---|---|
| Weapon | Missile strike |
| Weapon Stats | Missile: 135 to 400 damage Chaingun: 10 damage at 750 rpm |
| Capacity | 1 |
| Speed | Medium |
| Manoeuvrability | Medium |
| Appearances | All Conquest and Rush maps |
The most common flying vehicle in the game, the UAV-1 is a capable but fragile unmanned aerial vehicle effective at long-range support. Unlike other helicopters, the UAV has different buttons for ascending and descending. This makes it considerably easier to fly than other helicopters. Its standard weapon is a missile strike that causes plenty of damage to whatever it hits. Its low splash radius, however, makes it difficult to use against infantry.
The UAV has the least amount of health of anything in the game, even less than normal infantry. As a result it can be easily shot down by small arms fire. It is highly recommended therefore for players to maintain their distance with the UAV and use it from afar.
Unlike the other helicopters which deploy flares around themselves to destroy any attached tracer darts, UAVs equipped with the Smoke Countermeasures package will instead be able to fire three smoke grenades out at the targeted area.
When equipped with the alternate weapons package, the UAV gets a small machine gun effective against infantry. Aiming the UAV's weapon, however, can prove difficult.
The UAV is not entered like a normal vehicle. Instead, players must locate the computer monitor with an anti-glare hood over it. Doing so will enable them to enter the UAV. Attempting to exit the UAV will result in its destruction; it is impossible to land the UAV to repair it. It can, however, be repaired by teammates if it flies low enough.
Stationary[edit]
|
|
|
|
10 |
25 |
50 |
500
|
Stationary weapons also count as vehicles in the game. Stationary weapons come in four distinct flavours: stationary machine guns, effective against infantry; stationary anti-tank missile launchers, effective against vehicles; automatic grenade launchers, effective against infantry and light vehicles; and anti-aircraft guns, effective against helicopters, light vehicles, and infantry.
Some stationary weapons (grenade launchers and machine guns sometimes have shields; missile launchers and antiaircraft guns are always exempt) have a shield that stops all non-explosive weapons from hitting the gunner. The shield is completely impervious to any and all forms of sniper fire. Only explosive weapons such as tank shells, mortars, and rockets will destroy the weapon.
Stationary weapons recently occupied by an enemy will yield 100 points when destroyed, the same as any other vehicle.
Heavy MG[edit]
  | |
| Health | 125 |
|---|---|
| Weapon Stats | 16.7 to 25 damage at 550 rpm |
Machine guns are effective against enemy infantry. The Russian machine gun is the more common machine gun, and is the KORD (bottom). The rarer XM312 (top) is found on HMMWVs and occasionally in turrets. Only a few hits are necessary to get a kill, but not a lot of these weapons are equipped with the ballistics shield. This means that the gunner is often vulnerable to sniper fire. Usually these weapons are only manned if they are needed. Machine guns are also effective against trees. By shooting trees they can enable the gunner to have a longer line of sight with fewer obstructions, increasing the power of the machine gun.
When attacked by a machine gun, most players will use a rocket or grenade to destroy it quickly. Don't use the machine gun for too long.
Stationary AT[edit]
  | |
| Health | 125 |
|---|---|
| Weapon Stats | 100-900 damage |
Stationary missile launchers come in two types: the American TOW (top) and the Russian KORNET (bottom). These weapons are extremely powerful, but they are never found with a ballistics shield to protect the user from sniper fire. This makes the user of this weapon extremely vulnerable to infantry attack. However, these weapons are small and difficult to spot from a tank. These weapons can cause disproportionate amounts of damage to an enemy vehicle before being destroyed.
Auto GL[edit]
  | |
| Health | 125 |
|---|---|
| Weapon Stats | 30-60 damage (6 round burst) |
Automatic grenade launchers appear as the American XM307 (referred to as the XM306 in kill feeds; top) and the Russian-used (Chinese designed) QLZ-87 (bottom). More often than not, unfortunately, these weapons are often in bad spots and are thus not often used. As explosive weapons, these can cause considerable damage to lighter vehicles. If they are aligned properly, they can also cause considerable damage to buildings.
VADS & ZU-23[edit]
  | |
| Health | 125 |
|---|---|
| Weapon Stats | 20 or less damage at 200 rpm / 25 damage (8 round burst) |
These stationary AA guns are rarely found. Unlike the other weapons, which have identical stats regardless of side, the American Vulcan Air Defence System (VADS; top) and the Russian ZU-23 "Zeus" (buttom) perform quite differently from each other. The VADS causes very little damage per shot but has an extremely high rate of fire. The Russian Zeus fires in 8 round bursts. Both are highly effective against helicopters and will often jostle them around when struck. This can cause the pilot to lose control and crash in addition to the damage inflicted by the AA gun itself.
These AA guns are often positioned on top of buildings and will have issues depressing themselves low enough to fire upon ground targets. In some maps (such as multiplayer Heavy Metal) the weapon will prove useful against ground targets.
These weapons are often known very well to helicopter pilots and will often be targeted very rapidly by helicopters. If a helicopter gets the drop on one of these weapons, it can be easily destroyed.