- Required items: Communicator β (green), Rocket Launcher
Part 1[edit]
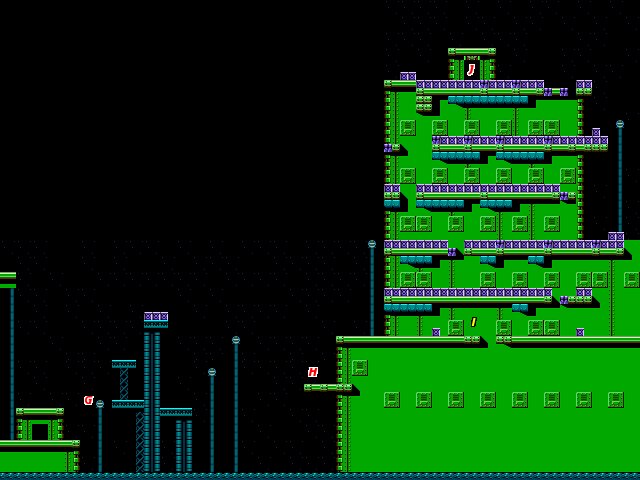
As soon as you enter this area, you will be greeted by a tall metalic wall. Only the Rocket Launcher can remove this structure and allow you to continue. Blast the wall away with the rocket launcher, and proceed to the first lamppost at location A. Before each lamppost, a spiked orb will pop out of the water. These orbs can hurt you, and they disconnect your grapple if they strike the line.
On the platform high above the first lamppost, you should notice a 1-Up doll. Swing from lamppost A, and fire your grappling hook straight up at the height of your flight. You should be able to grab the platform above and pull yourself up to collect the valuable free life. Then fall straight down to the platform below. Swing over the water using the remaining two lampposts.
Once you reach location B, you will notice springs in the floor. Use them to boost you up to the next platform. From here, get to high ground as quickly as you can so that you don't have to worry about falling in the water. As you rise, you will encounter two enemies. One is the typical soldier that parachutes down from the sky. The other is a gadgeteer who likes to tinker with small drones. The drones can harm you, but as soon as you shoot the gadgeteer, the drones will fall out of the sky and crash.
Make your way to the lamppost at C and use it to swing across to the next set of platforms. Walk across and get to the next lamppost by location D. Grapple to it and swing over. Note that you don't need to use the taller lamppost to safely reach the two small platforms before the next lampposts.
To survive the final section, and safely reach the door at location F below, you must start out by swinging from the first lamppost after the two platforms, and landing on top of the next lower lamppost. As soon as you land, grapple onto the next one over and swing to location E. Once again, you want to land on top of the next lamppost and connect to the next tall one before you fall down into the water below. Once you swing from the final lamppost, you should land safely to the right of door F, which leads to the next part.
Part 2[edit]

In the beginning, the second part is very much like the first. Start out by connecting to the lamppost at location G, and use it to reach the set of platforms over the water. Climb up to the higher platform, and then connect your grapple diagonally to the blocked-off platform above. Use it to swing out to the lower of the two lampposts so that you land on top of it, and quickly connect and swing from the taller one. As you fly through the air, be ready to fire your grappling hook up at the platform at location H. If you miss it, you will lose one life sinking in the water and have to start over.
Pull yourself up to H, and grapple up to the landing above. The grapple swing over the box to reach location I. From here on, the level changes. Now you are faced with a new challenge. Strong soldiers who throw boulders around are placed at the edges of various platforms. These boulders roll along each platform and fall down the gaps to continue rolling below. They will mercilessly flatten anything in their path, and slowly chip away at your health. If you brought the Energy Recovery potion along with you, don't forget to use it by pressing ![]() when your health meter is depleted.
when your health meter is depleted.
Getting through this section safely requires a lot of timing, and a bit of patience. You must climb up five platforms. At the end of each platform, you will see a gap and a spring somewhere next to it. When you reach these gaps, grapple up to the ledge above and use the spring to get started on the next platform. As you run down each lane, you will see holes cut out in the ceiling where you may grapple up and hang from the ceiling while a boulder passes underneath you. When you reach the end of each platform, look for the source of the boulders and shoot the soldiers down if you get a chance.
As you progress higher and higher, the lanes become more difficult to navigate, forcing you to either grapple up to the ceiling to escape the boulders, or use springs positioned in the floor to intentionally bounce over them. When you reach the top, by door J, a spring before the door will force you to deal with the last soldier throwing boulders from the rooftop. Take him out, and then approach door J from the left.
(There is a bit of a shortcut that you can exploit if you wish. When you come to a gap in the ceiling that you can grapple on to, grapple at a diagonal angle, and try to swing through the tiles that line the ceiling. If you hit them just right, your grapple will release and you will bounce upward. When this happens, quickly fire your grappling hook up again, and you may grab the blocks on top of the platform and pull yourself up, bypassing an entire platform. This can be done on each platform, but it invariably puts you in the path of a boulder, so make sure you have plenty of health if you want to do this.)
Boss[edit]

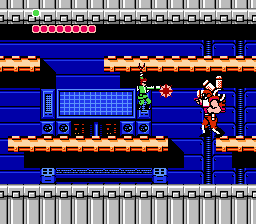
You will face a new boss this time around. The boss is a cybernetically enhanced soldier. He carries a large gun, and grappling hooks that can fire in three different directions. He paces back and forth on the platform just before the core. He uses the grappling hooks to attack you if you try to run directly above him. Shooting him at his feet is useless. The only vulnerable location on his body is his face, hiding in the head gear. This means that in order to hit him, you must grapple up to a platform above, and fire as you are pulling yourself up to the platform, before you reach the top. With the rocket launcher, it will only take four hits to defeat him, but your timing must be very good. You can choose whether you want to defeat the boss first and then destroy the core, or if you want to take your chances ignoring him, and quickly fire off three shots at the core before the boss has a chance to do too much damage to you. Either way, you clear the stage as soon as the core is destroyed.
Reward: You will earn ten bullets and receive the Permit. Without it, you can't enter Neutral Area 14, which contains an item that you will be needing in order to enter the second half of the game's areas.
Famicom Differences[edit]
- There are blue robots scattered in Part 1.
- At location H there are two moving platforms that, you will likely land on the lower one when reaching location H, but if you do not walk on the upper platform, it may push you off.
- In NES version, the hulk solders at the final part will only throw spiked balls. In Famicom version however, they will sometimes throw balls without spikes.

