
|
|
Section A[edit]

You will enter Area 4 in this hallway. This section is only inhabited by the small wall-walkers that dash across the screen whenever the SOPHIA crosses their line-of-sight. Jump up on top of the second platform to make it up and over the rocky blockade just beyond the warp from Area 1. Then continue all the way to the right to reach section B.
Section B[edit]

Two more enemies join the wall-walkers; ceiling turrets and the smaller floating orbs with antennae that bounce off the walls and platforms. Your goal is to reach the floor, but you'll have to drive out to the right a little bit before you can make a true descent. Once you reach the bottom, you have to make a choice between going to the left or to the right.
- Noted locations
- A: Don't bother heading to the right until you've defeated the boss of Area 4. If you head into section F, all that you'll find is a lock that you don't have the key for. When you defeat the boss and claim the key, return to this location to carry on with your adventure.
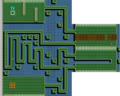
Section C[edit]

While this may be a long hallway, it's not particularly challenging to get through. Blast away any enemies that approach you, and drive to the left to reach section D.
Section D[edit]


As soon as you arrive, you will notice an entrance to an interior just across the pit. You may wish to clear away the enemies that hover back and forth before you approach it. Your ultimate objective is to drop to the bottom of the pit to reach the passage that leads to section E.
The first interior gives you a good introduction to what you should expect for all the interiors. There are a lot of gaps for Jason to fall into, so it's important to watch your footing. Move very carefully around the floors, especially on the narrow bridges that connect various portions of the interior together. The only enemy that you will encounter in this interior resemble robots about Jason's height, which fire guns at Jason. If you have maximum gun power, you should be able to take them out rather quickly by shooting very quickly ahead of you as you walk. If a robot is out of range, try to lure him into a position where you can safely attack him without getting hurt. After crossing the bridge to the section on the right, you'll find some blocks hiding a cache of capsules. There are three gun capsules and a Homing-Missile capsule, but the big haul is enough Hover power to refuel your entire Hover engine. And you'll need that later on.
Section E[edit]

This is where the lion's share of Area 4 takes place: the sewer tunnels. The tunnels are arranged in a rather large maze that you must navigate SOPHIA through. Your ultimate goal is to reach the section below the tunnels. Along the way, your exploration might take you to the locations of two interiors, neither of which are worth exploring. Both interiors contain very long, winding bridges between sections which you must carefully navigate, containing a heavy enemy presence. Even if you do make it to the group of tiles hiding capsules inside, the payoff is usually hardly ever worth the effort. Your more likely to lose gun power in the process of reaching them than walking away more powerful.
The enemies in the area consist of wall-walkers, land mines, slowly floating orbs, twisting ships that fly across the screen, and a few others. When you reach the vertical shafts, you will have to be especially careful of landmines when you are falling down from one platform to the next. If you're not concern with stopping in the middle, and wish to simply fall to the bottom, it's a good idea to cling to the left or right sides of the shaft instead of dropping from platform to platform.
- Noted locations
- B: This spot is the major crossroads of the sewers. From here you can go in a number of directions. Going up will return you to the way you came. Going right will lead to Interior 2. Dropping down will lead to Interior 3. Going to the left will lead you to your ultimate destination. Once you go left, you can drive all the way to the left edge of the sewer and drop all the way down to the bottom of the pit. Then head to the right until you can descend much further down again. When you reach the entrance to the section below the sewers, an orb is likely bouncing back and forth between the small opening. Use Thunder Break to clear him out of the way and drop down. Head to the right until you must drop down again, and drive to the left. At this point, several twisty ships will fly across the screen. If you don't have at least half of a tank of hover fuel, shoot these ships until you collect enough hover capsules. Then use hover to reach the upper platform that you can't jump up to. Continue to the left, blasting all of the enemies that get in your way until you reach the ladder that leads to Interior 4. Hop out of SOPHIA and climb up the ladder to enter the interior.
-
Interior 2
-
Interior 3


Area 4 Boss: Geroll[edit]

This is a long interior, but there are very few decisions to make along the way. Head to the right and take out any enemies that you encounter until you reach a narrow bridge. Move cautiously as you cross the bridge, and don't proceed until you are certain that any enemy threat ahead of you has been eliminated. Always take the opportunity to clear out enemies in sections across the water from you when possible.
After crossing the bridge head up, and around the wall to the right. You'll start to see Power capsules as you go, but only collect what you need. The extra will stay behind if you ever need to come back and collect them again. Continue following the path as it winds back and forth, leading downward. Blast the enemies as you go, and you'll soon encounter two gun capsules. Keep going down, and enter a passage to the left when you see one. Continue shooting enemies in advance of your arrival whenever you can and head to the next bridge.
On the other side, you'll see a Hover capsule between two Power capsules. Keep going and advance across the third and final bridge. On the other side, you'll see a flashing Power capsule, and a flashing Hover capsule. Take out the next two robots and head south through the passage to the room below. Then walk through this empty room to the right to reach the area boss.

The boss of this area, Geroll (ゲロール?) is a giant mutated frog which, if you're playing the American version of the game, is presumed to be the pet from which escaped from Jason's home and jumped into a vat of radioactive waste. It will hop around near the top of the screen. After three or four hops, he will stop and perform one of three attacks. He will first lash out with a long tongue attack, spit out a set of projectiles that bounce down the screen for his second attack, and shoot one fireball in Jason's general direction for the third. After spitting a fireball, this sequence repeats itself. Geroll is only vulnerable to attack when he stops hopping and opens his mouth up to attack Jason. When this happens, this is your chance to do some damage. Because of the way Geroll attacks, the best strategy is to stay up near the top of the screen, at a height level to Geroll's mouth. When he stops to attack Jason, you can fill his mouth full of grenades. You should only do this for the tongue and projectile attack and not the fireball attack since you are very likely to get hit if you stand still or too close. Be sure to move away when the fireball attack is next, and then return to him. When you defeat him, he will leave the key behind. Collect it and you will be transported back to the entrance.
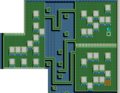
Section F[edit]

.png)
After defeating the boss, you will have to make your way all the way back to section B. That means you'll have to use some Hover to get back up to the sewer tunnels, and back track all the way up to the top left corner of section E. Once you enter section F, you'll be able to drive through the first lock, but because the second lock is on the other side of the door, you'll have to hop out of SOPHIA to continue.
- Noted locations
- C: After exiting SOPHIA, climb up the very long ladder. Once at the top, you'll need to carefully make your way down to the bottom by utilizing the provided platforms; remember, Jason cannot survive a huge fall like SOPHIA can. Drop from platform to platform and climb down the ladders until you reach the floor. Then head to the right to undo the second lock and reunite with SOPHIA. Jump back in, and head to the right to access the warp to Area 5. Note: the Japanese version is more difficult as there is only a small ladder that you can cling to without falling to your death.