
|
|
Section A[edit]

The theme throughout Area 6 is extreme cold. The icy surface on some of the platforms will interfere with SOPHIA's ability to speed up and slow down. It will take longer for SOPHIA to get traction and accelerate, and when you stop driving, SOPHIA will slide across the ice before coming to a stop. Naturally, this also applies to Jason, inside as well as outside. However, you will find that jumping in the air can help you gain greater control over SOPHIA's motion, even after slipping on ice. On the approach to the first passage on the right, you will encounter worms and mines. You can use Homing Missiles to safely remove most of them.
Section B[edit]
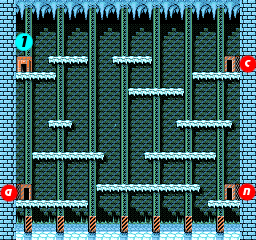

This room only contains mines. You enter the room through the lower left corner. The other three corners each contain something of interest. Across the room, in the lower right corner, there is a passage that advances you all the way near the end of the area, but it's a one-way trip at this point; you can only use it as a shortcut to return to Area 5 when you are done. In the upper left corner, you can find an entrance to the first interior. However, the slick surface of the icy floor combined with the unpredictable flying eyeball enemies makes this room a poor choice to visit if you're looking to keep your gun power elevated. Instead, head straight for the passage to section C in the upper right corner.
Section C[edit]
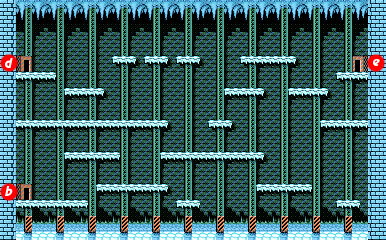
This room resembles the room in the previous section, with a multitude of icy platforms to jump across. Instead of mines, however, you will encounter enemies that resemble disembodied hands. From far away, they pose no danger, and are easily destroyed. If you get up close, they will toss out a batch of explosives which can easily do a lot of damage to SOPHIA with only a few hits. Take the hands out safely from far away before approaching their position. Make your way up to the top of the room. When you reach the top, you have a choice; you can head to the left to visit the small room in section D where you can find a useful interior, or you can go to the right to section E and continue on your way to the boss of the area.
Section D[edit]
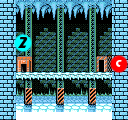

With no enemies in this small room to speak of, the only interesting point of this section is the entrance to the second interior. The lack of icy floors will make this interior much easier to navigate than the first one. The enemies aren't terrible difficult either. After making your way all the way to the top of the long vertical corridor, you will find your prize; a cache of SOPHIA weapon ammunition, hover and a flashing gun capsule. It's a good idea to go through this section a few times if necessary until you exit with full gun power.
Section E[edit]

Another long corridor, you'll have to navigate your way across platforms that are elevated on columns. Worms makes trouble for you as you pass through here. Homing Missiles will help clear away any of the more difficult worms that get in your way. Just be careful to avoid falling down on the floor below the platforms, as it can be tricky to get out in certain spots.
Section F[edit]
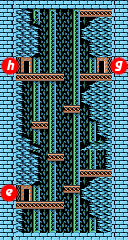
In this vertical pit, you'll have to make your way from the bottom up to the top. Along the way, the domed enemies that you first encountered in Area 2 cling to the surface of the walls and the platforms, taking the opportunity to charge at you whenever you drive past them. When you reach the top, the passage to the left is actually an exit from section H, in the event that you fall off from the correct path along the platforms at the top. Instead, head to the right to enter section G.
Section G[edit]
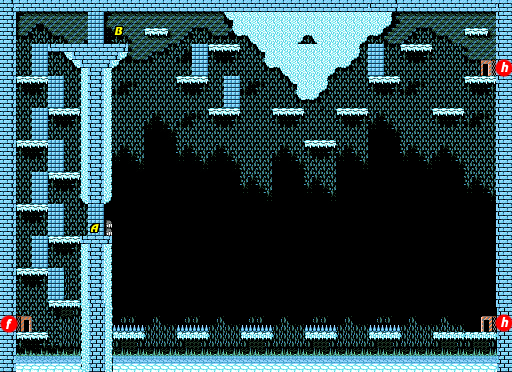
You start off in the bottom left corner of the room. You must shoot out the walls above you in order to create a path to the next platform. As you do, you'll face a dome enemy crawling up each chamber that you enter. Halfway up is a wall that you can break in order to get Homing Missiles. Once you reach the top, you'll have to proceed carefully in order to remain on the platforms and not fall down to the bottom. Remember that jumping up can help you gain greater control over SOPHIA, so leave the ground whenever you feel like you might be headed in the wrong direction.
- Noted locations
- A: You can't miss these two Homing Missile supplies on the other side of the wall. Be careful when approaching them, as you don't want to slip off and fall down to the right. If you do, you'll have to take the lower entrance to section H, and continue along the bottom until you wrap around to section F again and start over again.
- B: Once you reach this location, remember to take it slow. You need to cross all the way along the platforms near the ceiling in order to reach the upper passage to section H. If you fall down, you'll have to wrap around to section F and try again. Don't rely on Hover to save you too much, although it may help out in a pinch. After destroying the second wall below the chunk of ice on the ceiling, it's easy to make the jump over to the next platform, but it may take a leap of faith to discover that there is a lower platform waiting for you just beyond in order to help you continue. Enter the upper passage to section H to continue.
Section H[edit]
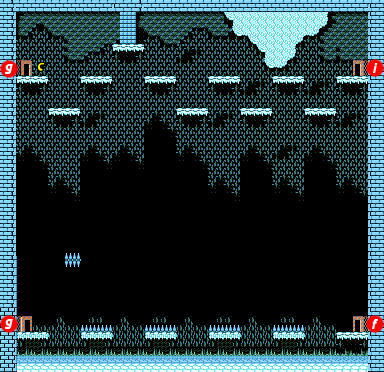
Not quite as difficult as crossing the platforms in section G, this section is made more challenging with the presence of worms. Before you leap over to the next platform along the way, be sure to clear the worms by using Homing Missiles.
- Noted locations
- C: Once again, you have to continue crossing this section via the upper platforms. Slipping up here means falling down to the ground below and being forced to loop around and take another shot at reaching the upper passage that leads to section I. Take your time, and jump up in the air to regain control over SOPHIA if you are sliding too quickly. There's only one wall to blast through, the rest is all jumping.
Section I[edit]
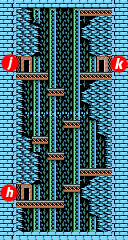
Like section F, this is a short vertical climb to two passage entrances at the top. Along the way, you'll encounter a few insect-like enemies that flutter around the platforms. You have two choices at the top. To the left is section J, a dangerous hallway that dead-ends at the entrance to the third interior. To the right is section K, which continues you on the path to the area boss.
Section J[edit]
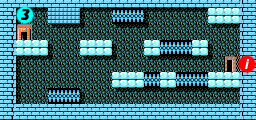

This section is only for the brave hearted. It contains more of the insect enemies, but even more dangerous are the long rows of spikes that interrupt the platforms. Naturally, these are bad news for SOPHIA, so you must leap over them at all costs. As you make your way to the left, you will encounter a set of blocks that can be destroyed. You'll have to clear them away in order to make it to the interior entrance on the left. This interior, while not nearly as dangerous as the first interior found in section B, is still quite a risk to enter if you already have full gun power. With many teleporting enemies, and a few floating eyeballs, you'll have to explore it carefully in order to locate the cache of capsules at the very end, and still hold on to maximum gun power. Even when you do, you have to navigate all the way back to the entrance, then hop in SOPHIA and cross back over the spikes to the right. In general, this section is best left ignored.
Section K[edit]

Enemies are not a problem in this section. Instead, you must navigate across several icy platforms, and blast away blocks that prevent you from making progress. It's worth it to take your time and blast away as many blocks as you can; quite a few of them contain ammunition for SOPHIA's special weapons, including two Multi-Warhead Missiles just above the entrance from section J. Watch out for the short row of spikes in the middle of the hallway. Your better off driving beneath them. Continue on to the right to reack section L.
Section L[edit]
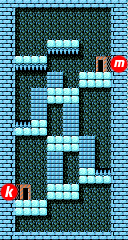
In this vertical climb, you have to continue blasting away block in order to open up passages that lead to the next platform above. Being greedy here won't pay off, as there are no weapon capsules in the blocks. You'll have to contend with a set of hovering enemies near the middle of the section. Watch out for the spikes that line the ceilings of the platforms near the top, as you approach the passage to section M.
Section M[edit]

You'll have to cross this one last considerably long hallway in order to reach the boss of the area. Similar to section E, it contains a set of platforms elevated on columns, with worms dropping from the ceiling in an attempt to interfere with your progress. Use Homing Missiles to clear them out of your way as you continue on to the right and enter section N.
Section N[edit]
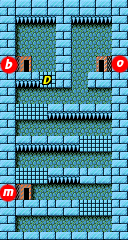
This is the last vertical climb before you reach section O and the entrance to the interior that contains the boss. Blast through the blocks above you to reach the next platforms. Each level contains a set of insects that you should clear away before attempting to cross over. When you get close to the top, don't be too eager and blast away the small set of blocks on the left. That passage leads back to section B, and without the Wall 1 upgrade from the boss, it's a one-way trip. Instead, cross over to the right and take that passage to section O.
Section O[edit]
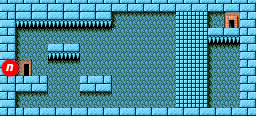
From the left side, you can jump up to the next platform if you wish, but watch out for the spikes above you. You can also simply drop down to the floor and continue from there. You'll encounter a few insects before reach a giant wall of blocks. Behind the wall is the entrance to the fourth interior. It's way up at the top, so you'll need to destroy the blocks strategically in order to reach the entrance. Don't start at the bottom, instead jump up and destroy two blocks. Then jump in, shoot out all of the blocks above you, then jump up and create another step for SOPHIA to reach. After making two or three steps in this fashion, you should have no trouble reaching the entrance. Hop out of SOPHIA and head inside to locate the boss.
Boss: Neo Gizzala[edit]

This interior is easily one of the largest that you'll have to explore in order to challenge the boss of an area. There are a number of threats to deal with, and keeping your gun power maximized is truly important. Fortunately, there are opportunities to refill your gun power before you reach the boss if you happen to lose any. You start out in the top room, which contains very generous platforms to walk on over a bed of spikes. The room contains teleporting enemies and floating eyeballs. You must occasionally walk across sheets of ice, which put you in jeopardy of sliding off onto the spikes. Stay in control, and when you are able to resume walking to the right, walk all the way to the far right wall before walking down to the very bottom of the room. Then make your way back to the left to reach the passage to the next room below.
The next room is a bit more challenging, featuring much narrower pathways to walk across, more frequent sheets of ice and more exposure to the spikes around you. To make matters worse, there are a number of eyeballs floating about. If you can keep your gun powers at maximum in this room, you are truly skilled at playing this game. But chances are high that you're going to lose some of your gun power. Fortunately, there will be a good opportunity to restore it in the next room below. That room contains a huge amount of blocks that you can destroy. From where you enter, you are forced to make your way to the left. You'll have to blast through a few open pockets that contain eyeballs. Every now and then, you may find a capsule or two if you a thorough in your search. When you reach the left side, you'll see the passage down to the next room. Don't be in a big hurry to enter. You can duck underneath the wall that separates you from the bottom row of blocks. Then blast that row as you walk back to the right. Soon you will be under the passage you entered the room, and you can access a huge set of blocks on the right side of the wall. Blast them and you will find a large number of capsules, including two regular and one flashing gun capsule. Then return to the left and enter the passage to the next room.
Hopefully you are back to maximum gun power, but if you're not, there's still opportunities to reach it. In the next area are the four-way turrets that potentially leave gun capsules behind when destroyed. When you enter the room, you have two choices. You can go to the left across a slick icy area that serves as a shortcut to the boss, or you can play it safe and take the long way around, which avoids any ice. However, the long way takes you through a series of those four-way turrets. Be prepared to take them out from a safe distance before continuing on to the far right, where you'll find a passage down to the room below. Remove the turret that is placed close to your arrival, and start making your way back to the left. Destroying the turrets along the way won't be too dangerous, but you must keep your eyes peeled for any eyeballs that try to ambush you along the way. When you reach the passage on the left, you'll arrive in the same place that the shortcut would have lead you to. A few more eyeballs will threaten you as you weave your way around the icy walls. Make your way to the bottom and you will see an entrance to the right, which leads to the boss.

The boss of this area, Neo Gizzala (ネオギザーラ?), may look familiar as it bears a strong resemblance to the boss you defeated in Area 2. However, this version of the boss has a few tricks up its sleeve that you'll need to be aware of. For one thing, its tentacles have gotten longer, so you're not nearly as safe as you once were hugging the bottom of the screen. On occasion, they can reach you all the way down there, so you'll need to be prepared to move out of the way. Secondly, this boss has a powerful projectile attack as it lobs rocks at you with its tentacles. So even if you're safely out of reach, you still have to dodge these rocks in order to avoid losing your gun power. Even at maximum gun power, this boss is quite difficult. If you lose maximum gun power, you're going to have to risk it, run up to the boss and lob grenades at its small weak point. You should start off fighting this boss from the left side of the room, and transfer to the bottom when the boss starts returning to the left. Try your best to avoid standing directly beneath either claw, as this tends to cause the boss to lob the rocks. Shoot from the bottom for as long as you can, but prioritize moving out of the way above shooting. Stand on either side of the room and attack horizontally whenever you have the chance. You are safer on the sides, but you have to move out of the way as soon as the boss starts advancing in your direction, or you are likely to get hit with a claw. If you survive this very difficult fight and beat the boss, you will obtain the Wall 1 upgrade, which allows you to cling to vertical walls as you drive.
When you return to SOPHIA, take the shortcut from section N to section B, and head all the way back through Area 5, Area 4, Area 1, and on to Area 2, where you must make your way to section L, climb the wall of section M, and pass through section N to reach section O and the warp to Area 7.