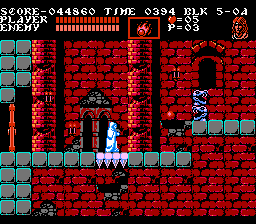
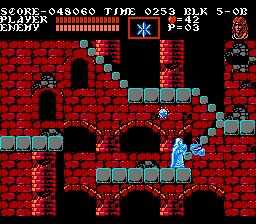
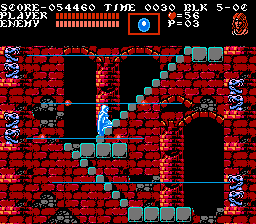
This is a red-colored tower level, similar to the second stage in the original Castlevania.
Block 5-0A[edit]

First, notice the light-colored platform with what appears to be spikes underneath. This is similar to the rotating platforms in the first stage, if you remember that. They're safe to walk on, but if you jump on them, you can fall through and the spikes will now be on top to impede you in the case that you didn't fall. Go right, dealing with the bone pillars. The candle right in front of the first bone pillar holds a knife for Trevor, so you may want to switch to another party member before getting its contents. Look out for the next bone pillar, then head up.
Now, the next room requires you to traverse vertically, climbing stairs. The problem is that flying skeletons called winged guards try to assault you. They fly in a wave pattern, similar to medusa heads. They do one wave as they move forward, then a higher one, unlike the set trajectory of the medusa heads. Even knowing their pattern, dealing with them can be tricky. While on the stairs, you won't fall, so if you aren't feeling too confident then try to stick to the stairs and spend little time elsewhere. Axes will probably be the most beneficial item for dealing with them. Sypha's lightning or ice spells also are good, but it is doubtful you have those here.
Also, there's a trick on stairs that might help you deal with them. Normally, if you hold ![]() , you'll attack once and that's it. On stairs, though, if the button is held you can rapidfire your weapon. This can come in handy if you hold the button while anticipating oncoming flying enemies.
, you'll attack once and that's it. On stairs, though, if the button is held you can rapidfire your weapon. This can come in handy if you hold the button while anticipating oncoming flying enemies.
The candle items are mostly just hearts. You can ignore them if you'd like, but if you do decide to get them, know that the one above the seventh platform holds a knife. This subweapon is far less effective in this area, so you may want to avoid it or switch characters first.
Dealing with Axe Knights[edit]
Up here, you'll have to fight an axe knight. This one isn't too inconvenient, though later they may prove quite a challenge. You can jump to hit this one, and its axe throws should be well telegraphed so you should avoid getting hit. Their thrown axes move forward a ways then return, similar to Trevor's cross. They can throw up or down, and they indicate by holding an axe and standing or kneeling where they'll throw. Their axes can be destroyed, so whichever direction they throw, your attacks should be directed there. Keep in mind that the high axes cannot be ducked.
There is a trick that could help with such enemies. If you attack while holding ![]() , you can immediately let go of
, you can immediately let go of ![]() and you'll transition to a standing attack, interrupting the crouched swing. So, you can just repeatedly attack while crouched, and if you see that an upper attack is coming, just let go to stand and hit the axe and knight. You should know that the inverse is not true. You cannot immediately crouch while stuck in the standing attack animation.
and you'll transition to a standing attack, interrupting the crouched swing. So, you can just repeatedly attack while crouched, and if you see that an upper attack is coming, just let go to stand and hit the axe and knight. You should know that the inverse is not true. You cannot immediately crouch while stuck in the standing attack animation.
Another, albeit probably less safe, option is to use Sypha. This is because her basic standing attack will hit the axes, up or down. Just note that standing too close may make the axes initialize close enough that the attack won't register, forcing you to take a hit. Due to this, a safe strategy would be to wait until an axe is thrown, hit it, then move close to the knight and hit them around three times. Then, move back a bit, wait for another axe to hit, and repeat this pattern.
Practice either technique against the knight, or just jump and attack it from a distance. Either way, continue up and right. Before proceeding through the door, some meat can be found in the block above the door if you need health.
Block 5-0B[edit]

Here, you'll notice two balls of destruction patrolling the upper and lower platforms. Wait until the path is clear, because it is difficult to jump between them both. The third candle holds a holy water for Trevor, which may have limited effectiveness in this stage. Sypha, though, gets the ice spell which is more useful. With it, you can even freeze the normally immortal balls of destruction, then simply attack them with a normal attack to be rid of them. Proceed up.
Another vertical part. This part is especially stressful, because the screen will move up periodically, with a loud noise indicating it. If you are too slow, this leads to instant death. Still, take your time going up the steps. Wait until the top of each platform is shown, because knights can appear suddenly and damage you if you go too fast. Just wait before the end of each set of stairs to see if they spawn at the top. If you got Sypha's ice in the previous room, it will be beneficial in dealing with the knights quickly, rather than attacking them and waiting for them to die. Once you get to a part with blocks across the whole screen, with two side-by-side sticking down, you no longer have to feel rushed. This is the top, and the screen stops moving up. Proceed up.
There are more winged guards here, as well as rotating platforms with spikes, like earlier. You can head directly left before going up to get a subweapon from a lone candle. Trevor gets a cross, while Sypha gets lightning orbs. Both are useful for the upcoming areas and boss, but if Trevor already has axes and you have Sypha, then you may want to stick with axes for Trevor and switch to Sypha before getting this item. This is because the homing nature of the orbs is more beneficial, and for Trevor the upward arc of the axes will be more appropriate. Whatever you decide to do, next head up and left, past the door.
Block 5-0C[edit]

In this next room, you'll have to deal with another axe knight. If you have subweapons that can reach it, you can stay to the far right and hit it from a distance. Otherwise, you'll have to deal with it headon. You can try the trick mentioned earlier if that is the case, just don't duck too close to the stairs or you'll be forced into a walking down animation and likely get hit. Better yet, if you position yourself correctly you can force the knight to the right, where it'll remain while you go up the stairs, and you can try the stairs trick mentioned above. In any case, know that the far left candle has a useless knife for Trevor. For Sypha, it's the fire spell. Fire is usually quite useful, but if you got the lightning earlier you may want to bypass this candle entirely. Either way, climb up.
Another room where you must continue upwards. The bone pillars on the far left and right sides can prove troublesome. If you're patient, you can watch for the pattern of their fireballs and try to move quickly, remaining between the sets of projectiles if you must. If you want to be especially careful, you can kill the bone pillars you can reach before continuing. The further ones will require subweapons like the lightning orbs or axes. Continue up a screen.
A raven awaits you up here. It would probably be best to deal with it here instead of rushing right, since you are less likely to be thrown into a pit. A second one is waiting to the right, over precarious areas, so be especially careful. The third candle has a fire book for Sypha if you die at any point or are just lacking a subweapon for her, but if you still have the orbs from earlier it'd be best to stick with that against the upcoming boss. After the platforms with stairs, you'll get to a room with green columns, which is the boss room wherein you'll face Frankenstein's Monster.
Before you go too far and fight this opponent, the first floating set of blocks in here contains a hidden meat, if you need energy before the boss. Don't be concerned about removing part of the platform, as it's unlikely you'll be standing here against the boss anyway.
Defeat the boss, collect the red orb, and you'll automatically be taken to Stage 6A: The Moat Bridge of Peril.
Items checklist[edit]
- Dagger/fire spellbook
- Axe/fire spellbook
- Dagger/fire spellbook
- Cross-boomerang/water spellbook
- Food (inside wall)
- DOOR 1
- Holy water/ice spellbook
- Holy water/ice spellbook
- Extra life (inside wall)
- DOOR 2
- Dagger/fire spellbook
- Double shot
- Axe/fire spellbook