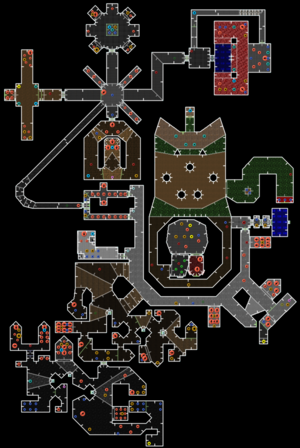
Starting area[edit]

You appear in a small room with one doorway. An imp and two former sargents are in the next room, with a rocket launcher (and shotgun on easy). Open the door to reveal a demon and a cacodemon (with the cacodemon only appearing on hard). Trick the monsters into fighting each other or kill them with your rocket launcher. Flip the switch to open a door in the starting room.
Avoid the medikits unless you are low critically on health.
When you head to the north, you should see a few platforms across a nukage pit. Run across the pits to the switch, and flip it to raise the bridge to the berserk. Grab the berserk, and turn around to see the middle platform sink into the nukage.
Jump in, and down the nukage corridor to the left, avoiding any medikits as necessary. At the end of the corridor is a switch; flip it and run back, collecting medikits on the island when returning. Return to the corridor surrounding the starting location, and you'll notice a new door on the eastern edge leading to the rest of the map.
The exit is right infront of you, but you need the three keys first.
Blue key[edit]
After entering the door to the right of the exit, head down the corridor until the first left branch. The key is to your left, but heading for it will open a few monster closets nearby. Experienced players can head there directly and deal with the enemies with their berserk punch, but it is safer to take a left at the second corridor branch and flip the switch there. This allows you to either take a few shots at the enemy demons before they are in close range, or gives better room to maneuver.
Behind the southern monster closet is a door that reveals a chainsaw.
Red key[edit]
Further down the corridor is a darkened wood maze. If it is too dark, you can get some light amplification goggles in the next room within the corridor. Additional goggles can be found near the end of the maze as well. Monsters are sparse in the maze, but can be released by going to certain areas.
When you wanter the first path to the mast and follow the left-hand wall, you can get a backpack. Proceeding down the corridor leads to some box of rockets, but opens a monster closet on the way back.
The western-most path leads to a dead end with a demon and blue armor.
To proceed, head to the south-west corner of the maze with the door to the south. Approaching the door will open a monster closet; to avoid awaking the monsters, go through the door and clost it behind you.
The second part of the maze is made of stone, and contains spectres. The plasma gun is located in the south-east corner of the first area. While it is safe, going to the north and collecting the health and armor bonuses will open a closet full of lost souls.
To reach the key, head down the left corridor. The key is located in the souther part of the room, and approaching it will release the monsters on the way back; the good news is that you can collect invisibility in that closet.
Return to the corridor once ou have the key.
Yellow key[edit]
At the end of the corridor are two doors. They both contain a series of imps and zombies in a line, while the right door also contains alcoves with demons on either side. Take the left door and enter the small room at the end. Flip the switch and go through the newly opened door to reach the hub.
To get the key, enter the southern room (the one immediately to the right with a short corridor). Defeat the initial mosnters, and run around the loop to get the key; this opens monster closets within the hub you entered from. You can kill or ignore the remaining monsters depending on how you want to proceed.
Return to the main corridor when you are done - note that two monster alcoves have opened in the main corridor.
The western room contains a chaingun and light amplification goggles. To exit, you need to flip the switch on the left, and avoid the crushing ceiling when you exit; fast players may leave before the door closes. Note that it may become inaccessible if the crushing ceiling stops at a low position.
The northern route from the hub leads to invisibility and armor. Collecting them relases monsters from the four corners of the room.
The eastern path leads to the false exit, and can be reached only with the yellow key. Enemies will attack from a few directions at once, and you can exit by taking the door on the side. You can collect a computer map on the way out of the false exit.
Exit[edit]
Once you have the yellow key, head to the true exit near the starting area. Note that there are two newly opened alcoves containing demons; the first is before the blue key, and the other is after.
The first alcove has a bug on harder difficulty levels, where extra demons will prevent the monsters from escaping as long as they are not killed.
With all three keys, open the doors leading to the exit. Flip the switch for the next level.
Secrets[edit]
There are three credited secrets in this map, all of which are accessible from the yellow key area.
- In the north room, on the center. (Sector 0)
- In the western room. (Sector 16)
- Exit from the false exit. (Sector 48)
The following are not secrets, but help complete the map:
- A chainsaw is near the blue skullkey, behind a metallic door in the nearby monster closet.