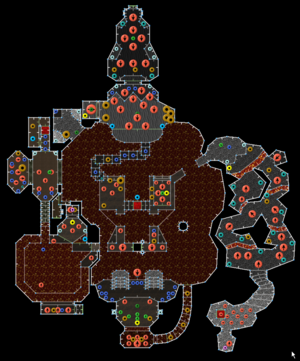
In some cases, you may start the level with only a few percentage points of health. If this is the case and you aren't worried about completing the game without deaths, feel free to commit suicide and restart with the initial 100% health and 50 bullets. A more powerful weapon, the shotgun, is directly behind you.
A major feature of the map is the large nukage pit. If you fall in, there is a superhealth you can collect just south of the large staircase, and a radiation suit between the two stairs near the start. The exit from the nukage is located at the south-east corner.
Orange Key[edit]
At the starting platform, the sargents face away from you, allowing you time to collect the shotgun and kill both enemies. On Hard, a cacodemon will become alerted and rise from between the stairs.
From the start, jump across the gap from the left staircase, and go through the door on the left. Jump on the small platform inside the nukage pit, and flip the switch - quickly run to the platform that rises around the perimeter, and reach the end to collect the plasma gun. A baron of hell will attack at point blank, and sargents will be released on the southern wall. The orange key is behind the Baron of Hell, which should easily fall to the plasma gun.
If you fall in the nukage pit and can't get out, grab the radiation suit next to the switch. This opens an exit on the north side of the pit, where you can reach a teleporter. Note that there are monsters on the left, which are free to exit if you returned to the start from the central nukage pit.
Blue key[edit]
To continue, return to the central platform to the yellow skull markers. Press the switch to open the central platform, which you can use to access the eastern cave, but reveals two barons of hell.
The eastern cave is filled with Specters and cacodemons, but a chainsaw can be found in the north-west corner.
When you reach the staircase at the south, you will see a teleporter back to the starting location. However, you need to collect the blue key first, located to the south of the teleporter. The key is guarded by another baron of hell.
To the exit[edit]
With the blue key, you can open the blue key gate to the north (although these two keys can be bypassed - see the secrets section for more information). The upper platform will initially be swarmed by demons, but there is also a cyberdemon overlooking this platform. Approaching the centerline will also open the door to the exit, releasing cacodemons.
It is not economical to attack the cyberdemon, especially without a large stock of nearby ammunition. Either run past it, or use a secret below to instantly kill it.
Secrets[edit]
There are three identified secrets:
- On the western edge of the map, there is a teleporter that brings you back to the start. Open a secret wall to the left of the teleport for a berserk pack. You can continue to open a door behind the teleport to a platform overlooking the main area, and some blue armor. From this platform, you can exploit a glitch to grab the BFG through the wall (by straferunning towards the north-east torch), or take a shortcut to bypass the blue key pillar.
- Near the exit, a line separating the light and dark areas opens the exit. It also opens a teleporter in the center region, which can be used to telefrag the cyberdemon and get the BFG.
- Exiting the Cyberdemon secret opens a small door to the south-west of the staircase leading to the exit. This door leads to E4M9: Fear.
While not counted as secrets, the following information is helpful:
- When you open the door to the yellow key, the southern wall will also open. Look for a door on the right in this newly opened area to reveal a switch. Pressing the switch will raise a platform in the central area, making movement in that area much easier.
- A supercharge is between the central platforms and the blue staircase.