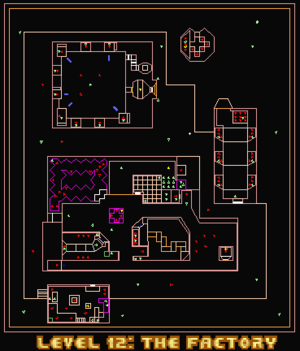
You start outside, and need to enter it. There are two entrances - the front is an elevator into a reddish building, while the back entrance is on the opposite corner of the map. Whichever one you choose, pickup the shotgun first. You can get a bit more ammo from the circular building to the right, as well as armor and invisibility, but this is not required.
The red-coloured building, while a direct route, is dangerous - the best way to deal with the room is to zip through it. The back entrance is safer, and potentially faster with straferunning - take that route instead.
You first need to enter the large building; it's only entrance is from a door to the west. Enter it and jump in. Unless you want to have a lot of alert monsters, try to avoid attacking. Grab an ammo box near the entrance.
Enter the north-east room, which looks like a series of erratically raised floors. Wait for the door to close and find your way across to the alcove - a mancubus should drop down. Hide behind one of the floors, and shoot it with your shotgun, then pickup the SSG. While the SSG is not strictly required, it will help in the exit area.
Now, go to the south exit on the central room, and grab the blue key. Without attacking, run in the opposite direction until you reach a small room (guarded by mancubui - if you attacked earlier within the room, they'll react as soon as you enter line-of-sight). Open it, kill the Heavy Weapon Dude, and grab the yellow key. The Mancubi are now alert; try to slip past them.
To exit the central area, go to the south-west blue-key door. Open it, and pickup the green armor. (If you want, you can run across to get an energy pack.) Dispatch the shotgun guys, get the backpack and medikit and teleport. When you do, you're in front of a mancubus - quickly jump down.
The yellow key gate is the building to the north from where you teleported. Grab the shotgun shells on route and enter. Note that once you enter the cacodemon area, you can't return.
You don't have to destroy all cacodemons, but killing the center three help. To exit, you need to flip a five switches in some of the alcoves - one is in each of the four corners, and the fifth one is on the wall opposite of the entrance, in the left alcove. All five alcoves appear to have a subalcove, and are also marked with blue on the map shown above.
Notes[edit]
The red building is filled with imps. If you approach from the elevator, the imps will attack from behind. In addition, more imps will come up from the sides. If you want to get by the room, the best method is to sprint forward.
The central atrium has another door to the south-east. This is covered in the secrets section.
The southern building has a Baron of Hell, an cacodemon and a few imps. You can reach a few items, including a chaingun and a beserk pack, and a teleporter provides another entrance to the building.
Weapons[edit]
- Shotgun at the start - you can't miss it.
- Supershotgun is behind the north-east gate of the factory atrium.
- Chaingun is in the southern building, accessible by a lift. It's easier to get one at the yellow key.
- BFG is in the north-west door of the atrium; see secrets.
Secrets[edit]
- (-217, -997): In the southern building, you need to first jump from the platform onto the berserk pack. Then, jump onto the platform showing a switch. Flip it, and it will lower. Go onto the left, and walk to the chaingun.
- (-80, 304): Go into the teleporter at the southern building. After killing four imps, and flipping the switch, you can get the supercharge.
- (-304, 495): Enter the south-east gate from the central area. Cross the slime pit by following the ceiling lights and flip the switch. Cacodemons will attack from behind - kill these and flip the switch from their alcove. The NW gate will open, and you can grab a BFG.
- (815,659): When you teleport out of the central building, turn around, and jump in the entrance to collect ammo boxes. You'll need to exit the central building again by the same route.
Deathmatch[edit]
- Rocket launcher replaces the blue key.
- Plasma gun in circular north building.
- An extra energy cell pack in the central building exit, but a player can make it inaccessible.
- A Spider Mastermind appears in the southern portion of the map.
The action is usually centered within the building - two major weapons are there, and the chaingun+supercharge brings you to the building as well. The only catch is a player trying to be sneaky and ambushing an opponent leaving the central area.
The exit area provides a nice supply for the plasma gun and the BFG. While the plasma gun is a bit of a detour, it is well worth the charge.
Bugs[edit]
Past the south-east blue key gate, you can glitch the raised floors by raising the platforms out-of-order.