The Shooter World[edit]
Upon arriving in World 2, you will enter the shooter portion of the game. The screen will scroll to the right on its own, while you must help Doraemon navigate the maze of obstacles and enemies that threaten him. Eventually, the path that Doraemon takes will move up and down, and the scrolling will change with the path. You still have your health meter, so you won't die instantly if you touch things. Even though you can travel through much of the terrain, you will take damage for doing so, so remain in the empty black space to remain safe.
Powering up[edit]
Health is hard to come by in this world, so you'll need as much protection and assistance as you can come by. Throughout this world, there are several side paths that Doraemon can take by pushing against them as they scroll by. For example, in the first stage, when you see a pool of water at the bottom, push Doraemon down against the water. The screen will stop scrolling to the right, and begin scrolling down. At the bottom, you can collect one of several items or people. What you will find at the bottom is random, but heavily dependent upon what you already possess.
- If you are alone or have one assistant
- You will most likely find Takeshi or Suneo. Takeshi lobs bombs that fall to the right when scrolling horizontally, and to the left or right while scrolling vertically. They crash through everything and are very helpful. Suneo fires a diagonal beam which alternates up and down while scrolling horizontally, and left or right while scrolling vertically. Occasionally, you may find a health restoring dorayaki.
- If you have both Takeshi and Suneo
- If you are fortunate enough to find a power-up pathway with both Takeshi and Suneo in tow, you will most likely discover either the Flash Light or the Hirari Mantle. The Flash Light emits a powerful expanding ripple beam that destroys enemies with one hit. The Hirari Mantle blocks 5 attacks that would otherwise damage you.
- If you have both assistants and both power-ups
- Holding on to every assistant and power-up can be extremely difficult. If you manage to do it, you are likely to encounter one of two items. You may find one of the two Genki Candies hidden in the world. After you find two of them, you will not find anymore. The other item that you may potentially find is the Passing Hoop, which is actually an item for World 3. If you claim it, you will start World 3 out with this valuable item right away instead of having to seek it out.
Powering down[edit]
While you can collect assistants and power-ups, you can also potentially lose them. If you take too many hits, then the last thing that you collected, whether it was a power-up or an assistant, will fall behind and scroll off the screen. Power-ups and assistants will drop away in the opposite order that you collected them. So if you collected Takeshi, then Suneo, and then the Flash Light, you will first lose the Flash Light, then Suneo, and finally Takeshi. Restoring your health by collecting dorayaki or Genki Candies can help prevent the loss of power-ups or assistants. You can never lose any Genki Candies or the Passing Hoop.
Stage layouts[edit]
Part A[edit]
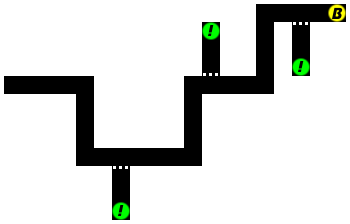
The world starts out simply enough. You will face a large flock of bird like enemies. Fire constantly and remove as many as you can. You won't face another type of enemy until you enter through the mouth of a cave. Shortly after that, you will make your first downward turn. At the bottom, you will travel right again, where you will have your first opportunity to break away from the main path and collect your first assistant. When you come upon a body of water, push down against it until it the scroll direction changes. At the bottom, you will collect a friend, and the scroll will reverse. When you get back to the top, you will continue right again.
At the end of the tunnel, you will begin rising upward. Avoid the rocks that fall from the top. When you reach the top, the stage will begin scrolling to the right again. You will be flying through a section of vines. The bottom tips of the vines are dangerous, but can be destroyed by shooting at them enough. Immediately after the vines begin, a hole in the ceiling provides you with the second opportunity to collect an assistant. Push up against the hole until the scroll direction changes. Once you make it to the top, you'll collect another friend and return to the bottom.
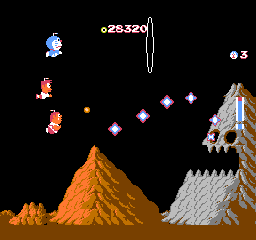
Continue to the right below the vines until you reach the end. You will start climbing to the top where you will escape back to the surface through the mouth of a volcano. Almost immediately after that, you will find a much smaller volcano with a gap in the floor. If you push down against it quickly enough, you will get the chance to reclaim a lost friend, or get a power-up. You'll rise back up to the top and continue to the right, where you will face the first boss.
The first of three bosses that you will face is the Ororon Rock. It fires a number of bullets at you with its eyes, which you can manage to destroy if you shoot them enough. But your primary target should be the mouth. You must get at least 32 normal shots in the mouth to destroy it. If you move back and forth within the mouth, you can gather your assistants closer together, and use them to help you fire upon Ororon.
Part B[edit]
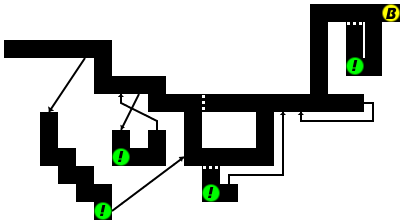
After defeating the first boss, you'll have to rise above the mountain to avoid getting hurt. The second section of the stage is a bit different than the first, as it contains a number of diverging pathways that don't actually line up completely with the main map. It starts off with a long stretch of vines. Shortly before you reach the end, you'll see a gap in the floor which you can take to collect the first power-up or assistant. If you take it, it will deposit you at the very bottom of the stage when you escape from through the water fall.
If you don't go down this gap, you will reach the end of the tunnel and begin dropping. You will fly forward through the long stretch, you will pass two bodies of water. The second one is the one that you can investigate. If you drop down, you will find a power-up or assistant. It will then bend to the right and back up, but when you return to the top, you will actually end up to the left of where you dropped; the first body of water. When you reach the end, you will drop down and fly forward once again. You will fly along a stream. When the stream drop down, you have two choices. You can allow the path to drop you down along the waterfall, or you can take the path that's accessible in the upper right. The upper right path is shorter, but misses out on a potential power-up.
Whether you reach the volcano through the first short-cut, or by dropping down with the water fall, you'll need to react quickly to find the next power-up opportunity. Right after the volcano, the floor drops out below the stream. Push down in to the body of water, and wait for it to reach the left edge of the screen before it allows you to change paths. If you take this path, you will collect an item or person, and then shortcut all the way up to the looping section. If you don't, you will reach the end of the tunnel and begin climbing up to the top.
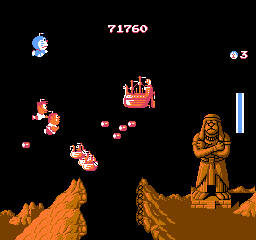
You will now enter the first region of this world that actually loops continuously unless you find the proper escape. It's not hard to find, you will see a sizeable hole in the ceiling pass by. If you miss it the first time, don't worry, it will come back around again. This gap in the ceiling will carry yo up for a bit until it deposits you back on the surface of the planet. Once again, there is an immediate pathway that leads to a power-up. If you've been doing well holding on to your power-ups, this one may very well contain the precious Genki Candy. Then you will return to the surface where you will face the boss.
The boss of this stage is the Bauwanko (Big Robo) Ship. This ship moves in a circular motion. As it does, it sends much smaller ships to attack you. The smaller ships always travel down and to the left no matter where you are. The real threat that you must avoid are the tiny barrels that they send your way. These barrels will travel in your direction, preventing you from staying in one position throughout the whole fight. If you have the Hirari Mantle, it will protect you from a number of the barrels, but not forever, so defeat the boss quickly. Focus all of your attacks on the mother ship. The smaller ships are simply a distraction. Eventually, you will sink the boss.
Part C[edit]
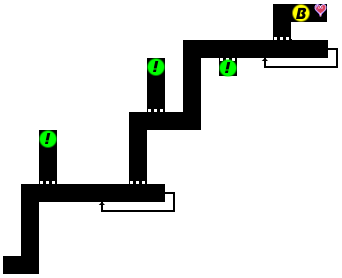
The third and final section of World 2 is much more straightforward than the previous section. It contains two looping sections that must be escaped in order to proceed. You start by dropping down the hole from which the second boss appeared. Then you will travel forward briefly and then climb a long distance inside of the first man-made structure of this world.
After you climb up the long tunnel, the stage will begin to scroll to the right again. However, a structure will split the tunnel in half. If you want to be able to reach the next power-up opportunity, be sure that you take the upper path, and prepare to enter the hole in the ceiling as it goes by. Once again, if you've done a good job holding on to your power-ups, you may manage to get the second Genki Candy.
After you drop back down, you will continue along the tunnel until it begins to loop. You will have an opportunity to escape the loop by rising through the next hole in the ceiling that you encounter. This will lead you up even higher. This time, you will have to choose the correct path even sooner than before, but again, it is the outside path, or the path to the left. When the stage begins to scroll to the left, you will receive another opportunity for a power-up. This time, if you held on to everything and gathered both Genki Candies, this may be your chance to collect a valuable item from the third world before you even get there, the Passing Hoop.
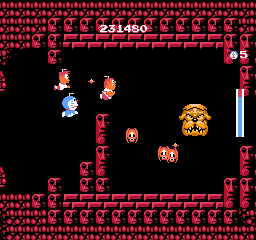
Whether you collect the power-up or not, you will reach the end of the right tunnel and begin to travel upward again. When you begin traveling right again, you will have to move quickly to take advantage of the very last power-up opportunity that appears on the bottom of the tunnel. It's a very short tunnel, and you will be back along the main path quickly. At that time, You will be entering the final looping section of the world. Pay attention for the gap in the ceiling that will allow you to escape the loop and set you on the correct path to the final boss of this world.
The last boss is the Kentaurus, a large face of a bull dog that loops around in a circle. It sends winged skulls out to attack you and defend itself. You can easily position yourself so as to stay out of the range of the skulls and still attack the head. Other than avoiding the skulls and the bullets that they fire, this is a fairly straightforward fight. Continue to blast the face as frequently as possible, and the Kentaurus will be defeated.
Moving on the next world[edit]
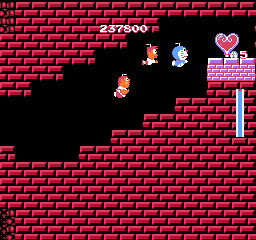
For defeating the third and final boss, you will be permitted to enter the chamber in the back. You will see a giant heart waiting for you on a ledge. Direct Doraemon over to collect it without hitting the walls, and the World will come to an end. You will ride Doraemon's flying contraption into the final world.