Son Goku and Bulma's quest begins when she suggests that they search for the remaining Dragon Balls throughout the world. She happens to have three, and he possesses the one given to him by his late grandfather. Goku wonders how they will determine where to look first, and Bulma shows him her invention: the Dragon Ball radar.
1st map[edit]
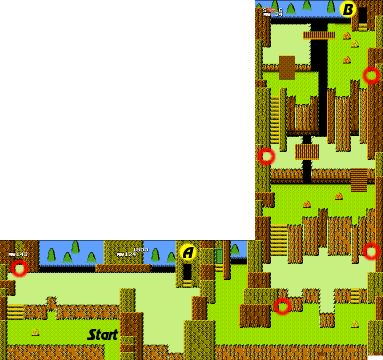
You begin the level in the bottom left portion of the map. You will encounter clones of Emperor Pilaf's canine ninja lackey, Shu. The blue ones can be knocked away with one hit, but the brown ones are a bit stronger and require two. There are many hidden cave entrances in this level, and the first one can be found if you enter the alcove in the upper left. Inside, you will find four stationary capsules. They will most likely contain meat and mystery points, but you may luck out and find a Power Pole. You may also be unlucky and discover an insect in one of the capsules. Be prepared to knock it away if you do.
Continue to the right and you'll encounter another Shu clone, as well as a bigger dog with a sword. Carefully fight them (the sword wielder will take many hits), and enter through door A.
Door A[edit]

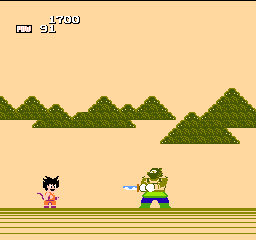
This will be your first major fight against a strong opponent, a large sword wielding bear. (This monster is intended to resemble the bear thief that wanted to eat Turtle in the third episode, even though you haven't encountered Turtle yet.) The bear will continue to advance in your direction. He will only swing his sword at you when he is close enough to touch you. This allows you to get in two or three quick pokes before needing to back off and put enough distance between you and him while he swings his sword. Then quickly return and get in a few more hits before the next swing. When you get pinned into the corner, quickly jump over him and attack him from the other direction. Continue this strategy until he is defeated and knocked away. It will take around 10 hits.
Immediately after this fight occurs, you will learn that Bulma has been captured by someone unknown. She will scream for help. You will continue to game to the right of door A. Head down and to the right as you take on more Shu clones. There is a hidden entrance along the way. Head inside to find four Shu clones (two blue, two pink, all one hit point each), and one capsule. Defeat the Shus and check the capsule to see if it's anything good. Then continue on.
Climb up the steps to the right and continue to the small alcove in the upper right corner. The hidden entrance here will take you to a room with six rotating capsules. You'll only get to collect one and the contents are random, so choose whichever one feels lucky. Then head out and travel to the left. Fight more Shus and climb up the wide steps. Up here, you will find a bomb tossing Pterodactyl. You can take the Pterodactyl out fairly easily by lining up with him when you attack.
Continue climbing up and cross the bridge. Keep walking all the way to the left and head inside the alcove. Two gray Shus will guard a single capsule. Return and climb up the long flight of steps. Defeat the two Shus, then lure the sword wielding dog to the edge. You can attack him from below and remain safe from his sword. Likewise, you can attack the dog that guards door B through the rocks and remain safe. Head to the hidden entrance below door B to find three stationary capsules. Collect the contents, and enter door B.
Door B[edit]

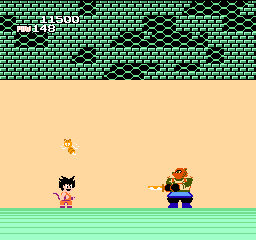
Your next fight will be extremely similar to the first. The biggest difference will be the bee that flies back and forth from one end of the screen to the other, and occasionally swoops down to strike Goku. You should not have to worry about it unless you feel that you are getting backed into the wall and need to jump over your opponent's head. Other than that, the strategy that you employ should be the same as the previous fight.
2nd map[edit]

When you resume, you will appear in a brand new section of map. In this new section, you will encounter more Shu clones. There are also a total of three hidden cave entrances to be found before you even approach point C. They each contain two Shus and one capsule. When there is nothing left to investigate, turn your attention to point C.
You will see a large block standing in the way of the passage to the right. Furthermore, the block is guarded by what looks like a spear wielding skeleton wearing armor. You don't have to kill the skeleton but it will make the next step a little easier if you get it out of the way. You must strike the block a few times in order to destroy and give yourself access to the area beyond.
Once the block is destroyed, a dialog will begin between Son Goku, Turtle, and Bulma. Turtle has become incredibly lost and is trying to find his way back to the sea. He is desperate for help, and Son Goku is only too happy to oblige. Bulma insists that she doesn't have time to waste, so Son Goku agrees to help the turtle alone. Realizing that she needs Son Goku's help as well, she resigns herself to following them.
The game will continue. In the forested area, you can find two more hidden entrances. The north entrance contains another set of six rotating capsules, from which you can choose only one. The southern cave contains three stationary capsules. It is likely that you will find turtle shells in one of these capsules, if you haven't found some already. These are the fuel for your Kamehameha attack (which Son Goku can perform even though he technically hasn't learned it from Master Roshi yet, or even met him.)
Back outside, you continue to make your way to the right. You will encounter more enemies, all of which you have already seen, such as the sword wielding dogs, the bomb dropping Pterodactyl, and the skeletons. You aren't actually required to fight any of these enemies, you can merely decide to avoid them, or defeat them for points. One last hidden entrance exists just north of the stage exit. Pass through the fence to return Umigame to him home and meet Master Roshi.
Epilogue[edit]
Master Roshi will introduce himself and ask who assisted his turtle friend. Turtle will announce that it was Son Goku who helped him. As a reward for the help, Master Roshi will bestow the Flying Nimbus upon Goku. Bulma is a little bit jealous of Goku's reward and asks Roshi for a reward as well. Master Roshi will only grant her request if she agrees to show her panties to him. Turtle is embarrassed by his friend's perversion, but Bulma accepts the terms. The sight of Bulma's panties causes Master Roshi's nose to bleed. He then fulfills his end of the bargain by providing her with another Dragon Ball.