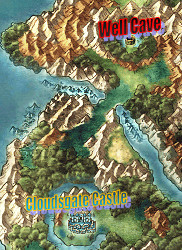
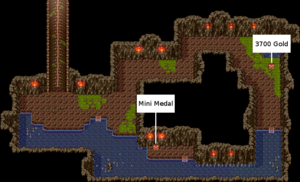
Mini Medal No. 86[edit]


Note: Change Amos into a Paladin if you haven't done so already, then return Ashlynn to her Merchant vocation.
Now, you technically could have gone to the Well Cave the instant you got the Floating Island. However, the enemies inside were much too strong, and there isn't much in there aside from the Mini Medal.
So, there wasn't a point going there until now. So head inside, raid it's contents, and sweep all it's enemies aside! You're more than strong enough now!
Mini Medal No. 87[edit]

This is another place you could have gone to earlier, but there was no convenient way to do so. The forests and mountains block off the Magic Carpet and Flying Bed, so you would have had to manually sail there. But now Peggy Sue allows you to get the 87th Mini Medal without hassle.
Mini Medal No. 88[edit]


Yet another place you could have gone earlier, if you didn't mind the harder fights. In fact, the story actually 'requires' you go here, later on!
However, this is when it's easiest to visit. The Urnexpected is beaten the same way as the Frighturn (just remember that it's immune to Sap), the 88th Mini Medal is here, and Carver deeply appreciates all the stat seeds.
Getting the Sage's Stone (Chateau de Sass)[edit]
The Sage's Stone is one of the most powerful items in the game, restoring 70-80 HP to everyone in your party every time it's used. We did not previously have the equipment needed to win the Levels 6-7 test, but now we do!
Zoom to Fashion Forge, go inside the well, and talk to the fashion designer inside. He will actually increase the Style of your weapons and armour; a mechanic that this guide has never gone over until now.
This is good, because the Dragonsbane, Dragon Armour, and Dragon Shield, give a combined total of +77 Style points when upgraded! That's an additional +15 bonus when they're all worn together, at only 2000G apiece! Add the Platinum Mask and Turnscote Pendant, and you should finally have what it takes!
Give all that gear to either Rex or Terry (hopefully you've been giving Pretty Betsies to Rex; otherwise, Terry needs to become a Dancer), and clear Levels 5-6. Afterwards, hive everything except the Turnscote Pendant to Lizzie (the Gold Bracer is fine for Style points), and have her clear Level 7!
If you want, you can win Level 8 as well by upgrading the Sunderbolt Blade, Armour of Orgo, Tempest Shield, and Helm of Sebath. However, the tab for all that comes out to a whopping 52,000G, and the Level 8 prize is just a helmet that restores a slight amount of MP while walking around. It is absolutely not worth the price, so Level 8 is best saved for post-game.
In any case, the next two Mini Medals involve two very dangerous fights, so be sure your party looks something like this before entering:
| Lizzie (Level 5): Ghent Staff, Dragonsbane, Dragon Armour, Dragon Shield, Platinum Mask, Gold Bracer |
| Terry (Level 24-33): Sage's Stone, Sunderbolt Blade, Hela's Armour, Tempest Shield, Platinum Mask, Gold Bracer |
| Carver (Level 28): Spear of Gracos, Miracle Sword, Mystic Armour, Power Shield, Metal King Helmet, Gold Bracer |
| Amos (Level 25): Fire Claw, Platinum Mail, Platinum Shield, Thinking Cap, Meteorite Bracer |
Undersea Vault (VS. Überkilling Machines)[edit]

The right path leads to treasure guarded by two Überkilling Machines, and the one to the left leads to treasure guarded by one Überkilling Machine and one Dragooner. The left one isn't any tougher than the Überkilling Machine + Iron Tortoise match at Stormsgate Citadel, but the right one is extremely hard to get everyone through. You don't need to have followed the guide in order to beat this latter group; you could have technically won this fight much earlier. It just would have been extremely hard and extremely luck reliant.
But now, you have Lizzie, the Sage's Stone, Terry, and a much stronger Carver. Lizzie is just strong enough to survive 4 hits without defending, Terry can survive while defending, and the Sage's Stone provides the extra healing you need for survival. Follow these steps, and you should win:
1st Turn: Lizzie uses Sage's Stone, Terry defends, Carver uses Spear of Gracos, Amos uses Selflesness on Carver
2nd Turn: Carver uses Forebearance while Lizzie and Terry heal him.
3rd Turn and beyond (if Amos lived): If Amos landed a 2nd Buff on Carver, you're pretty much golden. Terry and Amos will be free to tear the Überkilling Machines apart while Lizzie and Carver maintain Forebearance.
3rd Turn and beyond (if Amos died): You will have to constantly heal Carver until Lizzie gains back all her HP via the Sage's Stone. Then repeat the 1st Turn before proceeding as though Amos had lived. If you want to bring him back before the fight ends, have Terry use the Sunderbolt Blade until right before both Überkilling Machines die (they have 600 HP in the SNES and 480 HP in the remakes). Once he does that, have Terry use a single-target attack to kill just one of them; then Carver can keep using Zing on Amos while using Forebearance as necessary. With any luck, Amos should come back, allowing everyone to gain full experience.
If you have not followed the Vocation recommendations in the guide, then you can still do varients on this strategy. Amos can still use Buff on Carver if he doesn't have Selflesness, Milly can replace Amos if Amos doesn't have Buff, Nevan can replace both of them if you want a Zing user, and etc. One can even try to just bum rush them, having Ashlynn use Magic Burst while the others use their strongest attacks. However, none of these guarantee survival like the above strategy does.
The 90 Mini Medal Reward: The Scroll of Dragonic Dilligence![edit]
You have now collected every single Mini Medal there is to find in both the Dream and Real Worlds; the only ones left now are the ones in the Demon World and the post-game dungeon! So give the Scroll of Dragonic Dilligence to Goowain and change him into a Dragon!
Or you can use it on someone else. Carver plays a crucial role in defeating Mortamor, so you could choose to maximimize his Strength and HP. Or, you could choose to use it on Terry, and hope his Agility doesn't drop too low. You could even give it to a magic user if you're desperate for more HP; just be aware of the 30% MP penalty.
Slimopolis Ranks D-C[edit]
Now that Goowain has Fullheal, access to better equipment, and +200 HP, now is the perfect time to win more prizes from the Slimopolis. Equip him like so:
| Goowain (Level 21): Miracle Sword, Dragon Armour, Dragon Shield, Metal King Helm, Meteorite Bracer |
And watch as he demolishes his competition. Unfortunately, Rank B is a different beast, Round 1 involves a Scytheborg that deals +180 Damage hits with Frenzy, a Bomboulder that casts Kerplunk, and an Overkilling Machine. One can beat it now only on the Remakes, where Goowain can cast Zap with the Sunderbolt Blade. Even then, you will need a lot of resets to get past that round.
That said, one will get a Metal King Shield for their patience. Said shield is the best in the game, sporting -30 point of Damage reduction to every damage type except Crack and Woosh, as well as the highest Defense rating in the game. If you're willing to save and reset your way past Round 1, you can get up to two of them.
