Enemies[edit]
Walkthrough[edit]

After you defeat the Griathrious, the forest will continue to roll on beneath you. Three Dorlers will be on the ground shooting at you, surrounded by a group of Swallowtails fluttering about. Once you get past them, the forest will come to an end, and the terrain will transition to that of a desert. Several Kopteras will fly out to attack you as you reach the start of the desert. A red egg on the left and a blue egg on the right will appear at the same time. It's possible to get both if you are quick enough and know where they will appear, but generally it's safer to pick one or the other.
The giant scorpion-like enemy known as a Sasori (which is Japanese for scorpion) appears for the first time here. They are large slow ground targets that are fairly easy to bomb if safely dodge the projectiles they fire at you. The last of the Kopteras will appear before a short break in the action.
The next enemy that appears will arrive from the bottom of the screen. An enemy that resembles a giant trilobite, known as a Hari, travels along the ground from the bottom of the screen to the top. You can attempt to bomb it, but as soon as you are within bombing range, the Hari ejects three spines into the air. One drops straight down but the other two split off and travel in either direction. The safest action is to ignore it entirely so that you remain a safe distance away from the spines. If you insist on bombing a Hari, you should be prepared to move slightly to one side, so as to fly between the center spine and one of the others.
After one Hari passes by, the Koptera will appear again. This time, the last of the group will arrive in a pair holding a mine. They will toss the mine to the ground ahead of them, and the mine will burst into eight projectiles if you don't manage to shoot it before it hits the ground. They will do this twice before a second Hari appears on the right. More Koptera will appear, along with a couple of Gairas. Then two Haris will appear together. Both will be flashing. It's fairly difficult to safely obtain the random power-up orb from one of the Haris, let alone both of them. Another pair of Kopteras will come along to throw another mine at you.
After the screen clears, a new ground enemy will appear. The Arijigoku is a creature that lives beneath the sand, and burrows up to shoot at you before popping back down. They are only vulnerable to attack when their heads are exposed. Around the same time, a blue Pteranodon will fly out from the left and loop around the screen. And shortly after that, two more flashing Haris will crawl up from the bottom of the screen. Don't be lured into attacking them for a power-up if you can't reach a safe location to attack from. Another red egg will appear above the Arijigoku.

Gairas will cross the sky right about the time that tornadoes begin to appear on the screen. Tornadoes drift left and right as they travel down the screen. You can't destroy them, you can only avoid them. Two Arijigokus will pop out from the sand on the left, and a blue Pteranodon will fly onto the screen from the right. More Gairas will appear before another Pteranodon enters the screen, followed by some Kopteras. After two more Arijigokus appear near the left, two Sasori scorpions will appear together and travel down the screen. Shortly after that, a single flashing Hari will appear and travel up between the two Sasoris.
More Kopteras will appear, followed by three Tornadoes and a Sasori. Once only the last tornado can be seen, several groups Kopteras will fly down from the left and four Arijigokus will appear on the right. A red egg can be found to the left of those Arijigokus, and a blue egg can be found to their right. When you see three Arijigokus on the left, a new enemy will appear. These enemies are called Galagas, as an homage to Namco's popular arcade game Galaga. Like the enemies in that game, these Galagas fly out in formations. They arc up and around across the top of the screen and then back down the opposite side. Two groups will appear from the left, and one group from the right.
Another tornado will appear as two Haris will crawl up from the bottom. The first and left most one will be flashing. A third Hari will appear shortly after, a bit further to the left and flashing as well. Arijigokus will begin to appear again while more Gairas fill the screen. Finally, Kopteras will fly down as you begin to enter a canyon.
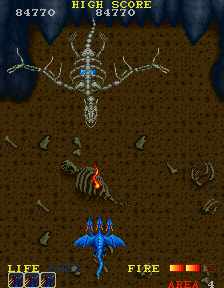
In this canyon, the Tomos from the first stage will make their reappearance. Aside from the occasional Koptera and Gaira, Tomos are all you will be fighting for the next few seconds of the stage. They will leap off the ground from several elevations around the canyon. After a flashing Koptera flies by, you will begin to hear the sound of rattling bones. These sounds come from the disembodied skulls of the dinosaur skeletons that litter the floor of the canyon. They spit projectiles at Amul, but they can be bombed.

Tomos will continue to attack for a long time, and a few more skulls will appear on the ground. You will soon notice a blue spirits flash briefly on the screen before they solidify into Ghosts. Ghosts travel around in circles in an effort to hit you until they are shot and destroyed. Lure them up high on the screen, and then drop back down beneath them to get rid of them. Then continue to deal with the Tomos as they appear.
Soon a second undead apparition will appear before you: the green Geists. Like Ghosts, Geists flash on the screen briefly before solidifying to attack you. Unlike Ghosts, they don't stick around long after they shoot at you. Their brief appearance makes them difficult to destroy intentionally, so you're best off just avoiding the projectiles they fire. Two groups of Geists will attack before another group of Ghosts appear. As the Tomos continue their attack, groups of Gairas will appear as well.
Skulls will continue to appear on the ground as a small elevated island in the canyon is occupied by two blue eggs and two red eggs in a diamond. Bomb them and collect the contents if you are safely able to. One last group of Geists will attack, followed by one last flock of Gairas, before the boss appears.
Boss: Death Guardian[edit]

Death Guardian is an animated dinosaur skeleton that "flies" through the air as it attacks you. It hovers around the screen, spitting fireballs straight down the screen. He will do this continuously until you shoot him enough times in the head to disrupt the force holding his bones together. When this happens, his bones scatter, and a the blue crystal core animating the dinosaur is exposed. At the same time, a group of ghosts will be expelled from the crystal, which are a pretty big threat and must be dealt with accordingly. To truly damage the Death Guardian, you must shoot the blue crystal core. If you don't shoot it enough to destroy it in time, the bones will reassemble around the core, and you must shoot the head to remove them again. The boss is only defeated once the core takes enough hits. To make matters worse, sparks will rain down from the top of the screen if you take too long to destroy the boss.


