Enemies[edit]
Walkthrough[edit]
You've made it to the final stage of the game. However, as short as the previous stage was, Stage 9 is by far the longest stage in the game. It will seem to take forever to reach the end. Fortunately, your full visibility has returned. You are greeted by a trio of Cowfish who occupy the ground and must be bombed. They are joined by Hand Eyes from the previous stage. When you get a little further in, you'll see a flashing Furo, a stationary ground plant that shoots at you. Bomb it to release a random power-up orb.
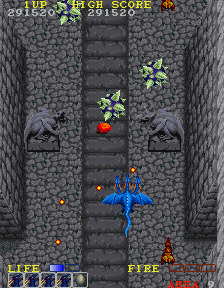
Shorty after that, you begin to fly between two Gargoyle statues. They shoot at you, but you can stop them by shooting them in the head enough times. As you do, be prepared to deal with more Splinter Rocks. As with the previous stage, these large crystals are nearly indestructible, and the effort it takes to destroy them (if you're strong enough) is not worth the trouble. Rather than put yourself in danger by focusing on them, ignore them and fly around them. You'll encounter a red egg between the second set of Gargoyles, and a blue egg between the third set.
Beyond the Gargoyles, you'll encounter crab enemies known as Kani (Japanese for crab). They fire multiple projectiles at you, and then scuttle off to one side of the screen or the other. Bomb them if you can. Behind them is a small wall on which two face statues known as Dead Masks sit and fire at you. You can shoot at them to disable them.
The wall creates two corridors on either side. Blue armored warriors known as Guardians will walk down each corridor. Guardians toss axes which are capable of passing through the center barrier. You'll have to choose one corridor or the other to fly down through. Bomb the Guardians that you have access to, and watch out for the axes thrown by the Guardians on the other side. Cave Bats join the Guardians in this section. There's a red egg to the far side of whichever corridor you travel down.
Eventually, the barrier in the middle of the corridors will end, and new walls will split the stage into three passages. Only the center stairs can be navigated successfully; the two passages on either side lead to dead-ends. All of the passages are occupied by Furos, and the Furos that sit at the end of either dead-end will be flashing. If you're fast, you can fly up and bomb one of these Furos to collect a random power-up, and then quickly fly back down to the center before flying up the central passage.
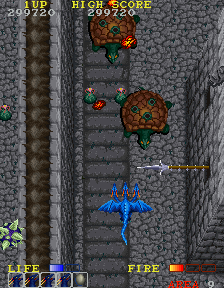
As you fly up the narrow central passage, you'll have to dodge more Splinter Rocks as they slowly drop down the screen. At the same time, Furos will be on the ground and Cave Bats will fly toward you. At the end of the narrow passage, you'll see a red egg before two more Furos, and three Dead Masks on the wall ahead of you. You'll have to choose a direction again, left or right. The left side leads to a very narrow corridor occupied only by Furos (the first of which is flashing) and Splinter Rocks. At a certain point midway up the path, a spear trap will pop out of the wall in an attempt to snag you. The narrow confines of the path don't give you a lot of room to fly around for safety. There's a red egg at the top of this passage as well.
The right path on the other hand is a bit more open, but has more to deal with. You also start off with a flashing Furos, and a spear trap popping out of the wall. The path will double back to the left a bit, and further in, you'll start to encounter a new turtle-like enemy known as Zougame (Japanese for giant tortoise). They crawl along the ground, spraying the air with fireballs that they release from their shell. More spear traps will appear along this path, and you'll also encounter more Dead Masks, one on the wall ahead of you, and one on the wall to the right side.
Once you make it through either passage, you'll enter a flat area where you will encounter the Caterpillars from Stage 5. Bomb them when they are not rolled up into small balls. One of them will be flashing. Two Dead Masks up ahead will signify the start of another branching path. Both paths will be occupied by nothing but Spiders and Spider Webs. The path to the right is slightly more open than the narrow path on the left. But since the exit above is on the left side, you're better off on the left than having to get to the top of the right and dash across in front of three Dead Masks. Be mindful of the masks which appear on the side walls as well.
Flying up through the narrow path on the left, you'll encounter more Caterpillars in an open area, including one flashing one. Three Dead Masks occupy the wall above, and a fourth is on the side wall to the right. As you head over to the path on the right, spear traps will pop out of the walls in an effort to snag you. A Furo will occupy the floor before you have to swing back to the left. The wall ahead will contain three more Dead Masks, and a fourth will be off to the left. Fly up the left path carefully, dodging more spear traps and bombing to Furos at the top.
What you encounter next can be a great opportunity to power up Amul as long as you are careful. You'll enter a region that contains four rows of five flashing Furos. Since they each provide a random power-up when bombed, there's no way to predict what each one will release, but as long as you avoid getting shot, and collecting any of the black "Power Down" orbs, you can increase Amul's firepower significantly. Do your best to collect the helpful orbs while avoiding the streams of projectiles coming from the Furos and the Dead Masks on the side walls.
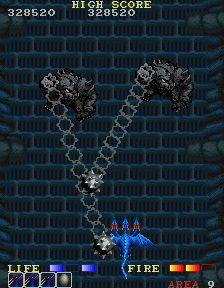
Beyond the flashing Furos, you will fly over a blue stone floor. This large corridor is occupied by one specific enemy: an armored demon known as Bagos. There are six of them, and each one is armed with a large ball and chain. They swing the ball and chain over their heads and occasionally launch them forward. To defeat them, you must shoot them in the head until they are destroyed. It's not a good idea to ignore them: if they reach the bottom of the stage, they'll retreat back up one time to continue their attack. Then they will drop off the bottom the second time. They are among the strongest enemies to defeat (although nowhere near as bad as Splinter Rocks) so keep pouring on your firepower.
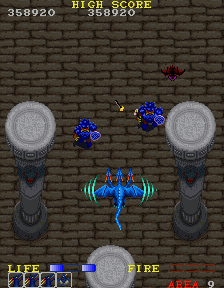
Beyond the Bagos, you will encounter groups of Zougame tortoises. While bombing them may be a good idea, there's quite a lot of them, and you may be forced to simply avoid them until they pass. Following quickly behind, however, will be Guardians and Cave Bats. All of the Cave Bats that you encounter here will be flashing, so it's another good opportunity to power-up if you are careful about what you collect. When you reach a section loaded with columns, the Guardians will stop appearing for a bit, and in their place will be projectile spitting faces known as Enchou (Japanese for column). They shoot a spread of projectiles in three directions, and they can't be destroyed, so your only option is to avoid getting shot by them.
Beyond the columns, the Guardians and flashing Cave Bats will continue to appear. Dead Masks will appear on the wall before the path branches again. There's no distinction between the left and right side. When the barrier in the middle ends, it will recreate the scenario where there are two dead-ends on either side and a stairway up the middle. As you fly up the middle path, pillars will rise out of the ground which can kill you. Hug the wall up the central path.
As the path opens up, more pillars will rise out of the ground. Stay to the sides to avoid them, but watch out for the Spear Traps which pop out of the walls. Through the next section, spear traps are lined up with Furos on the ground, so you'll have to bomb them carefully while avoiding getting hit by the traps. Provided you survive, there will be one last flashing Furos on the ground for you to bomb, and then the screen will darken.
SUB-BOSS: Hydra[edit]
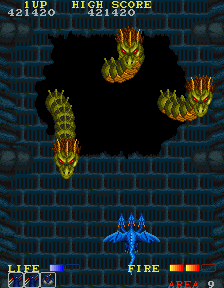
When the lights return, you will be face to face with a three-headed Hydra. The Hydra's body does not appear, as it seems to be below the floor, but the three heads are sticking up through a giant hole. Each head must be destroyed independently with either 48 Level 1 shots, 24 Level 2 shots, or 16 Level 3 shots. As you move back and forth along the bottom, the heads will try to align in such a way as to have the best shot at you. They breath large fireballs, around three to four of them, all at once, before taking a break. It's best to focus on one head at a time. The head in the middle seems to have the most freedom to move about and position itself to attack you. Although it's difficult to do without any indication of what parts of the screen are safe to occupy, you must try to place yourself in regions of the screen where the fireballs will zip past you, and then press your attack while the heads are taking a break from breathing fire.
Once you destroy all three heads, you will fly over the hole and on to the chamber above.
BOSS: Zawell[edit]
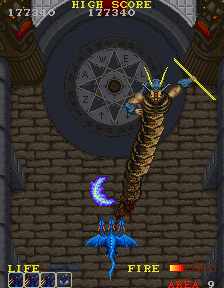
Zawell is the demon who has imprisoned Alicia. You must defeat him to rescue her. Zawell can fly all over the room with complete freedom. He carries a staff which is capable of blocking all of your attacks, and he can generate a wave of energy from between his antennae which spins around and seeks out Amuls position in an effort to hit him. You must avoid these circulating energy waves, as well as avoiding Zawell himself. Since his staff can block your shots, you need to attempt to shoot him during those brief moments when he raises the staff to the side, exposing himself to your attacks. He requires the same number of shots to defeat as one of the individual Hydra heads, so be prepared for a long battle if your weapon has been reduced to Level 1. If you manage to destroy him, you will be treated to the ending of the game, and the end credits.
