- Green text on this page indicates that it is exclusive to the GBC and SNES versions.
| Monsters in Alefgard Ocean |
|---|
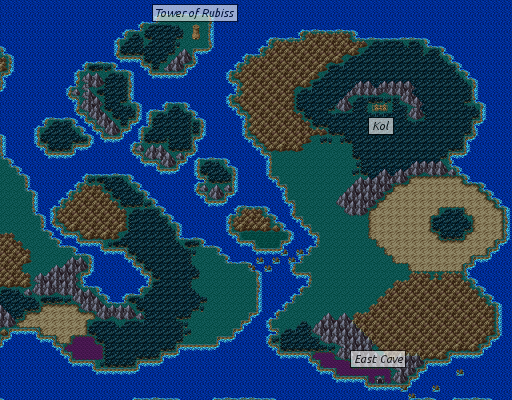
With most of the land accessible destinations explored, it's time to hop in your ship and explore the eastern regions of Alefgard. Your first stop will be the village of Kol, which is nestled into a crown of mountains near the north. Some of its occupants are, like you, originally from the world above. One particular man has the power to craft a treasured weapon if you can provide him with the proper materials. On an island to the east of Kol is a tower where the spirit who created this land is said to be trapped. Further to the south is the town of Rimuldar. A tunnel to connect the lands of Kol and Rimuldar is under construction, but it isn't ready yet. You'll learn more information about how to reach Zoma in Rimuldar, and maybe even find an important item. But most important of all is the Holy Shrine found on a small island south of Rimuldar.
| Monsters in Kol Area |
|---|
Sailing to Kol[edit]
There is no path by land that you can take to reach Kol, so you'll have to board your ship and sail there. Reaching Kol is fairly easy, but powerful monsters of the sea like Kragacles may make it a bit more challenging. Sail up along the west coast of Alefgard until you see Garin's home. Then start sailing east along the north coast. You will pass a chain of islands, one of which has a tower on it. You're not yet ready to take on the tower, so skip it for now. Sail down to the right of the tower until you are well south of the hills that occupy the land to the east. Then anchor your ship along the coast and travel east until Kol appears in the distance. You can park next to the hills if you want to, but remember that walking through hills increases your chances of encountering an enemy.
| Tool shop | ||||||
|---|---|---|---|---|---|---|
| Medical Herb Herb |
Fairy Water Repellent Holy Water |
Wing of Wyvern WarpWing |
Full Moon Herb MoonHerb |
Pierce Slime Earrings | ||
| 8G | 20G | 25G | 30G | 950G | ||
| Services | |
|---|---|
| Inn | Healing |
| 124G/person | No |
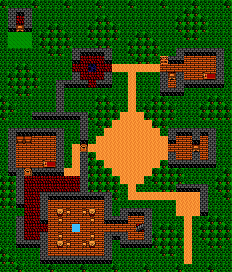
Nestled in the forest, Kol appears to be a very lush and woodsy town. Above the entrance is an equipment shop, but the only unique item that it sells is the Water Flying Cloth (Water Dress), a particular good piece of defensive equipment for Wizards (Mages), which specializes in fire protection. In town, one guy tells you that he heard the Sword of Kings (King's Sword) was shattered into pieces by Zoma, while another woman tells you that the owner of the item shop is skilled at restoring useless items. Go in the Well and check south of the stairs for a ![]() TinyMedal /
TinyMedal / ![]() Small Medal. Across from the inn, a woman will inform you of the open air baths. Check the stairs in the Bath for a
Small Medal. Across from the inn, a woman will inform you of the open air baths. Check the stairs in the Bath for a ![]() TinyMedal /
TinyMedal / ![]() Small Medal. North of the Inn is a
Small Medal. North of the Inn is a ![]() MysticNut /
MysticNut / ![]() Mystic Nut hidden behind the trees. Beyond the baths, in the upper left corner of town, is a woman standing behind a counter. She tells you that the Archfiend uses powers of Darkness, and that you should be able to weaken those powers if you have the Sphere of Light.
Mystic Nut hidden behind the trees. Beyond the baths, in the upper left corner of town, is a woman standing behind a counter. She tells you that the Archfiend uses powers of Darkness, and that you should be able to weaken those powers if you have the Sphere of Light.
As you travel down the left side of town, you will reach an apartment where the woman inside says she was from Jipang, and she and her husband fled when she might have become an offering to Orochi. She says her husband used to be a swordsmith. Check both dressers behind her for ![]() Token /
Token / ![]() Pachisi Ticket and
Pachisi Ticket and ![]() Cloth
Cloth ![]() /
/ ![]() Clothes. In the building to the southeast, a man says that the Sword of Kings (King's Sword) was rumored to me made of Oricon, and the man in the lower right corner of the room says that the man upstairs is from Jipang. Check the tile in the middle of the room for a
Clothes. In the building to the southeast, a man says that the Sword of Kings (King's Sword) was rumored to me made of Oricon, and the man in the lower right corner of the room says that the man upstairs is from Jipang. Check the tile in the middle of the room for a ![]() Token /
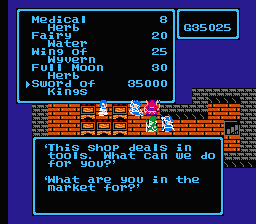
Token / ![]() Pachisi Ticket. Climb the stairs to meet him. You will see a large room with a man behind the counter. The man will offer to sell you a handful of items, with nothing special. However, if you happened to have found the Oricon from the pasture in Hauksness (Domdora), he will offer to purchase it from you at the cost of 22,500 gold. Sell it to him, leave the village, return to it, and speak with him again (In the remakes you need to save and then reset the Game. Load the savestate and return to him). He will have a new item in his list of wares: The Sword of Kings (
Pachisi Ticket. Climb the stairs to meet him. You will see a large room with a man behind the counter. The man will offer to sell you a handful of items, with nothing special. However, if you happened to have found the Oricon from the pasture in Hauksness (Domdora), he will offer to purchase it from you at the cost of 22,500 gold. Sell it to him, leave the village, return to it, and speak with him again (In the remakes you need to save and then reset the Game. Load the savestate and return to him). He will have a new item in his list of wares: The Sword of Kings (![]() Kings
Kings ![]() /
/ ![]() King's Sword), which you can purchase from him at a cost of 35,000 gold. Do so at your earliest convenience. Also check both bags behind him for
King's Sword), which you can purchase from him at a cost of 35,000 gold. Do so at your earliest convenience. Also check both bags behind him for ![]() Token /
Token / ![]() Pachisi Ticket and
Pachisi Ticket and ![]() TinyMedal /
TinyMedal / ![]() Small Medal.
Small Medal.
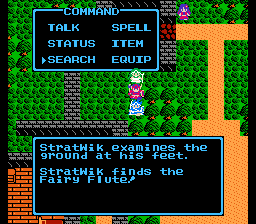
There are two people standing outside of town, one of whom is a little difficult to reach. There is a woman standing below the Inn, but you'll have to walk above and around the Inn to reach her. She informs you that according to rumor, Rubiss is sealed inside the tower you passed. A man standing outside the lower left corner of town informs you that you can free Rubiss from the curse if you have the Fairy Flute. So where is this Fairy Flute? You'll need to think back to the first Dragon Warrior in order to find it. Read the spoiler below for more information.
Tower of Rubiss[edit]
| Monsters in Tower of Rubiss |
|---|
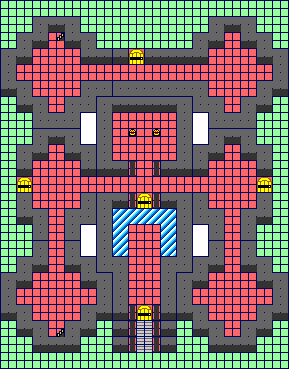
If you have possession of the Fairy Flute, then it's time to sail back to the tower and investigate. The tower is filled with many powerful enemies, including Leonas and Winged Demons. It also has its share of MagiWyverns and Metal Babbles. When you arrive, you will walk up a set of steps to a door. Unlock the door and step inside. Cast StepGuard to walk on the Barrier tiles before the next door and open that one as well. Immediately above you will be two treasure chests. The one on the left is a Mimic, but the one on the right contains 1016 gold.
Below the chests, you must choose between heading to the right or two the left. The truth is that visiting the right is unnecessary, but if you choose to investigate it, you will find a door that leads out to the grass on the east side of the tower. Taking care not to travel too far so as to exit the Tower, you can walk up to a man who is waiting alongside the tower. He tells you that if you have the Fairy Flute, you should proceed to the fifth floor. Beyond that, there is nothing of value to the right.
From below the two treasure chests, head to the left. Once again, you can open a door that leads outside the tower. This time, there is a man standing just off screen to the bottom. He gives you a hint about how to traverse on the revolving floors. Walk back inside the tower, and head down the passage on the left side to reach a set of stairs that lead to the second floor.
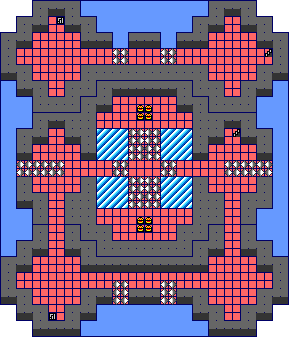
A short distance to the right of where you arrive, you will notice a strange looking tile on the floor. These are the "revolving floor" tiles that the man below was talking about. When you step on them, they change the orientation of the directions on the control pad. Up becomes the direction that the darkened triangle is facing, and down becomes the direction the light triangle is facing. Use the following table to help you determine which direction to press when you are standing on one of these tiles.
| Right | Left | ||||
| Up | Down | Down | Up | ||
| Left | Right | ||||
Therefore, if you are standing on a tile whose dark triangle is pointing left and you want to move one square up, you must push the control pad left. If you are standing on a tile whose dark triangle is pointing right, and you want to move to the right, you must push the control pad down. The control pad only changes direction once you are fully standing on the tile, not while you are walking on to it.
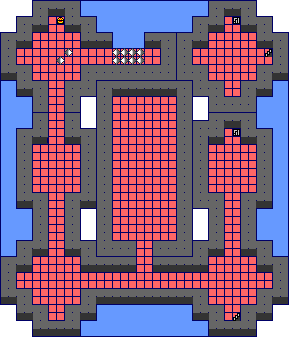
From here, you can access two sections of the second floor: the bottom and the middle. The top part is closed off to you. The bottom section contains nothing but two sets of revolving tiles that lead to openings in the wall. If you walk through them, you will arrive back on the first floor. Walk up to the middle section.
In the center, you will find a large number of revolving floor tiles, big sections of Barrier tiles, and eight treasure chests broken into two groups. If you don't want to deal with the revolving tiles, you can simply cast StepGuard and walk across the Barrier tiles to reach the treasure chests. However, it would be a good idea to get some practice on the tiles while you are here, since mastery of them will be necessary later on.
In the bottom set of treasure chests, you will find one Vitality Seed and three Acorns of Life (You get only 2 ![]() LifeAcorn /
LifeAcorn / ![]() Life Nut,
Life Nut, ![]() Love
Love ![]() /
/ ![]() Benevolent Ring and
Benevolent Ring and ![]() Flame
Flame ![]() /
/ ![]() Flamerang). Among the top set of treasure chests, one has 960 gold, another has a Full Moon Herb (
Flamerang). Among the top set of treasure chests, one has 960 gold, another has a Full Moon Herb (![]() TinyMedal /
TinyMedal / ![]() Small Medal), and the remaining two are Mimics (No, there is only one in the remakes and the other chest has
Small Medal), and the remaining two are Mimics (No, there is only one in the remakes and the other chest has ![]() STR
STR ![]() /
/ ![]() Strength Ring). After you have examined the chests, walk over to the right side of the middle section to locate the staircase that leads to the third floor.
Strength Ring). After you have examined the chests, walk over to the right side of the middle section to locate the staircase that leads to the third floor.
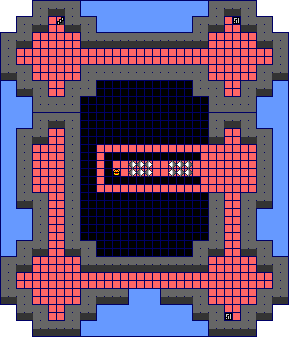
After climbing to the third floor, you will have to walk down, and you will encounter stairs to the fourth floor very quickly. It is a good idea to climb them now and go straight to the fourth floor. Once there, you can go left or up. The left leads to a dead end. The upper path, however, leads to an important treasure chest. Follow the path up until it leads you to a strip of floor over a giant hole. Take careful not of the revolving tiles on the floor and determine what direction you must push on the control pad to get across them and reach the treasure chest to the left. Along the right set of tiles, you'll have to push up, and along the left set of tiles, you have to push down.
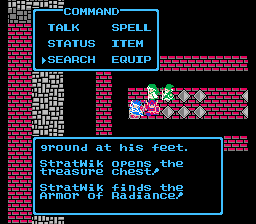
Once you are across, you will be standing before the treasure chest. Examine it to find the Armor of Radiance (![]() Light
Light ![]() /
/ ![]() Light Armor), one of the three Tantegel (Ludatorm) treasures needed to defeat Zoma. Give it to your Hero to equip. It will heal one hit point of damage with every step that he takes. After you collect it, you can opt to go back the way you came and take the staircase, or you can simply fall over the ledge and drop down to the giant room in the middle of the third floor. Let yourself fall down and search above the lowest skull for a
Light Armor), one of the three Tantegel (Ludatorm) treasures needed to defeat Zoma. Give it to your Hero to equip. It will heal one hit point of damage with every step that he takes. After you collect it, you can opt to go back the way you came and take the staircase, or you can simply fall over the ledge and drop down to the giant room in the middle of the third floor. Let yourself fall down and search above the lowest skull for a ![]() Token /
Token / ![]() Pachisi Ticket. Either way, return to the central corridor in the bottom of the third floor, then head left and walk up the left side of the floor.
Pachisi Ticket. Either way, return to the central corridor in the bottom of the third floor, then head left and walk up the left side of the floor.
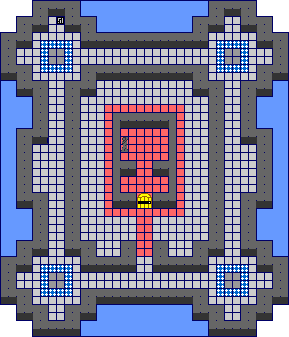
When you cross the boundary to the top of the floor, you will see one treasure chest near the top, but it is a Mimic (![]() TinyMedal /
TinyMedal / ![]() Small Medal). Walk right to the center and stand on the revolving tiles before the gap in the wall. Allow yourself to walk through the gap, and you will fall all the way down to the first floor. However, you will now be standing before the back side of the tower. Unlock the door to the back and step inside.
Small Medal). Walk right to the center and stand on the revolving tiles before the gap in the wall. Allow yourself to walk through the gap, and you will fall all the way down to the first floor. However, you will now be standing before the back side of the tower. Unlock the door to the back and step inside.
Inside the back of the first floor, you can go right or left, but right leads to a dead-end, so enter the room to the left. Climb the stairs up to the second floor. From there, carefully cross the corridor that leads to the right which contains revolving tiles on the floor. Push down to cross the both sets of tiles. Once you make it across, climb the stairs to the third floor. This will deposit you in a small room with stairs that lead up to the fourth floor. Go ahead and climb them.
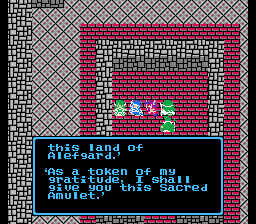
On the fourth floor, cross the hallway back to the left. On the opposite side, you will find the stairs that take you up to the fifth and final floor of the tower. Upon arriving at the fifth floor, walk down to the bottom of the floor and cross over to the right until you reach an entrance into the interior. Walk up and approach the locked door. Open the door and continue up to the room containing a statue. Stand before the statue and play the Fairy Flute. Suddenly, the spirit of Rubiss will be freed from her imprisonment. As a reward for your bravery, she will offer you the Sacred Amulet (Crest / Sacred Talisman). Having secured the amulet, you may now leave the tower.
The tunnel project[edit]
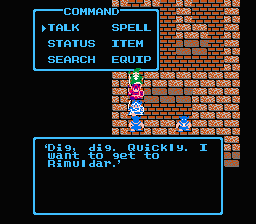
If you played the first Dragon Warrior, you may recall that there was an underwater tunnel that connected the land south of Kol with the land surrounding Rimuldar. The entrance to this cave can still be found at the bottom of a poison marsh along the southern coast of the island. However, if you investigate it, you will find that in this time, the cave is only under construction, and still has quite a ways to go before it is complete. You won't be able to utilize it to reach Rimuldar, so you'll have to find another means of getting there. Check right of the westernmost bed for a ![]() Token /
Token / ![]() Pachisi Ticket, go south and search between both mens for a
Pachisi Ticket, go south and search between both mens for a ![]() TinyMedal /
TinyMedal / ![]() Small Medal)
Small Medal)
Heading further south[edit]
| Monsters in Rimuldar Area |
|---|
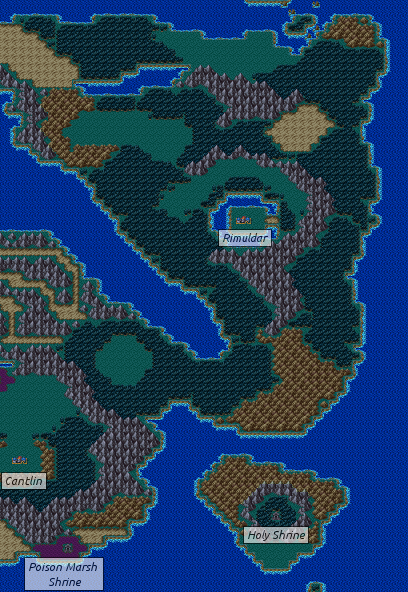
To reach Rimuldar, you have two options. From Kol, you can simply sail east along the north coast of Alefgard, and then sail south along the east coast until you reach the next portion of land. Alternatively, you can walk to the first bridge south of Hauksness, and travel east through the mountain trails that take you through the land north of Cantlin (Mercado). Then you can begin to walk north once you are across the land bridge that connects the two regions.
Either way that you go, you'll need to head to the center of the land until you see the town of Rimuldar encircled by a body of water with a bridge leading to it on the east side. You'll have to approach the bridge from the north side, as the south side is blocked off by the semi-circle of mountains that shelter Rimuldar.
There are just a few remaining locations of interest left for you to visit in the land of Alefgard. Far to the south of Rimuldar is an island which contains a Holy Shrine. And north of Rimuldar, you can reach the peninsula that leads to the island where Zoma's castle is situated. However, no bridge connects the two pieces of land, and no ship can sail into the interior waters of Alefgard, so you'll have to find another way to reach it. Perhaps you can learn of another way in Rimuldar.
Rimuldar[edit]
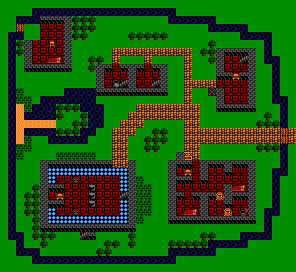
Rimuldar thrives due to the protection of it's natural water and mountain borders. The equipment shop above the entrance has an interesting assortment of items. You may be tempted to buy the Sword of Destruction, but 45,000 gold is a lot to pay for a weapon that is essentially cursed. Though it provides more attack power than any other weapon, it has a tendency to make its wielder freeze up in battle.
Many inhabitants wander around town. A Soldier near the equipment shop claims he saw an old man standing on the west edge of the land across from Zoma's island. A little boy claims that Ortega has already gone ahead to defeat Zoma. And another man claims that you can't defeat the Archfiend without the Sphere of Light (Light Orb), a third reference to this mysterious item.
| Services | |
|---|---|
| Inn | Healing |
| 80G/person | Yes |
Along the top of the town are two people standing in buildings who claim that the Sacred Amulet (Sacred Talisman) is proof of Rubiss' love, and that the Armor of Radiance (Light Armor) may be found in the tower where she is held. Search the cupboard in right room for a ![]() Zen
Zen ![]() /
/ ![]() Zen Book. In the left room are
Zen Book. In the left room are ![]() GoldBeak /
GoldBeak / ![]() Golden Beak in cupboard,
Golden Beak in cupboard, ![]() STRseed /
STRseed / ![]() Strength Seed and
Strength Seed and ![]() TinyMedal /
TinyMedal / ![]() Small Medal in pots. A man standing on an island claims that Ortega didn't know how to cross over to the island and drowned in the ocean, but many people have predicted his death before, and so far they have all been wrong.
Small Medal in pots. A man standing on an island claims that Ortega didn't know how to cross over to the island and drowned in the ocean, but many people have predicted his death before, and so far they have all been wrong.
The building below the man on the island is an interesting place. Inside, a woman finds it remarkable that there is a World of Light above Alefgard, and the man behind the counter claims that drops of liquid light can create a rainbow bridge at the western edge above Rimuldar. Walking up the stairs, you will reach a House of Healing. Additionally, a jail will be visible in the southern portion of the building, but it won't be immediately clear how you can access it. Step back outside of the building, and investigate the south side.
Walk toward the two trees below the building, and push up one square to the right of them (In remakes you need to push from the left side). You will find a covered region of the building with a set of stairs that lead to the jail. The guard standing nearby claims that the prisoner is a chronic liar. If you wish to speak with him, open the jail door and step inside. He will tell you that there's a secret passage behind the thrones in Zoma's castle. Whether he is lying or being honest remains to be seen, but check the table to find a ![]() TinyMedal /
TinyMedal / ![]() Small Medal.
Small Medal.
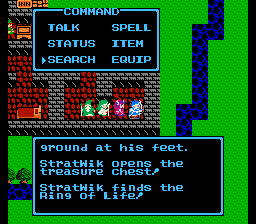
Below the Inn, you will see another Soldier walking about. If you speak with him, he claims to be worried about the item that he left in the Inn which he says was given to him by Ortega. Naturally, you should be very curious, and take advantage of this person's naivety. Step inside the inn and open both locked doors that lead the way to the treasure chest in the lower right corner. Open the chest, and you will find the Ring of Life (![]() Life
Life ![]() /
/ ![]() Life Ring). This item will restore one lost hit point for every step its wearer takes. Note that the Hero will not earn back two hit points if he or she wears both the Armor of Radiance and the Ring of Life, so be sure to give the Ring of Life to someone else who takes a lot of damage, or runs out of hit points quickly. Also check the cupboard in the Inn for a
Life Ring). This item will restore one lost hit point for every step its wearer takes. Note that the Hero will not earn back two hit points if he or she wears both the Armor of Radiance and the Ring of Life, so be sure to give the Ring of Life to someone else who takes a lot of damage, or runs out of hit points quickly. Also check the cupboard in the Inn for a ![]() Toughness /
Toughness / ![]() Hard Heart.
Hard Heart.
Finally, it is possible to explore the outer edges of town. If you walk up along the right side of town, just outside of the water, you will encounter an unhappy woman who is upset that someone hasn't met her. If you continue left along the north side of town, you will reach the building in the upper left corner. In the original Dragon Warrior, this is where you first bought Magic Keys. However, at this time, the man only wishes to see a Magic Key. If you bother to fetch the key from the Vault and show it to him, he will only remark about how interesting it is, and you gain nothing. But you can get ![]() Token /
Token / ![]() Pachisi Ticket and
Pachisi Ticket and ![]() TinyMedal /
TinyMedal / ![]() Small Medal from the cupboards and also a
Small Medal from the cupboards and also a ![]() INTseed /
INTseed / ![]() Wisdom Seed in the pot. If you continue around to the lower left corner of town, you won't find anyone waiting there. In order to see who the other woman was talking about, you must actually step pretty far out to the left. There you will find a man who mentions that the Sage's Stone can heal everyone's wounds and be used any number of times.
Wisdom Seed in the pot. If you continue around to the lower left corner of town, you won't find anyone waiting there. In order to see who the other woman was talking about, you must actually step pretty far out to the left. There you will find a man who mentions that the Sage's Stone can heal everyone's wounds and be used any number of times.
Visit the Holy Shrine[edit]
| Monsters in Shrine of Honor Area |
|---|
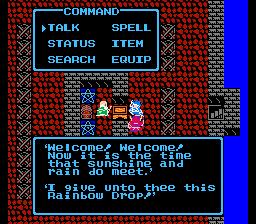
To reach the Holy Shrine south of Rimuldar, you have no options but to sail. The bridge that connects the land in the future is far off from being built. Follow the east coast of Alefgard south until you reach the small island surrounded by hills along the north edge. In the middle of the island is a shrine surrounded by trees and a ring of mountains. Approach the shrine from the south. Inside is a man for remarks that the Stones of Sunlight (Sun Stone), the Staff of Rain (Rain Staff), and the Sacred Amulet (Crest / Sacred Talisman) are marks of proof of a hero. If you are missing any one of these items, he will have nothing to do with you and ask you to leave. However, if you bring all three of these items to him, he will create the ![]()
![]() Rainbow Drop for you. Check under the left Cross for a
Rainbow Drop for you. Check under the left Cross for a ![]() TinyMedal /
TinyMedal / ![]() Small Medal.
Small Medal.
