- Green text on this page indicates that it is exclusive to the GBC and SNES versions.
| Monsters in Samanao Area |
|---|
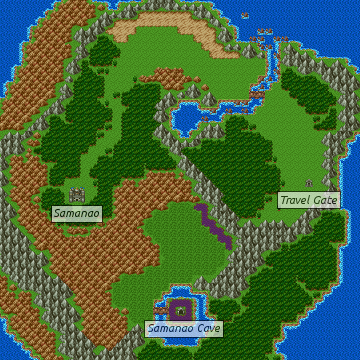
One region of the world that you may not have visited yet is the mountain-locked region in the north half of this world's South American continent. If you look for a means to sail there, it looks like there might be one river that provides you with access, but your hopes will be quickly dashed on the shoals that block the mouth of the river and make passage by ship impossible. Another means must be found. Once you make it there, you will discover a kingdom that is ruled by a man who has become an executing tyrant in very recent times. A little digging around in the nearby cave may help you find an item that will shed some light on the ruler's personality change. Successfully solving the mystery will net you a possession that begins a chain of item exchanges which ultimately ends with an object that is more a key than a weapon.
Travel Gates[edit]
As hard as you try to find an entrance into the region above the Pirate's Den, you will not find any available access into the kingdom surrounded by mountains. The one river in the north is blocked off by rocks which prevent your ship from entering. In order to gain access, you'll need to find another method. That method will be by Travel Gate. Possession of the Final Key gives you access to the few doors that are found inside of shrines. Beyond most of these doors, you will find Travel Gates. The kingdom that you are trying to reach is known as Samanao, and you have a couple of options when deciding how to get there.
- If you are sailing north of Soo, there is an island just off the north coast of the continent that contains a shrine. The shrine contains three distinct Travel Gates. From left to right, they will transport you to the shrine north of Romaly, the shrine north of Baharata, and the shrine east of Samanao. If you take the right most gate, you will arrive via the left gate in the Samanao shrine.
- If you happen to be in the vicinity of Baharata or Dhama, you may wish to walk north of Baharata until you reach the shrine known as Olivia's Promontory. Open the door at the top to learn a little about the history of the Promontory from the occupant. Than open the gate to the right where you will find two Travel Gates. The bottom gate leads to the middle gate in the shrine north of Soo described above, while the top gate takes you to the right gate in the Samanao shrine.
- If you are around the Portoga / Romaly area, visit the shrine that connects the two kingdoms. Open the gate found along the underwater passage, and use the Travel Gate found there to transport to the Shrine North of Soo, where you can walk across to the right side, and use the gate to reach Samanao.
Once you reach Samanao shrine, it will look as though you've reach a House of Healing, but in fact the man standing there will tell you about how the king of Samanao's personality has changed, and how Simon was banished and ordered to travel through the right gate (leading back to Olivia's Promontoty). Step outside the shrine to get a glimpse of the new land around you. To reach the kingdom, you will have to journey north, and then head west across the bridge that spans the rocky river. Continue west until you can follow a path to the south that leads directly to Samanao. Fortunately, once you visit there, you can easily cast Return to get back.
Samanao (Samanosa)[edit]
| Tool shop | |||||
|---|---|---|---|---|---|
| Medical Herb Herb |
Antidote Herb Antidote |
Fairy Water Repellent Holy Water |
Wing of Wyvern WarpWing |
Full Moon Herb MoonHerb |
Poison Moth Powder BugPowder Moth Powder |
| 8G | 10G | 20G | 25G | 30G | 500G 310G |
| Services | |
|---|---|
| Inn | Healing |
| 80G/person | Yes |
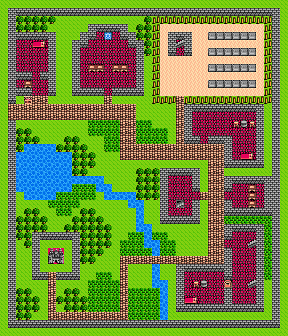
On your very first visit to Samanao (Samanosa), you will bare witness to an unfortunate event. A funeral will be taking place in the cemetery to the right of the House of Healing. Speaking with those in attendance won't yield a lot of information, but you will learn that the man was put to death for bad-mouthing the king. It turns out that most of the town has gone to the funeral, so you won't be able to accomplish much until you leave the town and return. Even walking downstairs to the gambling hall is enough to reset the activity in town. This is not so in the Remakes, so ignore it for now, since it will be reset much later. Check the barrel by Inn for a ![]() Token /
Token / ![]() Pachisi Ticket. Searching through the Tombstones will yield you those treasures:
Pachisi Ticket. Searching through the Tombstones will yield you those treasures: ![]() TinyMedal /
TinyMedal / ![]() Small Medal in the top row, fourth down from the left,
Small Medal in the top row, fourth down from the left, ![]() Token /
Token / ![]() Pachisi Ticket in the second row, second from the left, and
Pachisi Ticket in the second row, second from the left, and ![]() AGLseed /
AGLseed / ![]() Agility Seed in the third row, third from the left. In house south of it is a
Agility Seed in the third row, third from the left. In house south of it is a ![]() STRseed /
STRseed / ![]() Strength Seed in the left pot.
Strength Seed in the left pot.
When things resume their normal schedule, you will still see people mourning the loss of loved ones, and many complaining about the atrocities that the king has committed on the people. A man who lives in a room below the cemetery suggests that the Staff of Change is what might be responsible for the king's behavior. Another man reports that the king goes to sleep alone every night on the second floor of the castle. And a boy who claims to be the son of Simon is trying to find the whereabouts of his father. At night, you will find the equipment shop owner speaking with a man about the effects of the Staff of Change.
The Equipment shop in Samanao is unusual in that it is found on the second floor, and it has some very valuable weapons and shields. The Dragon Killer is extremely expensive (Dragon Killer isn't sold here, so you have to buy Zombie Killer instead), but worth every piece of gold if you can afford it. Give it to your Hero, and a Soldier (Warrior) if you have one. The Silver Shield (again you have to buy Dragon Shield instead of Silver Shield) is also provides incredible protection. If you can't afford them all now, start saving up for them. When you are ready, approach the castle in the lower left corner of town.
Trouble in the castle[edit]
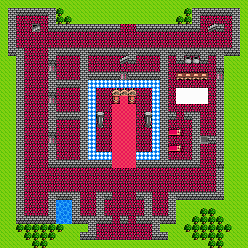
The guards that stand in front of the entrance are not easily persuaded, but don't be deterred so easily. Take a walk around the left side and search the ground northeast of the small pond for a ![]() TinyMedal /
TinyMedal / ![]() Small Medal. Take a walk around the right side of the castle, where you'll find another guard protecting a service entrance. Fortunately, he's a bit more gullible than the front guards. Whether you speak with him or not, he won't stop you from unlocking the door and entering the castle kitchen. The women inside will be frantically preparing the king's meal. Check the barrel for another
Small Medal. Take a walk around the right side of the castle, where you'll find another guard protecting a service entrance. Fortunately, he's a bit more gullible than the front guards. Whether you speak with him or not, he won't stop you from unlocking the door and entering the castle kitchen. The women inside will be frantically preparing the king's meal. Check the barrel for another ![]() TinyMedal /
TinyMedal / ![]() Small Medal. Unlock the gate to access the rest of the castle's interior.
Small Medal. Unlock the gate to access the rest of the castle's interior.
Walking around the castle, you will learn that people are genuinely concerned about the transformation of the king. Even the princess can hardly believe that he is really her father. Check the toprightmost flowerbush for a ![]() LifeAcorn /
LifeAcorn / ![]() Life Nut. A set of stairs in the upper left corner lead down to the prison, while a set of stairs in the upper right corner lead up to a tower with openings along all four walls. Walking through the lower gap on the left side allows you to fall down on the second floor where you can access the king's bedroom through a window (In Remakes this is abit different. Go up twice the stairs, then you will be outside the Castle on a high platform where you can jump down. Do that and go through the Door to the left to enter the King's Room). However, during the day, it will do you little good to bother (not true either, since you can grab
Life Nut. A set of stairs in the upper left corner lead down to the prison, while a set of stairs in the upper right corner lead up to a tower with openings along all four walls. Walking through the lower gap on the left side allows you to fall down on the second floor where you can access the king's bedroom through a window (In Remakes this is abit different. Go up twice the stairs, then you will be outside the Castle on a high platform where you can jump down. Do that and go through the Door to the left to enter the King's Room). However, during the day, it will do you little good to bother (not true either, since you can grab ![]() Club
Club ![]() /
/ ![]() Club and
Club and ![]() Cheat
Cheat ![]() /
/ ![]() Cheater Guide in the King's Room, though you can also do that later when you have the Mirror of Ra.).
Cheater Guide in the King's Room, though you can also do that later when you have the Mirror of Ra.).
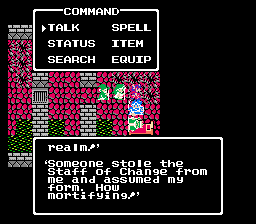
You may wish to advance and speak with the king, but as soon as you are close to him, he declares you to be scoundrels and has your party locked up in prison! Fortunately, you are not stripped of your equipment, so your Final Key will work very well on the cell door. If you talk to the guard above, he appears to be sleep talking. He dares not defy the king, but mentions a rumor that there is an escape passage from the jail. You can open the doors and free the other prisoners if you like. In the Prison Cell north of your is one more ![]() TinyMedal /
TinyMedal / ![]() Small Medal in the pot. The prisoner in the upper right corner will tell you about the Mirror of Ra which can reportedly show someone's true form, and is found in a cave to the south. Opening the lower right gate, you will see a passage that leads to a staircase.
Small Medal in the pot. The prisoner in the upper right corner will tell you about the Mirror of Ra which can reportedly show someone's true form, and is found in a cave to the south. Opening the lower right gate, you will see a passage that leads to a staircase.
Climbing down the stairs, you end up in a very old and damaged part of the jail. In the cell to the right, you will see a king lying in bed. Check the Ground by the King's head for a ![]() LifeStone /
LifeStone / ![]() Life Stone. He claims to be the rightful king, and that the person who took his place used the Staff of Change. He says nothing else, but you may notice that the left and right walls are not made of brick. Rather, they are black, suggesting the possibility of something lying beyond them. If you open the left cell door and push along the left wall, you should eventually find a passage that goes up and back to the right before leading to a set of stairs. Climb the stairs and you will arrive… in the Samanao cemetery! You could return to the castle if you wish, but the truth is you have all the information you need. It's time to visit the cave and obtain the Mirror of Ra.
Life Stone. He claims to be the rightful king, and that the person who took his place used the Staff of Change. He says nothing else, but you may notice that the left and right walls are not made of brick. Rather, they are black, suggesting the possibility of something lying beyond them. If you open the left cell door and push along the left wall, you should eventually find a passage that goes up and back to the right before leading to a set of stairs. Climb the stairs and you will arrive… in the Samanao cemetery! You could return to the castle if you wish, but the truth is you have all the information you need. It's time to visit the cave and obtain the Mirror of Ra.
Samanao (Samanosa) Cave[edit]
| Monsters in Samanao Cave |
|---|
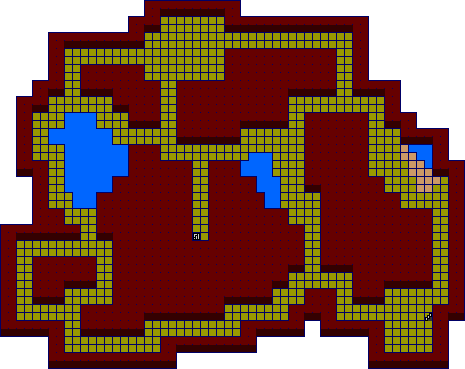
As the prisoner said, you will find the cave south of Samanao, and to the west across a bridge. It's a good idea to cast Repel or use Fairy Water, and stay off the hills if you wish to reduce the amount of combat you see on the way to the cave.
Once inside, you will have to be on your guard for powerful enemies such as Voodoo Shamans/Voodoo Men who can cast RobMagic to steal MP, and Vivify in an attempt to bring back fallen comrades. Multi-armed Skeletons/Skeletors can lower your defense and use their powerful sword attacks twice per round. Tortragons are dragon-like creatures with thick turtle shells on their back that can breath sleeping gas on your party. And Terror Shadows/Shadows can damage your whole party with SnowBlast. You'll definitely have a tougher time keeping up with the healing in this dungeon.
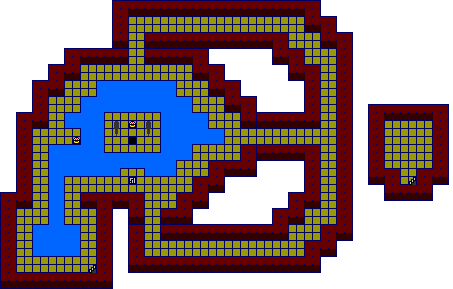
The first floor of this dungeon is a bit of a maze, with an outer ring that takes you all the way around the perimeter of the floor. However, a couple of paths cut into the interior of the dungeon, and that is where you'll ultimately find a passage that leads to a staircase that goes to the floor below.
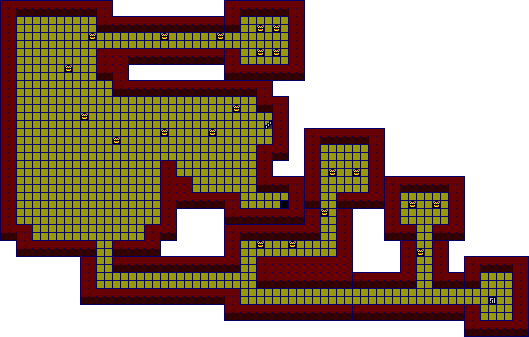
When you arrive on this floor, you may be surprised to find a sequence of treasure chests, practically arranged in a line like bread crumbs leading you up and around to a room at the top of the floor. In order from the stairs to the room, the contents of the chests are 128 gold, a ![]() Strength Seed (
Strength Seed (![]() STRseed), 56 gold, a Wing of Wyvern (
STRseed), 56 gold, a Wing of Wyvern (![]() Token /
Token / ![]() Pachisi Ticket), 568 gold, 24 gold, an Acorn of Life (
Pachisi Ticket), 568 gold, 24 gold, an Acorn of Life (![]() LifeAcorn /
LifeAcorn / ![]() Life Nut), a Medical Herb (
Life Nut), a Medical Herb (![]() TinyMedal /
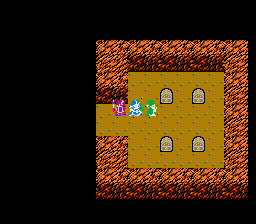
TinyMedal / ![]() Small Medal), and finally 320 gold. When you enter the next room, you will see four treasure chests. However, each and everyone is a Mimic. Mimics are especially dangerous, with their ability to cast Defeat. Although it's unlikely, they can potentially wipe out your entire party with one spell. The amount of experience and gold you obtain from these monsters is less than what you typically earn fighting less dangerous monsters in this dungeon, so choose wisely whether you wish to take these on or not.
Small Medal), and finally 320 gold. When you enter the next room, you will see four treasure chests. However, each and everyone is a Mimic. Mimics are especially dangerous, with their ability to cast Defeat. Although it's unlikely, they can potentially wipe out your entire party with one spell. The amount of experience and gold you obtain from these monsters is less than what you typically earn fighting less dangerous monsters in this dungeon, so choose wisely whether you wish to take these on or not.
Whether you choose to clear the room of Mimics or not, return to the left, and explore the bottom of the floor. You will find a passage that leads down and to the right until it branches. The upper path is shorter, with three chests that contain a Vitality Seed (![]() VITseed /
VITseed / ![]() Stamina Seed), 24 gold, and a Medical Herb (
Stamina Seed), 24 gold, and a Medical Herb (![]() Token /
Token / ![]() Pachisi Ticket) before you reach another room with two chests. If experience is any guide, you'll realize that these two chests are both Mimics (or not, since the right Chest give you a
Pachisi Ticket) before you reach another room with two chests. If experience is any guide, you'll realize that these two chests are both Mimics (or not, since the right Chest give you a ![]() TinyMedal /
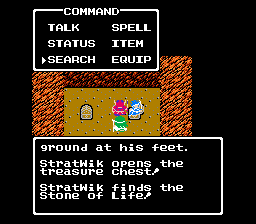
TinyMedal / ![]() Small Medal). Double back to the lower branch, and follow it along until you reach another branch. The chest along the upper path is actually a Mimic, as is the left chest in the room above. The right chest, on the other hand, contains a very rare item called the Stone of Life (
Small Medal). Double back to the lower branch, and follow it along until you reach another branch. The chest along the upper path is actually a Mimic, as is the left chest in the room above. The right chest, on the other hand, contains a very rare item called the Stone of Life (![]() LifeStone /
LifeStone / ![]() Life Stone). When held by someone, the Stone of Life (Life Stone) will absorb one successful attempt to kill a player by magic and break, saving the holder. The spell has to succeed in order to destroy the stone, failed spells will leave the stone in tact. The right branch leads to a staircase that goes down to the third floor.
Life Stone). When held by someone, the Stone of Life (Life Stone) will absorb one successful attempt to kill a player by magic and break, saving the holder. The spell has to succeed in order to destroy the stone, failed spells will leave the stone in tact. The right branch leads to a staircase that goes down to the third floor.
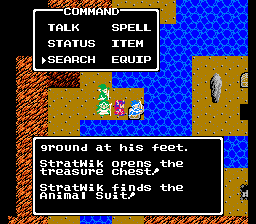
Like the first floor, this lower level is composed primarily of a path that leads around the perimeter. One treasure chest on the left contains the Animal Suit (![]() Plush
Plush ![]() /
/ ![]() Plush Suit), an unusual piece of armor that makes its wearer look like a cat. It has very low defense, and seems worthless, but does have one particular use which will be discussed later in this page. You can also see a treasure chest to your right on an island with a hole in the floor, but as much as you walk around, you won't be able to find a way to access it, although you will find a staircase that leads down to small room which is apparently where you would fall down to if you could reach the treasure chest on the island.
Plush Suit), an unusual piece of armor that makes its wearer look like a cat. It has very low defense, and seems worthless, but does have one particular use which will be discussed later in this page. You can also see a treasure chest to your right on an island with a hole in the floor, but as much as you walk around, you won't be able to find a way to access it, although you will find a staircase that leads down to small room which is apparently where you would fall down to if you could reach the treasure chest on the island.
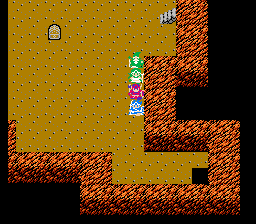
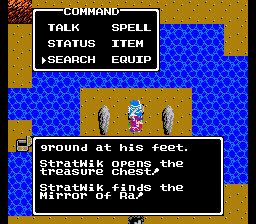
Your goal is to find a way to access the island, and once again, experience may teach you to explore the floor above. Back on the second floor, you may have been lured away from the space below the stairs to the first floor by the string of treasure chests. If you explore the area under those stairs, you will find a hole in the floor. Step on to the hole, and you will indeed fall down to the island below. Search the treasure chest that you find there, and you will obtain the ![]() Mirror of Ra (
Mirror of Ra (![]() LarMirror). From here, you can fall down the hole and climb back up the stairs, or simply cast Outside.
LarMirror). From here, you can fall down the hole and climb back up the stairs, or simply cast Outside.
Saving a kingdom[edit]

| Monster in Samanao |
|---|
|
With the Mirror of Ra in hand, head back to Samanao. You'll need to find a way to use it on the supposed king. Even if you can sneak past the guards through the kitchen, you'll still need to find another way to access the king's bedroom. To do that, you'll need to climb the upper right tower, and jump off the left side to land on the roof of the first floor. Then sneak in through the bedroom windows, and approach the king. Use the Mirror of Ra while standing by the king, and he will transform into a monster. For your transgression, a Boss Troll will attack you. Though capable of powerful attacks, a single Boss Troll should not overwhelm you. Once you defeat it, peace will be restored to the kingdom. When control is returned to you, you will see a treasure chest above the bed. Inspect it, and you will find the Staff of Change (![]() Change
Change ![]() /
/ ![]() Change Staff). Jump off the roof of the castle, and return to speak with the king. The guards will be much more welcoming now, and the king will record your progress like usual. The occupants of the castle, as well as the entire town, will be grateful for your efforts.
Change Staff). Jump off the roof of the castle, and return to speak with the king. The guards will be much more welcoming now, and the king will record your progress like usual. The occupants of the castle, as well as the entire town, will be grateful for your efforts.
