Room A[edit]
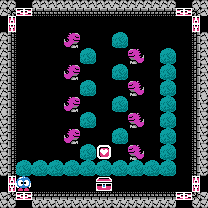
| Approach from | Center dungeon room | Strategy | ★ | Agility | ★★ |
|---|---|---|---|---|---|
| Real Exits | South west left | ||||
Solution:
Ordinarily, this room would be a death trap, but one of the guardians will grant you super speed. Since you can scoot quickly around the room, the only danger you'll face is the moment that you pick up the single Heart Frame, as you must quickly move back out of the way of the fireball that the bottom Gol will fire at you. At your speed, the remaining Gol fireballs should not be a problem.
Room B[edit]
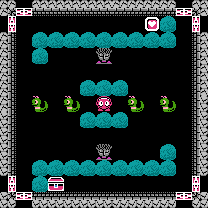
| Approach from | Room A | Strategy | ★★ | Agility | ★★ |
|---|---|---|---|---|---|
| Real Exits | South east right, North east up | ||||
Solution:
Another Guardian grants you with infinite Egg shots. Armed this way, there isn't too much to worry about. You'll want to remove the threat of the Alma so that you can use the center passageway and avoid getting seen by the Medusas. You can shoot out all of the Snakeys and shoot the Alma from a safe distance, or shoot the Snakey next to the tunnel entrance from above or below and hit the Alma as it comes out. Once it's removed, proceed through the tunnel, collect the heart, and return the way you came to collect the key.
Room C[edit]
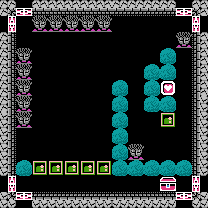
| Approach from | Room B | Strategy | ★★ | Agility | ★ |
|---|---|---|---|---|---|
| Real Exits | South east down, North east right | ||||
Solution:
- There's no special trick to this room, you simply need to arrange the Emerald Frames properly. Start by pushing the left most frame up three and a half spaces so that it blocks the view of the two lowest Medusas.
- Push the next frame up five and a half space so that it blocks the view of the next two Medusas. Push the next fram up seven spaces so that it blocks the view of the highest Medusa.
- Push the next frame up a view spaces, then over to the right one half of a space, and then all the way up so that it blocks the view of the last two Medusas along the top of the screen.
- With the remaining block, put it up, to the right and down through the tunnel to block the Medusa on the inside area of the boulders. Then push the Emerald Frame on your right over to the right wall, and up the other tunnel to block the upper Medusa's view as you collect the last Heart Frame.
- Now return to the outside of the boulder area and collect the key.
Room D[edit]
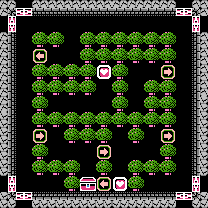
| Approach from | Room C | Strategy | ★ | Agility | ★ |
|---|---|---|---|---|---|
| Real Exits | North west left, North east right | ||||
Solution:
One of the guardians will give you the ability to eliminate just one tree from this room by pressing ![]() . Since you can only remove one, the tree that you need to remove should be obvious, the single tree in the left column between the two Arrow Tiles. Grab the upper Heart Frame, and then pass through the lower Arrow Tiles to collect the lower Heart Frame, and then the key.
. Since you can only remove one, the tree that you need to remove should be obvious, the single tree in the left column between the two Arrow Tiles. Grab the upper Heart Frame, and then pass through the lower Arrow Tiles to collect the lower Heart Frame, and then the key.
Room E[edit]
| Approach from | Room D | Strategy | ★ | Agility | ★★★ |
|---|---|---|---|---|---|
| Real Exits | North west left, North west up | ||||
Solution:
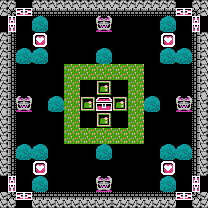
The Heart Frames in each corner are placed in safe locations, but the paths between them are extremely treacherous. Once you collect the first Heart Frame, you'll have to safely make it to the very center of the room before you attempt to venture out and collect the others. Bear in mind that the top and bottom Don Medusa have a greater range of movement than the left and right ones do. Additionally, the top and bottom Don Medusas are the only ones that can threaten you immediately after collecting a Heart Frame. Repeat the strategy of traveling from the center to each Heart Frame until all Heart Frames are collected. Then safely return to the center.
Room F[edit]
| Approach from | Room E | Strategy | ★ | Agility | ★ |
|---|---|---|---|---|---|
| Real Exits | South west down, South east right | ||||
Solution:
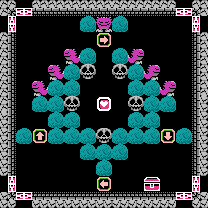
You are given infinite Egg shots once again, and they will come in handy. Simply approach the center chamber with the Heart Frame. Before you collect it, double shoot all of the Skulls to remove them from the screen. Additionally, single shoot or double shoot the Gol at the top of the screen. Then collect the Heart Frame. Head out of the chamber and to the right. Before you progress down, shoot each of the Gols before you pass in front of them, and then move down to the key below.
Room G[edit]
| Approach from | Room F | Strategy | ★ | Agility | ★★ |
|---|---|---|---|---|---|
| Real Exits | South west left, North west up | ||||
Solution:
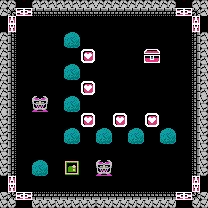
There's no special trick to this room. Walk to the left of the only Emerald Frame and push it all the way to the right to pin the lower Don Medusa against the wall. Then walk up and collect the right two Heart Frames along the lower row. When it is safe, collect the column of Heart Frames and stop next to a boulder and wait for the left Don Medusa to travel down. Head for the key when it's safe.
Room H[edit]
| Approach from | Room G | Strategy | ★★ | Agility | ★ |
|---|---|---|---|---|---|
| Real Exits | South west down, North west up | ||||
Solution:
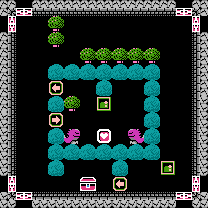
- You are granted the ability to remove just one tree from this room again by pressing
 . First, head inside the chamber, push the Emerald Frame right one space, and then down in front of the right Gol.
 - Exit the chamber, remove the lower of the two trees near the top of the stage. Then walk to the lower right corner, push the Emerald Frame up, and to the left just above the row of trees. Push it until you can push it down the left side of the chamber.
- Push the frame inside the chamber, and stop when it's above the Heart Frame. Walk to the right side of the Emerald Frame, push it left one space, and in front of the left Gol. Now you can collect the Heart Frame, exit the chamber, and collect the key.
King Egger[edit]
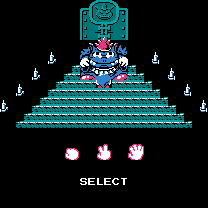
This is it, you have made it to the final room where you must face off with King Egger himself! And the fate of poor Lala will be decided once and for all… over a game of Jan-ken-pon (or rock-paper-scissors). In order to play, you must place the cursor under your selection, and you must wait until the music ends and Lolo and King Egger stop dancing before you find out the outcome of the round. If you win, one of the four candles on the right will light up. If you lose, one of the four candles on the left will light up. The first person to win four rounds wins the battle, but the truth is, the game will not allow King Egger to win a fourth time, so ultimately, it doesn't matter what you choose. You will always win four matches before King Egger does. When you win four times, you will proceed to pummel King Egger into oblivion, and open the door to rescue Lala. Then you will be treated to the ending and the staff credits.