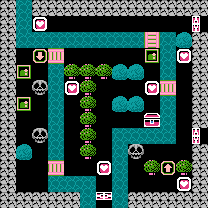
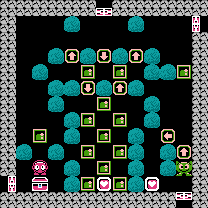
You can only complete this stage by entering through the upper right door. First walk across to the left and collect the Heart Frame and 2 egg shots.
Then cross the bridge, and push the Emerald Frame down. Walk left to the Arrow Tile, and fire one shot at the Skull. Push the egg south one space, then walk left, and push the Emerald Frame down so that it lines up with the next Skull. Shoot the lower Skull and push it all the way down so you can cross the bridge to the right.
Collect the three inner Heart Frames, earning two more egg shots from the left Heart Frame. Then cross over the right-most bridge. Collect the Heart Frame at the top and approach the right Skull. Either shoot it once and push it into the water, or shoot it twice to remove it.
Collect the last Heart Frame and the contents of the chest will reveal itself to be a raft. Collect the raft quickly before the Skulls have a chance to get anywhere near it and become a nuisance. To continue on with the game, you must collect the raft, and stand to the left of the Arrow Tile. Push up and Lolo will set sail on the raft to the room to the north.
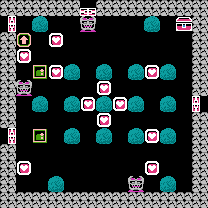
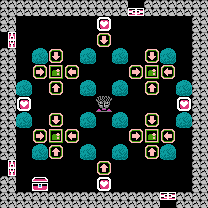
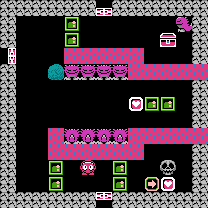
This room is your first introduction to Don Medusas. There are two along the top and bottom and one along the left wall. You must constantly ensure that there is a boulder or a Heart Frame blocking Lolo from their view, or they will instantly kill him.
You can start by collecting the three right-most Heart Frames, but be sure that the low Don Medusa is on his way back to the left before collecting the lowest frame. Then return to the safety of the boulders.
When it is safe, run across the bottom lane of the boulders, collecting a Heart Frame as you go, and stand to the right of the lowest Emerald Frame. When the Don Medusa is above it, push it left, and then push it up so that it lies one block below the boulder. Collect the low Heart Frame.
Time your approach to the top Emerald Frame so that you are slightly behind the Don Medusa on the way up. Collect another Heart Frame and push the Emerald Frame left and down so that the Don Medusa is now trapped to the left of the boulder, unable to move. Collect the left Heart Frame.
Before you return to collect the center Heart Frames, grab the other high Heart Frame as the top Don Medusa begins to head right. Then return to the boulders, and collect the remaining Heart Frames when it is safe to do so. Grab the key to finish the stage.
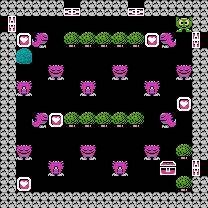
You can collect the Heart Frames in which ever order is most convenient to you. The most important detail is to not let the Rockys trap you in place, or push you to the outer walls where the Medusas will kill you. Continue to change lanes in an effort to steer clear of the Rockys.
Collect whichever Heart Frames are positioned farthest from the Rockys' current locations. Leave the top center three Heart Frames for last as they will trap the center Rocky in place so that he won't be as much of a nuisance to you. Grab the key without fear, since the Rockys will disappear as soon as you touch it.
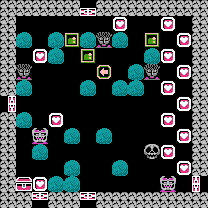
Push the left of the two Emerald Frames down two space, and push the Emerald Frame that you are now standing next to over to the right one space so that it is in front of the center Medusa. Then stand to the right of the original Frame and push it over to the left until it touches the left Medusa.
Walk back around and collect the Heart Frame above the Emerald Frame that you just positioned. Then walk around the middle boulder and approach the arrow tile from underneath. Walk up to it and then to the right. Walk to the top wall and collect the Heart Frame to your left.
Among the two columns of Heart Frames on your right, collect the first two Heart Frames at the top of the left column so that you can push the nearby Emerald Frame to the right of the right Medusa. Now you can safely collect all of the Heart Frames except the two lowest frames.
When the Don Medusa is returning to the left, collect the lowest of the two Heart Frames. Then stand above the remaining frame, wait for the Don Medusa to return, and collect it once he is moving left again. Then quickly return to the Emerald Frame that you recently positioned so that you are safe from the Don Medusa below.
Walk below the center Medusa and approach the Heart Frame above the left Don Medusa. When it is moving to the left, collect the frame and return to the boulder immediately. Then walk around the boulder, and in the gap. Once again, when the Don Medusa is moving left, run quickly to the space above the last Heart Frame. Collect it, and when it's safe to do so, collect the key.
You can enter this room from the right or from the North. It is best to deal with the Leeper first. Push the Emerald Frame low enough to allow the Leeper to escape. Then stand in the upper right corner of the stage and let the Leeper touch you and fall asleep. Walk down and around, following the Arrow Tiles to collect the right Heart Frame.
Next, approach the Arrow Tiles near the top. Go down the center down Arrow Tile, and push both Emerald Frames on either side of you all the way to the left and to the right. Then go down the next down Arrow Tile, and push the Emerald Frame on your right all the way to the right. Go down one space, and push the right frame right. Go down again, and push the frame in this row left. Then down again, and push the left frame left. Down once more and push the frame to the right, and collect the last Heart Frame.
Now retreat out of this area, through the up Arrow Tiles, and walk around to the left side of the room with the Alma. Push aside the Emerald Frame that keeps the Alma trapped with the chest. Let it chase you out of the region and back up to the top. Let it tuck into a ball and roll after you near the top of the screen. Sidestep the rolling Alma and return to the chest's location to collect the key.
You can approach this room from any direction, with the single exception of the door in the upper right hand corner, which will trigger the Leeper to fall asleep improperly. Regardless of how you enter, you should ideally force the Leeper to fall asleep directly in front of an up or down facing Gol. Anywhere else may cause problems.
In order to complete this stage, you can collect the Heart Frames in any order, except for the Heart Frame in the upper left corner, which should always be saved for last.
As soon as you collect the final Heart Frame, all of the Gols will wake up. However, you can safely maneuver Lolo behind their backs by snaking around the stage. From the top walk around behind the right Gol, then walk under, over, under, and over the next four Gols. Walk behind the right facing Gol, and walk under, over, under, and over the next four Gols to reach the chest safely.
The trick to beating this room is understanding how to maneuver the Emerald Frames out of the circle of Arrow Tiles without getting Lolo trapped in the middle. If you get caught in theOnce you figure out how to do this for one frame, you can do it for all of the other frames and surround the Medusa so that she can't kill you.
Assuming that you started from the lower right corner, start by approaching the lower right Emerald Frame. Push it only the distance of a half block up. Double back around, and push the frame left to the boulder. Then you'll have to move up, and then out and around until you are beneath the frame again, and push it up until it is even with the Medusa. Then you can walk to its right and push it left against the Medusa, and collect the right Heart Frame.
Now you must perform a similar set of operations on the Emerald Frame in the upper right corner, pushing it down first a half-block, then over to the left, then all the way to the top, one space away from the wall. Push it left on to the down Arrow Tile, collect the top Heart Frame, and push the Emerald Frame down to the Medusa.
Repeat steps 2 and 3 on the upper left and lower left blocks to safely collect the remaining Heart Frames and collect the key in the lower left corner.
This is an odd board that seems less complicated than it should be by the time you encounter it. Assuming that you arrived from the right, push the lower of the two Emerald Frames in two spaces. Then push the Emerald Frame to the upper right of the Heart Frame left of down, and collect the one and only Heart Frame. This will give you two Egg shots, but you don't even need them. Push the Emerald Frame that lies up and to the right of the former Heart Frame up or left to return to the top of the stage, and push the highest of the left Emerald Frames to the left to get out and around, and collect the key.
Start by collecting the four Heart Frames below the lava and around the Gols. This will give you the Ladder Power, but you should not actually use it yet.
Instead, walk along the right side of the stage, past the up Arrow Tile, and push one of the Emerald Frames you encounter all the way in. Collect the next four Heart Frames and you will activate the Arrow Power as well. Walk back to the up Arrow Tile and use your Arrow Power to change the arrow and pass back through to the bottom.
Walk to the left of the Emerald Frame just below the lava, and stand to the right of the tree. Activate the Ladder Power here to arrive below the right most Emerald Frame in the group of four. Push it up and very quickly collect the four remaining Heart Frames. You must do this fast and return to the ladder before the lava consumes it, or Lolo will be trapped.
Cross back over the ladder. At this point, the Gols will be awake, but from this location, you can easily make your way over to the key without fear of getting burned.
Start out by pushing the highest Emerald Frame left to make your way to the other side of the frame, and back to the right, in front of the Gol. Take the other Emerald Frame, and push it in front of the left two Gols in the top row. The frame should be a half space in front of both of them.
Position the two Emerald Frames to the right of the top Heart Frame in front of the right two Gols in the top row, and in front of the right two Gols on the bottom row, but do not collect the Heart Frame.
Walk down to the bottom, and push the lowest Emerald Frame in so that the Alma has a chance to escape and chase you. Line up with the Heart Frame above, and let Alma tuck into a ball and roll toward the Heart Frame. Return to the bottom of the stage.
Push the Emerald Frame that lies to the left of the Skull closer to the Skull, and collect the bottom Heart Frame, and push the Emerald Frame down to get out.
Now you must position the left Emerald Frame below the lava to the space above the left two Gols in the bottom row. In order to do this, you may have to distract the Alma and lure it to the top or the bottom of the stage in order to have clean access to the center row.
Once all 8 Gols have been successfully blocked, you can grab the final Heart Frame. Watch out for the Alma, and make your way safely to the Key.